Bear Drawing Step By Step
Bear Drawing Step By Step - It’s best if we notice the proportions of each part of the bear. Enclose a smaller oval inside each eye. Color the eyes and muzzle. Start by drawing a boxy oval shape for the head. Begin the cartoon bear outline by drawing its face. How to draw a bear step by step for beginner simple and easy.more. How to get started with a bear drawing. Connect the head with the body using a long curved line on the top of the ovals. Finish up the ears and draw ovals for eyes and nose. © brynn metheney) begin with a light sketch.
Thanks for watching our channel. Begin your bear drawing by lightly sketching an irregular polygon shape on your canvas, which will define the boundaries and ensure the correct scale and proportions for your bear illustration. Draw the fur on the head. Draw a small oval to form the head. Web how to draw polar bear step by step#drawing #art #sketch #animals Draw a curved line on top of it, then two more beside it for the cheeks. Enclose a smaller oval inside each eye. Watch a video or download the instructions. Don’t forget to complete the rear leg. Connect the head with the body using a long curved line on the top of the ovals.
Thanks for watching our channel. 29 views 2 months ago. Add an ear, front legs and paw. Color the eyes and muzzle. Follow these step by step directions to create your own bear drawing! How to draw a bear step by step for beginner simple and easy.more. Web easy and fun bears drawing ideas. Web how to draw polar bear step by step#drawing #art #sketch #animals Black marker (optional) how to draw a bear printable pdf (see bottom of lesson) in this lesson, we will start with a blank piece of paper and learn how to draw a bear in 9 instructive steps. Begin by looking for the basic shapes in the picture.
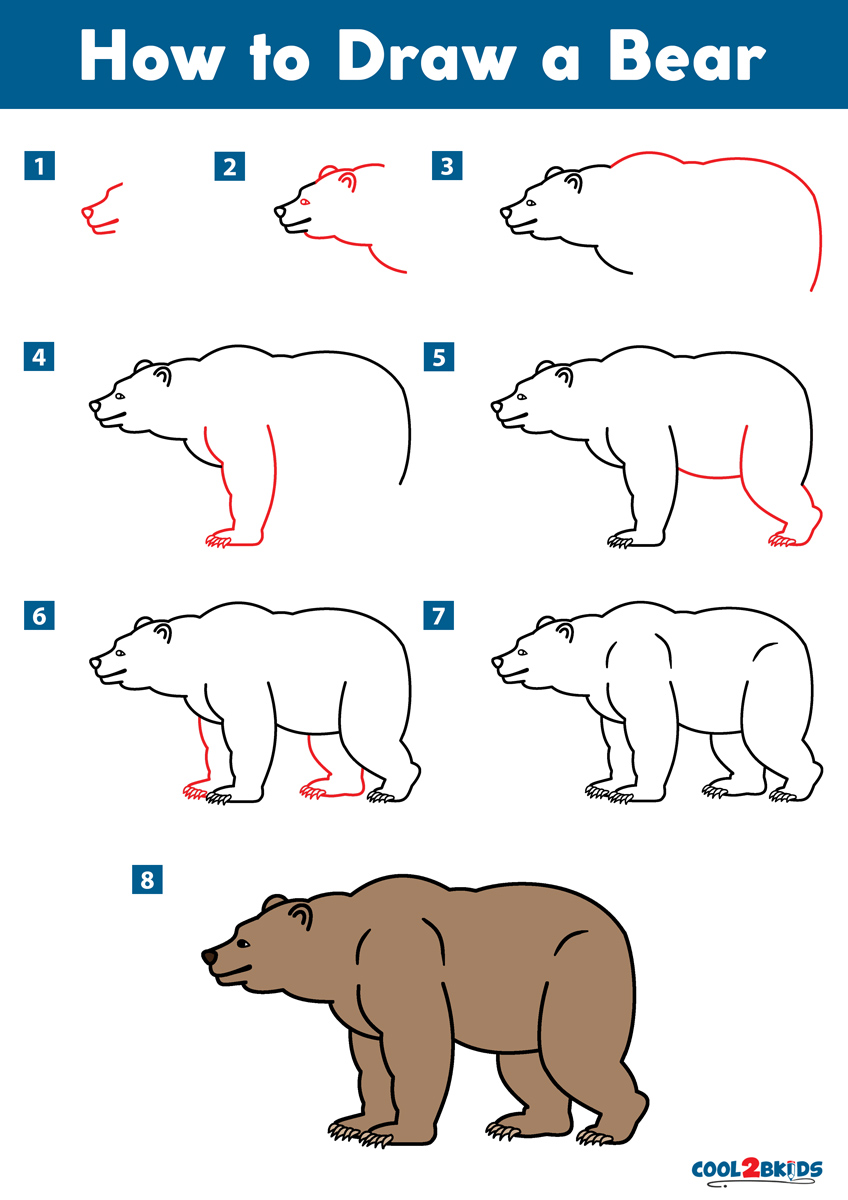
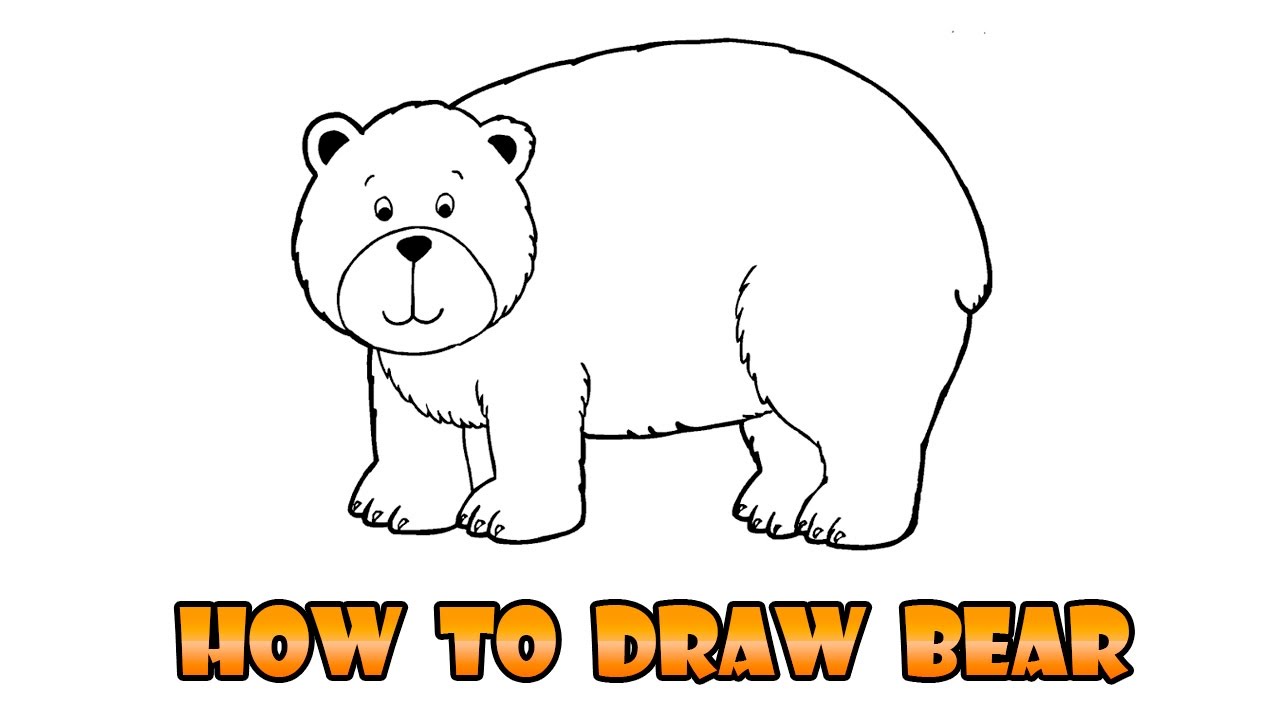
How to Draw a Bear Cool2bKids
• how to draw a cheetah. Web how to draw polar bear step by step#drawing #art #sketch #animals Draw the top of the bear’s head by drawing a small curve. We will be using a pencil for this step, as we will be adding some elements to this shape in the next step. At this stage we're just finding the.

How to Draw a Care Bear Step by Step Easy Lutz Wasterem
Draw the additional 2 legs and paws. Draw the fur on the head. It doesn’t have to be perfect at all! Enclose a partial oval on top of each cheek to form the eyes. It’s best if we notice the proportions of each part of the bear.

Pin on Wildlife Center ideas
Proportions are the key to a realistic drawing of a bear or any animal. Draw the eyes, nose, and mouth. Color the eyes and muzzle. Sketch the bear's head and front legs. Thanks for watching our channel.
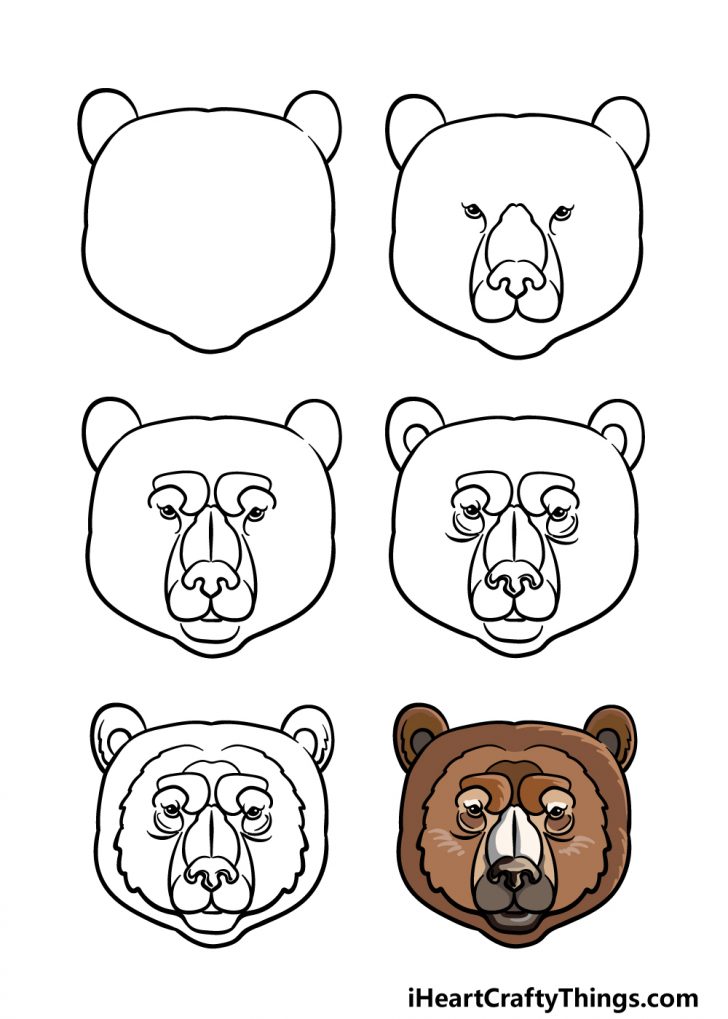
Bear Face Drawing How To Draw A Bear Face Step By Step
This shape looks a bit like an oval with a bulge at the bottom. Draw the additional 2 legs and paws. This will be your guide for the positioning of the structure and will keep your drawing centered. Finish up the ears and draw ovals for eyes and nose. Our how to draw a bear tutorial starts with the usual.
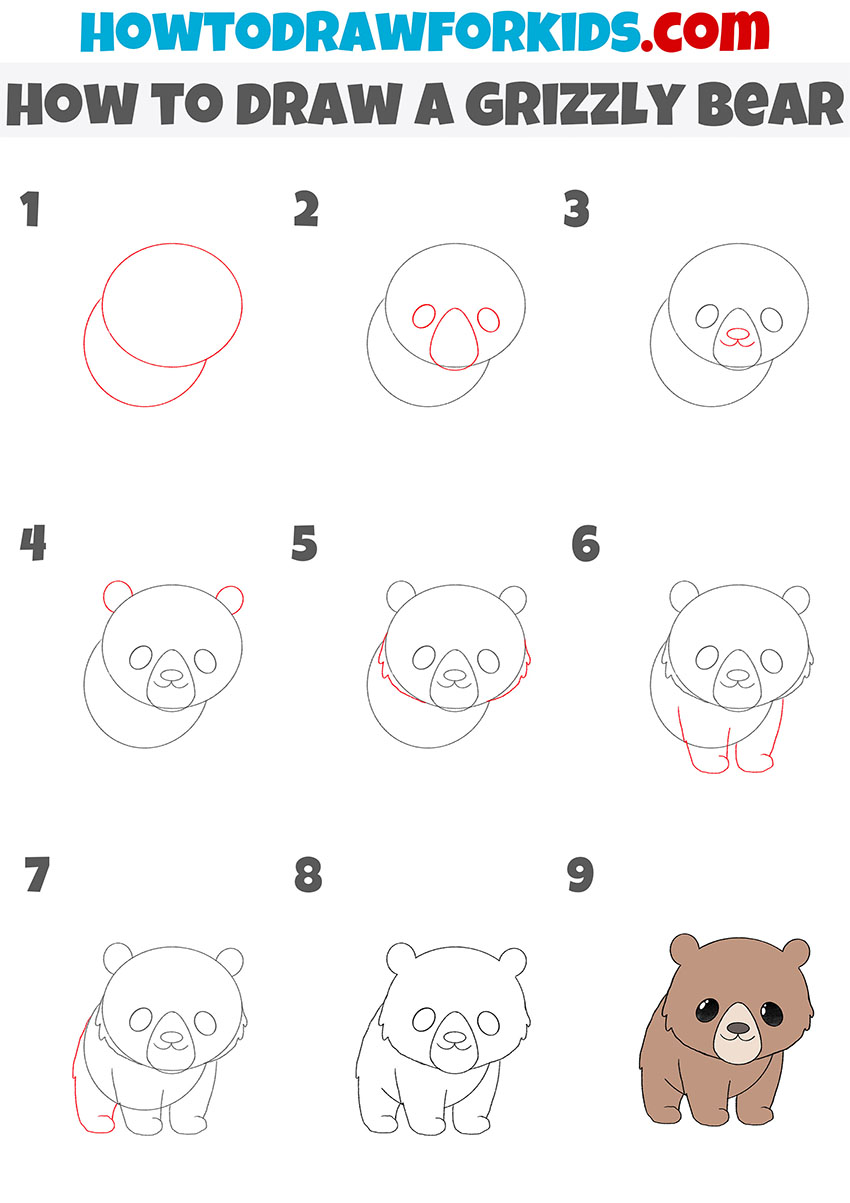
Grizzly Bear Drawing Step By Step
Web easy and fun bears drawing ideas. The head is already coming along nicely. Black marker (optional) how to draw a bear printable pdf (see bottom of lesson) in this lesson, we will start with a blank piece of paper and learn how to draw a bear in 9 instructive steps. Next, we are going to draw the bear’s snout.
How To Draw A Bear Step By Step Easy Draw a line, which will act as
Web step by step bear drawing instructions. Proportions are the key to a realistic drawing of a bear or any animal. This will be your guide for the positioning of the structure and will keep your drawing centered. Connect the head with the body using a long curved line on the top of the ovals. • how to draw a.
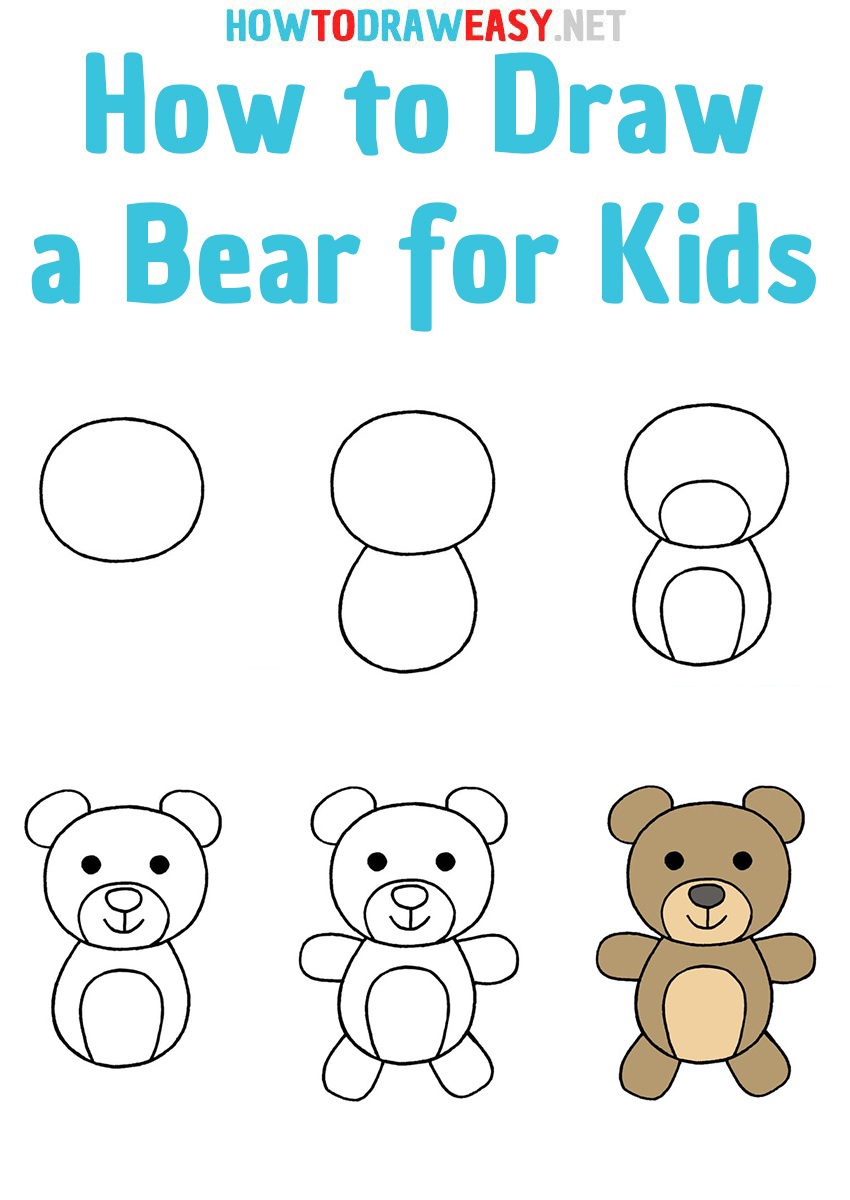
How to Draw a Bear for Kids How to Draw Easy
Web the easiest way for novice artists to have fun with a simple bear drawing is to drop everything below the shoulders and focus on the head of the bear! In this drawing, the bear’s body is the largest shape — a round or oval shape. At this stage we're just finding the shapes of the animal's form. Our how.
How To Draw A Black Bear Easy / How to draw a black bear EASY & SLOWLY
At this stage we're just finding the shapes of the animal's form. Web the easiest way for novice artists to have fun with a simple bear drawing is to drop everything below the shoulders and focus on the head of the bear! Start with a rounded triangle for the nose. Begin your bear drawing by lightly sketching an irregular polygon.
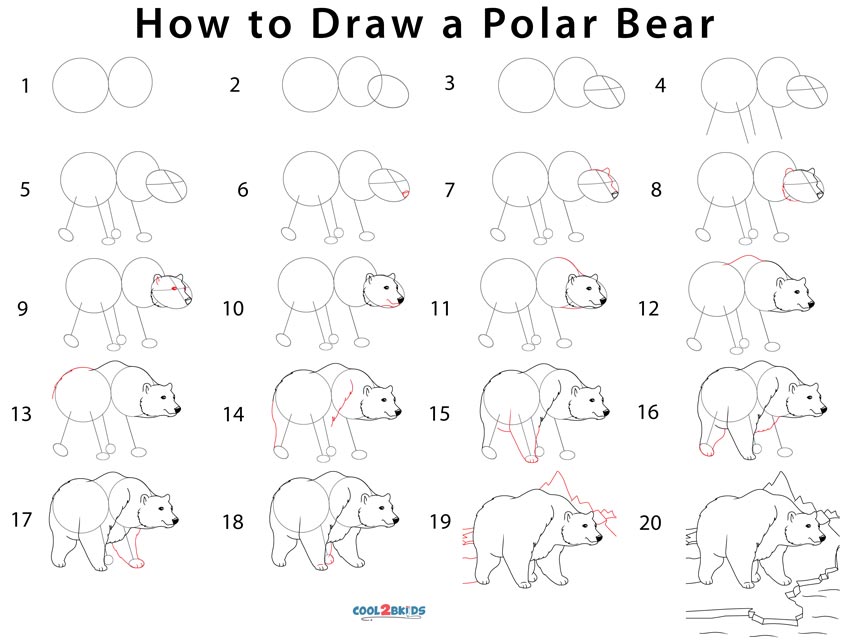
How to Draw a Polar Bear (Step by Step Pictures)
Connect the head with the body using a long curved line on the top of the ovals. Begin by looking for the basic shapes in the picture. Don’t forget to complete the rear leg. We are going to start by drawing the bear’s head. Next, draw the outer lines for the ears and the line for the snout.
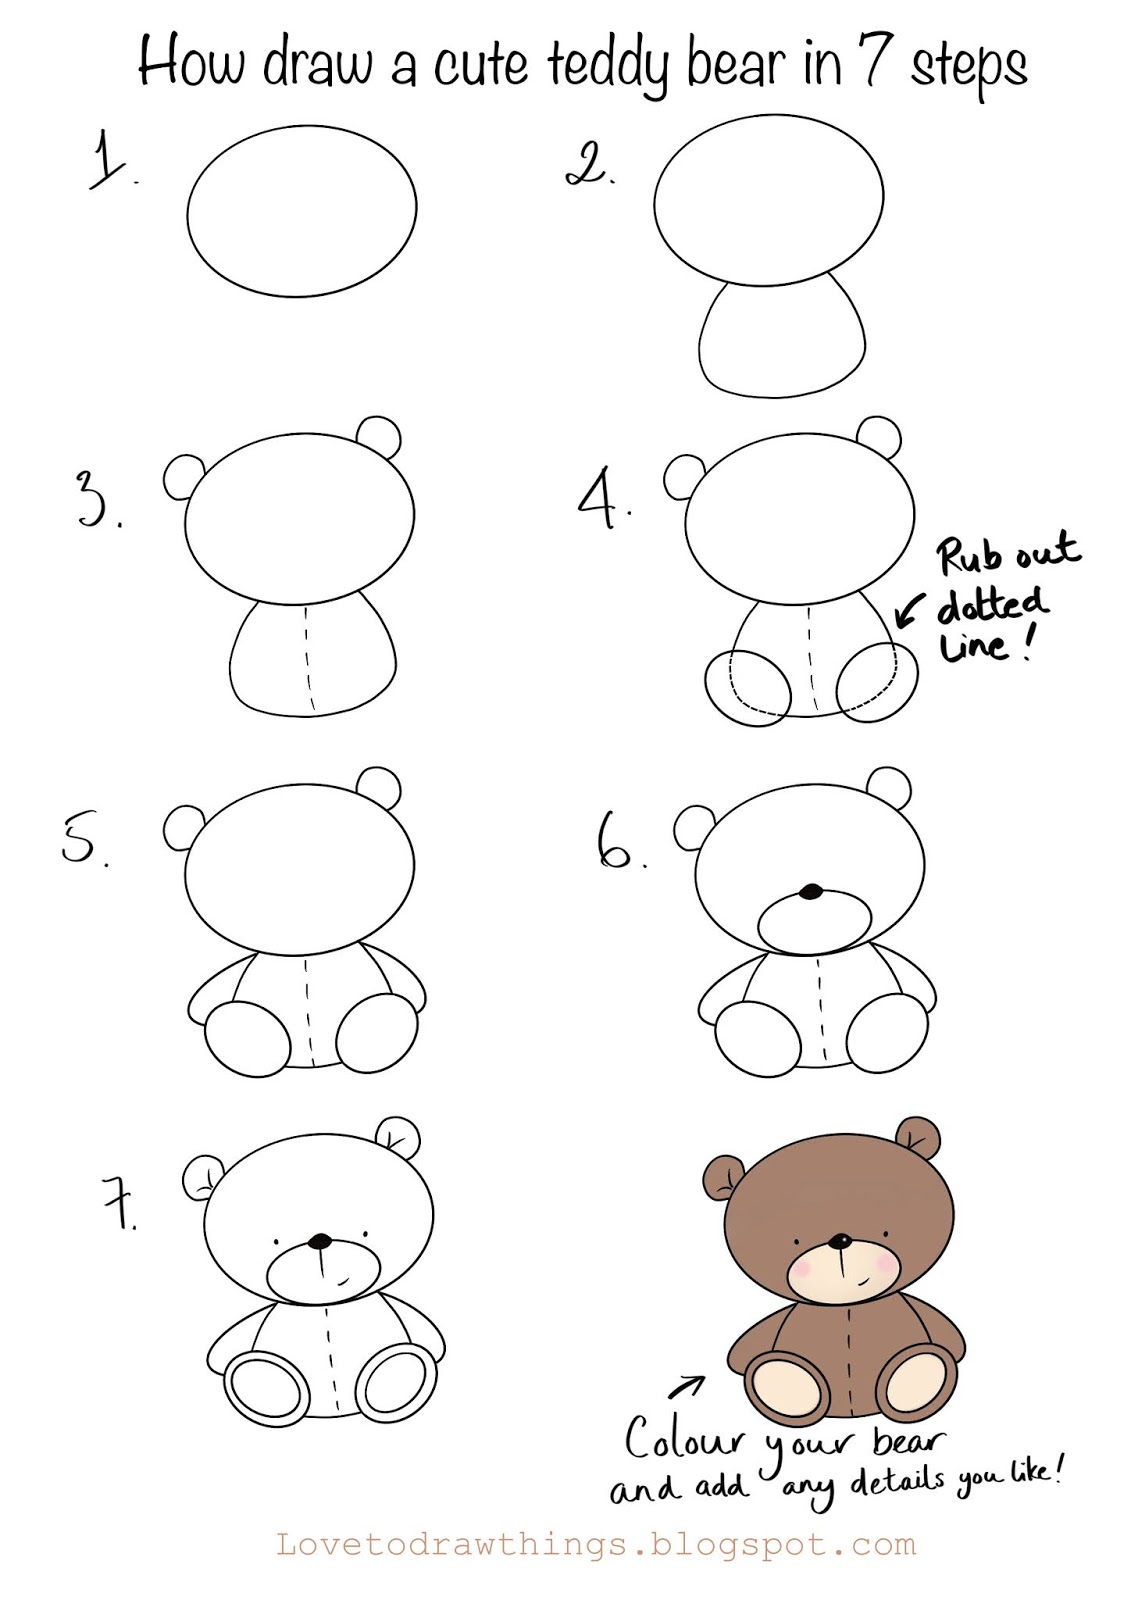
How to draw a cute teddy bear in 7 steps
In this drawing, the bear’s body is the largest shape — a round or oval shape. Then, draw a teardrop shape above each eye to suggest the eyebrows. Sketch the bear's head and front legs. How to get started with a bear drawing. Next, draw the outer lines for the ears and the line for the snout.
How To Get Started With A Bear Drawing.
Start with a rounded triangle for the nose. It’s not that hard to draw one that looks pretty realistic, if you take it one step at a time. We don't want to make any solid marks or bold lines yet; Split your canvas into four equal parts.
Color The Eyes And Muzzle.
Start by drawing the top portion of the bear’s head. Our how to draw a bear tutorial starts with the usual simple sketch. © brynn metheney) begin with a light sketch. Enclose a partial oval on top of each cheek to form the eyes.
Thanks For Watching Our Channel.
Next, draw the outer lines for the ears and the line for the snout. This shape looks a bit like an oval with a bulge at the bottom. Learn how to draw bear topics with step by step drawing tutorials. Begin the cartoon bear outline by drawing its face.
Start With A Light Sketch.
At this stage we're just finding the shapes of the animal's form. Connect the body with the head. Make very faint lines since we’ll be erasing these guidelines later. We will be using a pencil for this step, as we will be adding some elements to this shape in the next step.