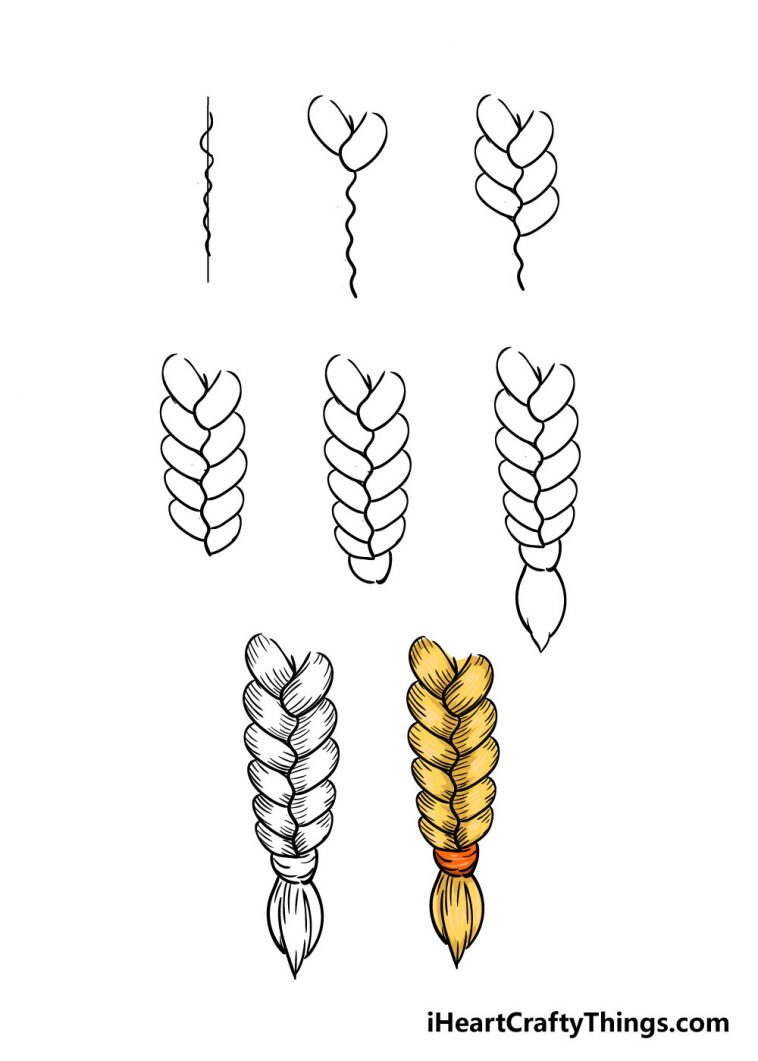
Braids Drawing
Braids Drawing - Do this all the way down. You will continue this process until you reach the end of. Many hair ties have to be twisted once or twice to wrap around someone's hair, so try drawing several pieces. Stay close to the outline made in step 1. Use light lines in this step because these will be the guidelines for the next step in the process. Add more sections of hair. Draw a ring to tie off the braid. Web in addition, one feature that is often overlooked, yet plays a crucial role in completing the braid drawing, is the end of the braid. Post this point, the hair fans out, presenting a fluffier appearance,” explains larson. Gain full access to my regular drawing vlog, drawing tutorials, behind the sc.
Simplify your braid into basic shapes to streamline the process of drawing hair. They can also be a tricky task for artists of any experience level. Afterward, pull two more sections of hair from the side as you did in step 1. Web in addition, one feature that is often overlooked, yet plays a crucial role in completing the braid drawing, is the end of the braid. Starting on the left side of the braid, draw a curve that touches the top portion of hair and ends at every convex corner. Stay close to the outline made in step 1. Pay attention to the proportions of these boxes, you can keep them all the same size or you can slowly make. Web 4 simple steps to drawing braids. Do the same for the right side. It may fluff out a little beyond the confines of the hair.
Web ***i made a newer, better version of this tutorial***watch it here: These lines represent the individual strands that create the braid. Do the same for the right side. Web breaking down braid drawing. Web in addition, one feature that is often overlooked, yet plays a crucial role in completing the braid drawing, is the end of the braid. Post this point, the hair fans out, presenting a fluffier appearance,” explains larson. Draw the tail below the tie. Gain full access to my regular drawing vlog, drawing tutorials, behind the sc. Begin by drawing small, curved lines along each strand, following the direction of the hair. Web easy steps for drawing braids.
Braid Drawing How To Draw A Braid Step By Step!
Web ***i made a newer, better version of this tutorial***watch it here: Web easy steps for drawing braids. Do this all the way down. This is where the hair tapers to an end. Post this point, the hair fans out, presenting a fluffier appearance,” explains larson.
How to Draw Braids with Easy Step by Step Drawing Tutorial How to
Web easy steps for drawing braids. Gain full access to my regular drawing vlog, drawing tutorials, behind the sc. Establish your line of action. For straight or curly hair and hair of different lengths, textures and volumes, there are a lot of elements at play if you want to draw hair and braids well. Begin by drawing small, curved lines.
How to draw braids MediBang Paint the free digital painting and
Web easy steps for drawing braids. You will continue this process until you reach the end of. While there are infinite ways to make this process your own, you can use these four steps as a framework to help you nail a great braid drawing, from outline to finishing details. Post this point, the hair fans out, presenting a fluffier.

How to Draw a Braid
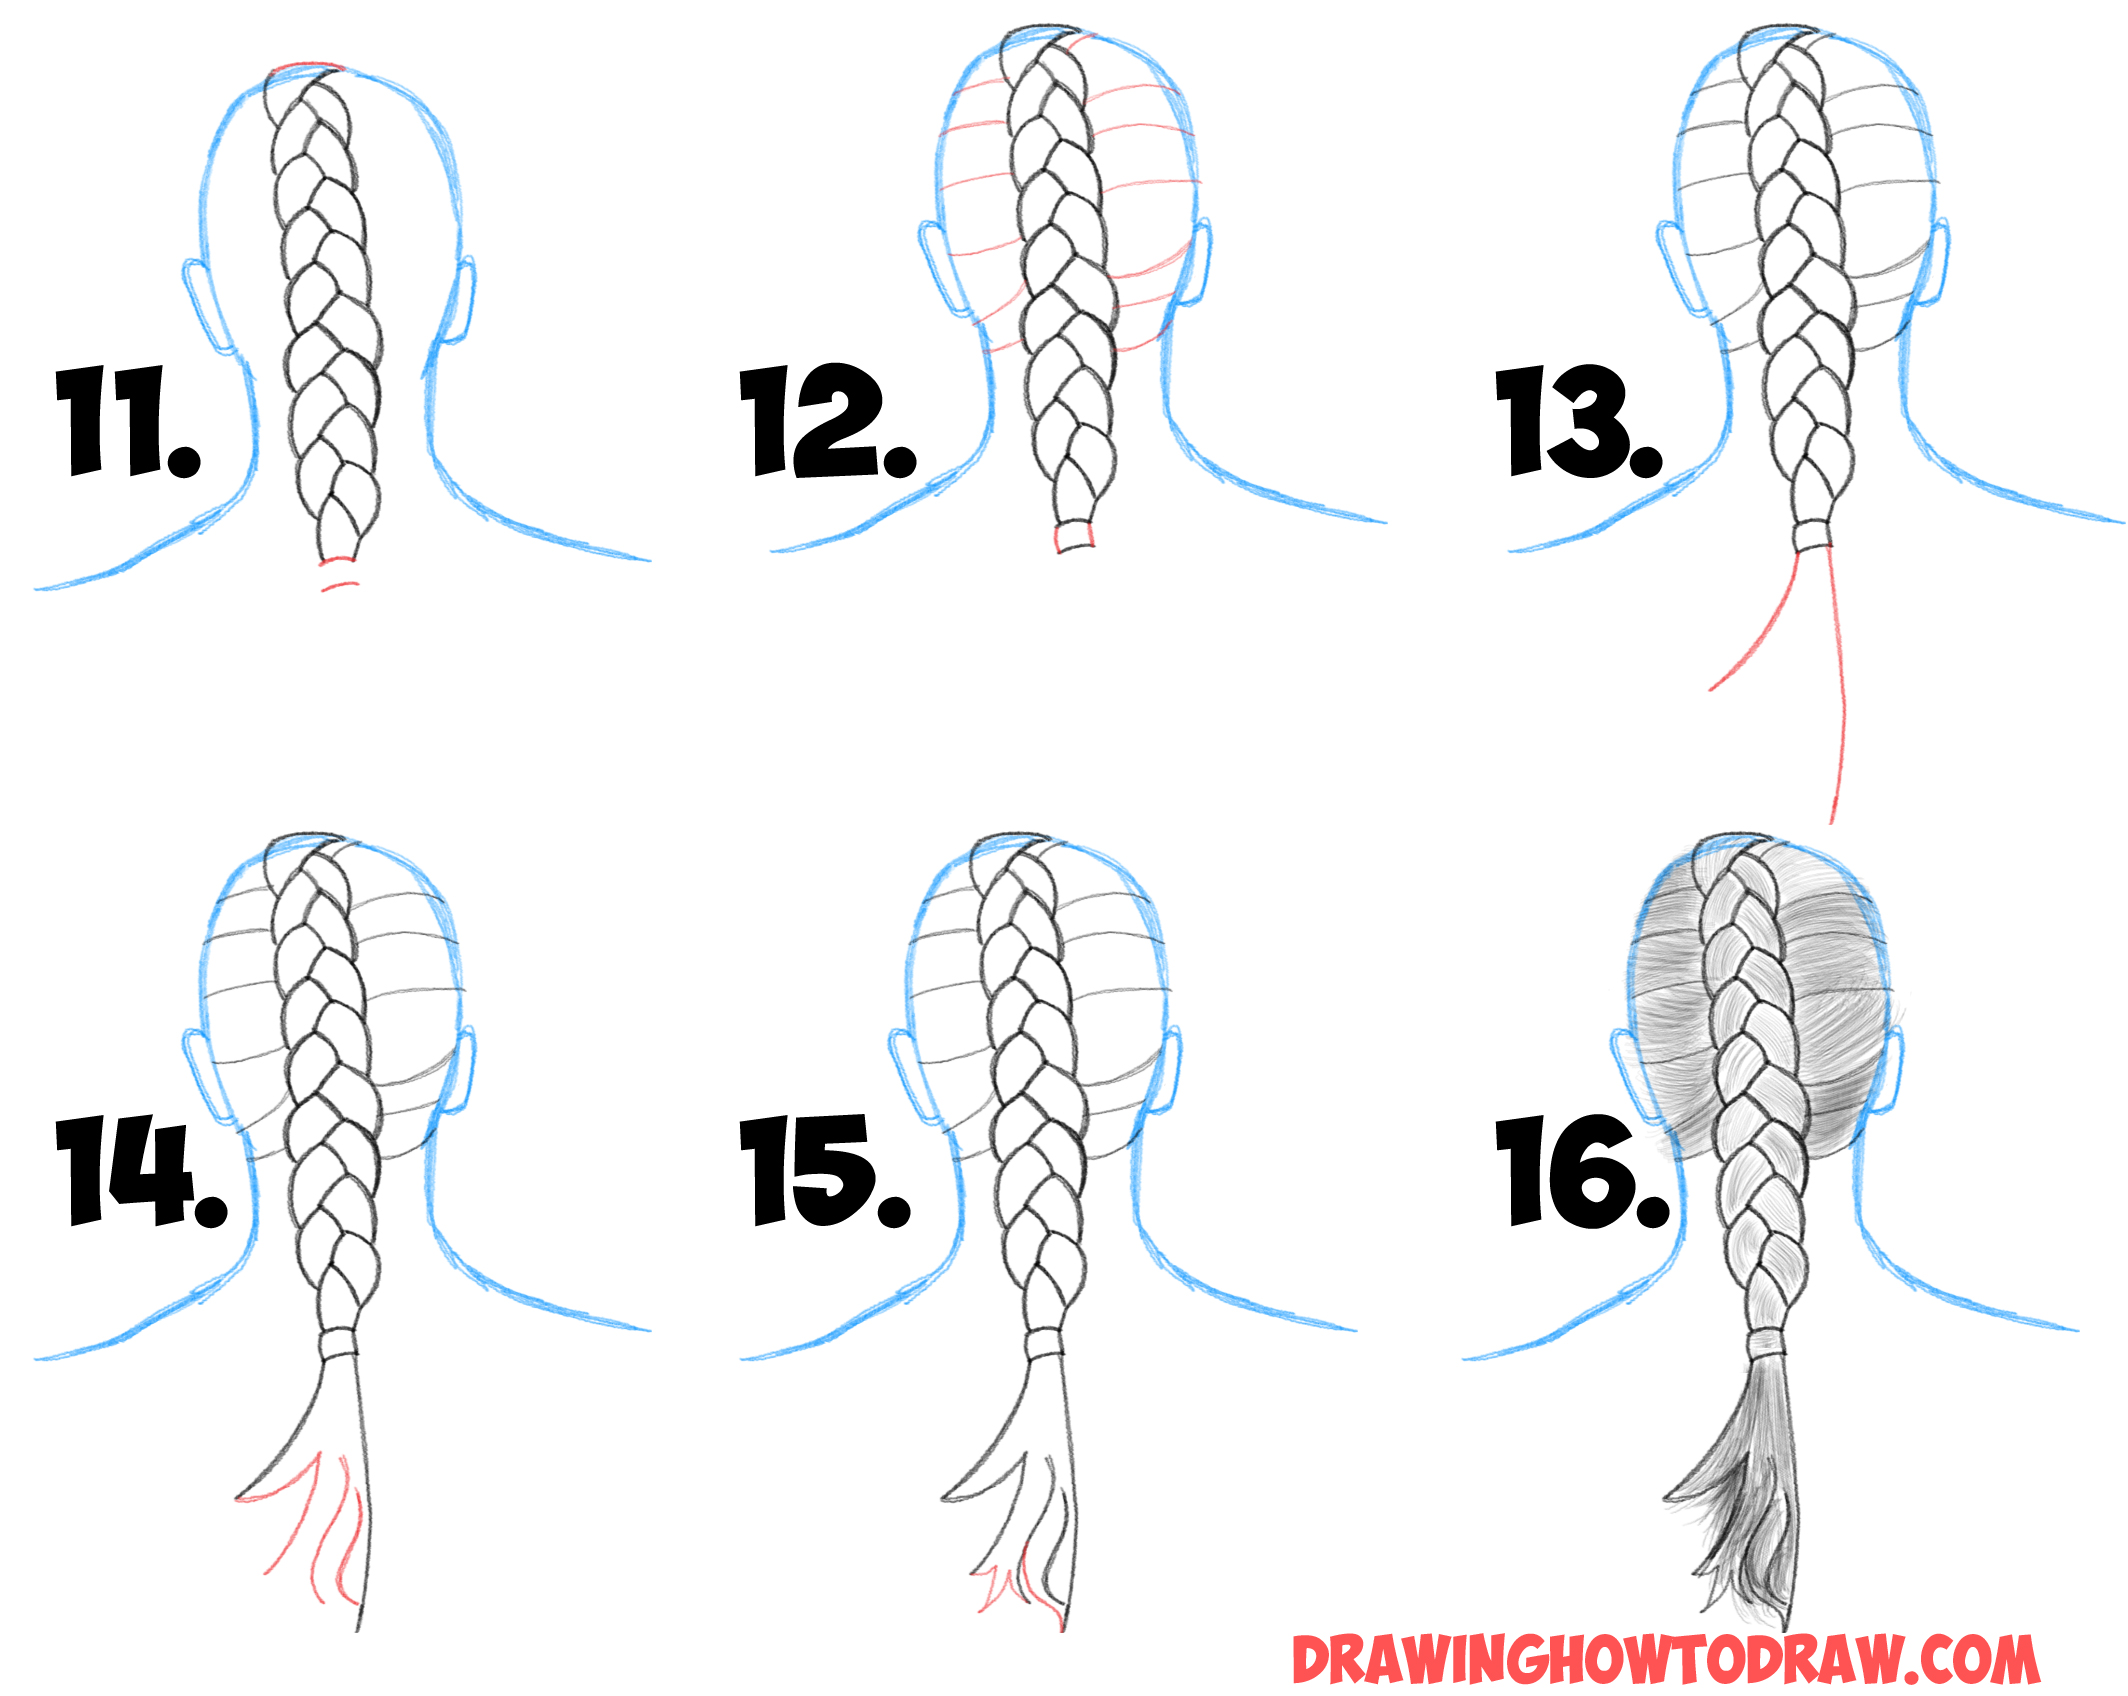
Do the same for the right side. Use light lines in this step because these will be the guidelines for the next step in the process. “visualize a tiny band clenching the hair ends together, causing a gentle compression at that point. They can also be a tricky task for artists of any experience level. For straight or curly hair.

How to draw braids in 10 steps Plus videos RapidFireArt
Pay attention to the proportions of these boxes, you can keep them all the same size or you can slowly make. This is where the hair tapers to an end. Add more sections of hair. Begin by drawing small, curved lines along each strand, following the direction of the hair. You will continue this process until you reach the end.

gaksdesigns Hair art, How to draw braids, Natural hair art
Afterward, pull two more sections of hair from the side as you did in step 1. This is where the hair tapers to an end. Begin by drawing small, curved lines along each strand, following the direction of the hair. Web ***i made a newer, better version of this tutorial***watch it here: Hair drawings can be striking and beautiful when.
Braid Drawing Reference and Sketches for Artists
Web ***i made a newer, better version of this tutorial***watch it here: Use light lines in this step because these will be the guidelines for the next step in the process. Post this point, the hair fans out, presenting a fluffier appearance,” explains larson. Draw a ring to tie off the braid. This is where the hair tapers to an.

How to draw a braid How to draw braids, How to draw hair, Ponytail
Draw a ring to tie off the braid. Pay attention to the proportions of these boxes, you can keep them all the same size or you can slowly make. Establish your line of action. Web 4 simple steps to drawing braids. Starting on the left side of the braid, draw a curve that touches the top portion of hair and.

How to Draw a Braid 4 Easy Steps (with Pictures)
You will continue this process until you reach the end of. Establish your line of action. Simplify your braid into basic shapes to streamline the process of drawing hair. Add more sections of hair. Afterward, pull two more sections of hair from the side as you did in step 1.

line art, black and white, braided, drawing How to draw braids, Black
Afterward, pull two more sections of hair from the side as you did in step 1. You will continue this process until you reach the end of. “visualize a tiny band clenching the hair ends together, causing a gentle compression at that point. Draw a ring to tie off the braid. Begin by drawing small, curved lines along each strand,.
Web Easy Steps For Drawing Braids.
Simplify your braid into basic shapes to streamline the process of drawing hair. You will continue this process until you reach the end of. It may fluff out a little beyond the confines of the hair. Web in addition, one feature that is often overlooked, yet plays a crucial role in completing the braid drawing, is the end of the braid.
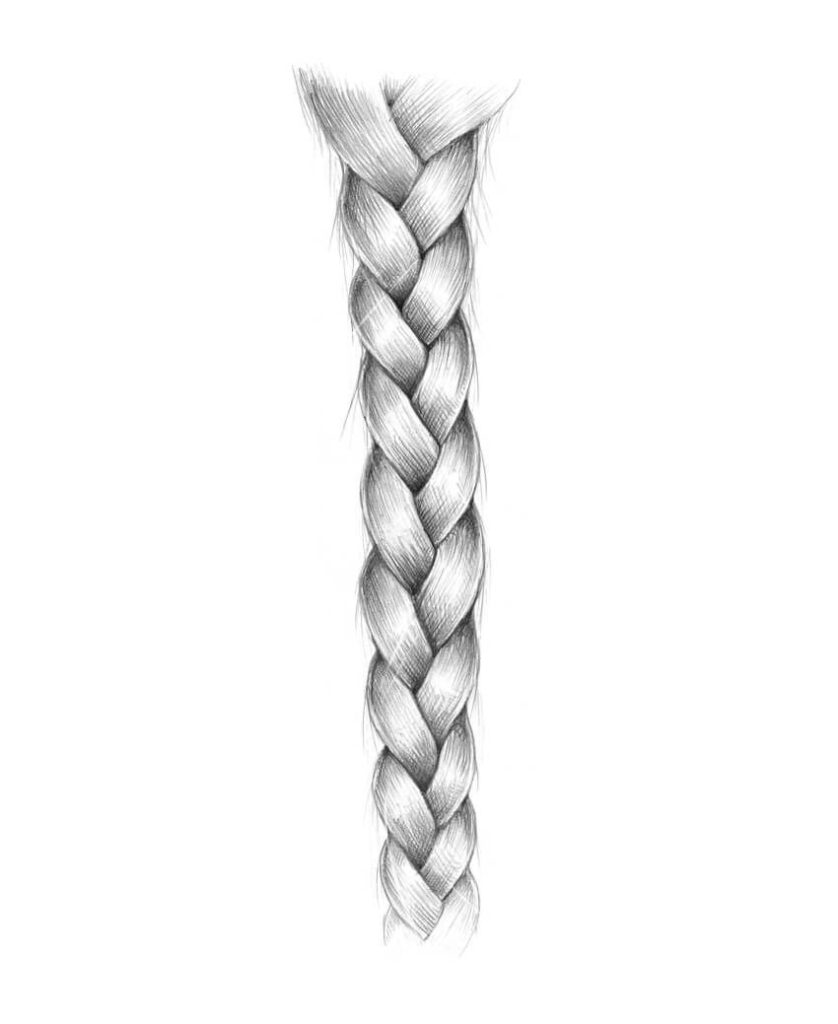
Hair Drawings Can Be Striking And Beautiful When Done Well;
Stay close to the outline made in step 1. Web ***i made a newer, better version of this tutorial***watch it here: Do this all the way down. Before you proceed, erase the line going down the middle (through the zigzag).
Web Breaking Down Braid Drawing.
You'll have to interrupt one of the hair sections; To make the braid look realistic, it’s crucial to add texture. Add more sections of hair. Establish your line of action.
Use Light Lines In This Step Because These Will Be The Guidelines For The Next Step In The Process.
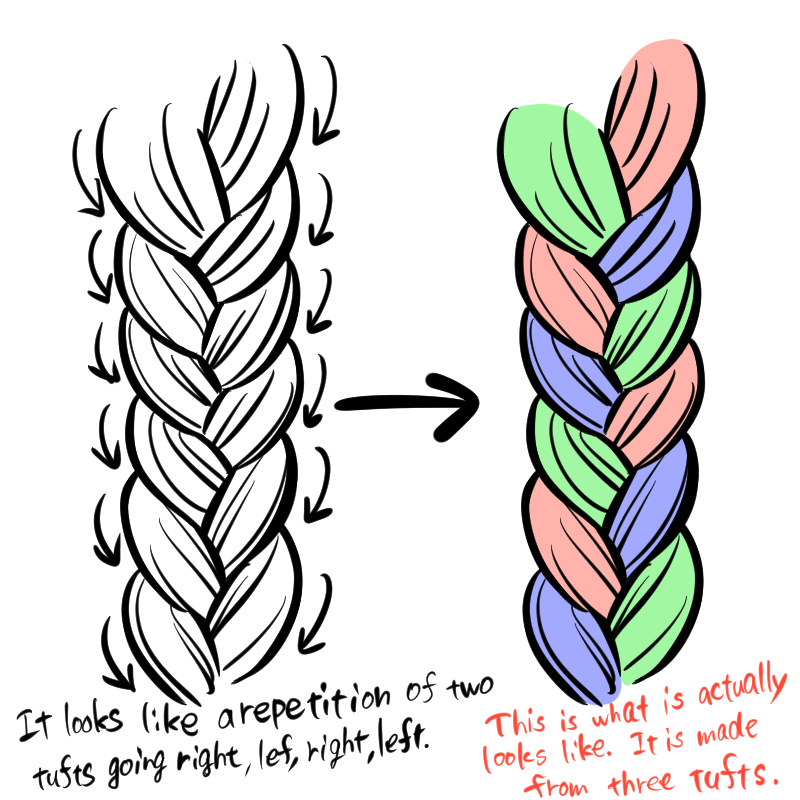
While there are infinite ways to make this process your own, you can use these four steps as a framework to help you nail a great braid drawing, from outline to finishing details. Many hair ties have to be twisted once or twice to wrap around someone's hair, so try drawing several pieces. These lines represent the individual strands that create the braid. Pay attention to the proportions of these boxes, you can keep them all the same size or you can slowly make.