Draw Shirt Collar
Draw Shirt Collar - Connect the two sides of the collar with a short line as well. Draw another triangle at the centre of the waistline for the tip of the tie. Following the sides, draw the lower part of the inner outline and the upper part. Now let’s put on a collar and neckline! This is the border of the shirt collar. Web let’s take a look at how it’s done step by step: Drawing a shirt collar simply involves drawing an oval around the neck of the figure and ad. In order to draw shirt collars in html, you’ll need to access the different ways to specify color or font size. This will depend on the type of shirt you are drawing and the style of the collar. Coming out of the collar add the shoulders followed by the sides and then the bottom of the main part of the shirt.
Html provides several ways to do this including hex values, rgb or rgba. By incorporating buttons, pockets, and other unique features, you can transform a simple shirt into a visually interesting and captivating piece. Start by mapping the shirt collar on both sides of the neck. That way, you will have a great drawing base for you to start on. It all depends on the style and type of collar you want to draw. I'm gonna show you how to draw a super This is the border of the shirt collar. Enhance your artwork with stylish collar designs and bring your characters to life. Below i am showing two. How to draw shirt collars steps7 step 8:
Now add the jacket collar. Web the first thing you need to draw for your shirt is the collar. Enhance your artwork with stylish collar designs and bring your characters to life. Web learn how to draw collars with these simple and creative techniques. Web how to draw shirt collars steps step 7: Following the sides, draw the lower part of the inner outline and the upper part. Draw the collar of the shirt by making a curvy line around the neck part. Web draw a horizontal oval at the waistline taking the waistline as its dividing line. This will depend on the type of shirt you are drawing and the style of the collar. The neckline should connect smoothly with the collar.

View How To Draw A Collared Shirt PNG Shiyuyem
Web to draw a shirt, follow these professional steps: Start by mapping the shirt collar on both sides of the neck. Below i am showing two. Html provides several ways to do this including hex values, rgb or rgba. Web for this illustration, we will be adding a shirt underneath the notched collar jacket.
How To Draw A Shirt Collar DRAWING IDEAS
Connect the open ends of one triangle to the open ends of the other triangle using curved lines. Web in this fashion school with nick verreos video, nick shows you how to draw basic shirt collars including the convertible, band/nehru, mandarin and peter p. Now add the jacket collar. Below i am showing two. I'm gonna show you how to.

Collared Shirt Sketch at Explore collection of
This is the border of the shirt collar. Web how to draw a shirt collar. Start with an outline of the top. In order to draw shirt collars in html, you’ll need to access the different ways to specify color or font size. Connect the open ends of one triangle to the open ends of the other triangle using curved.

How To Draw A Shirt Collar HOWTOCI
It all depends on the style and type of collar you want to draw. Web how do i draw a collar shirt? Web draw a curved line starting from the bottom left corner of the collar and extend it to the right, creating the neckline of the shirt. Start with an outline of the top. Web the first thing you.

how to draw shirt collars cottoneyejoetutorial
Repeat this step on the other side, mirroring the curve. That way, you will have a great drawing base for you to start on. This part of the shirt is called the placket. This completes the outline of the collar. Coming out of the collar add the shoulders followed by the sides and then the bottom of the main part.

How To Draw A Collared Shirt StepByStep Guide Best Casual Shirts
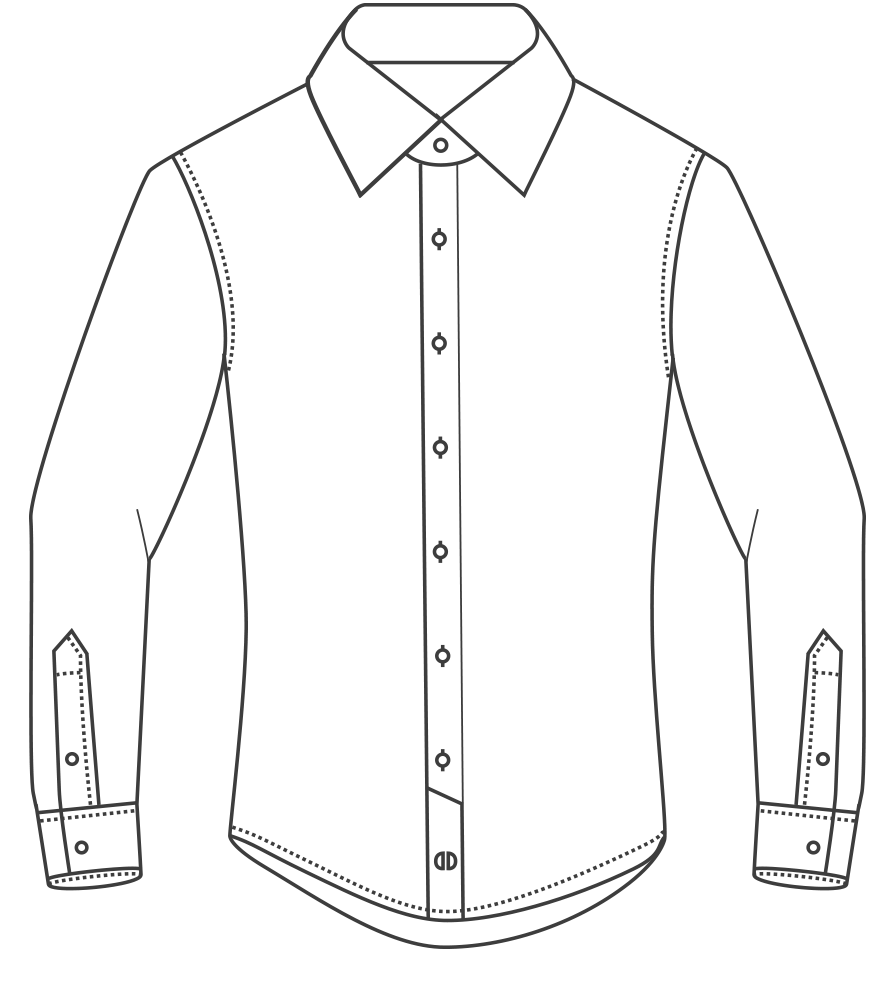
How to draw shirt collars steps7 step 8: This part of the shirt is called the placket. Extend two lines from the top ends of the collar, curving downwards to. The neckline should connect smoothly with the collar. Draw two inner lines and dotted lines like in my image.

how to draw shirt collars cottoneyejoetutorial
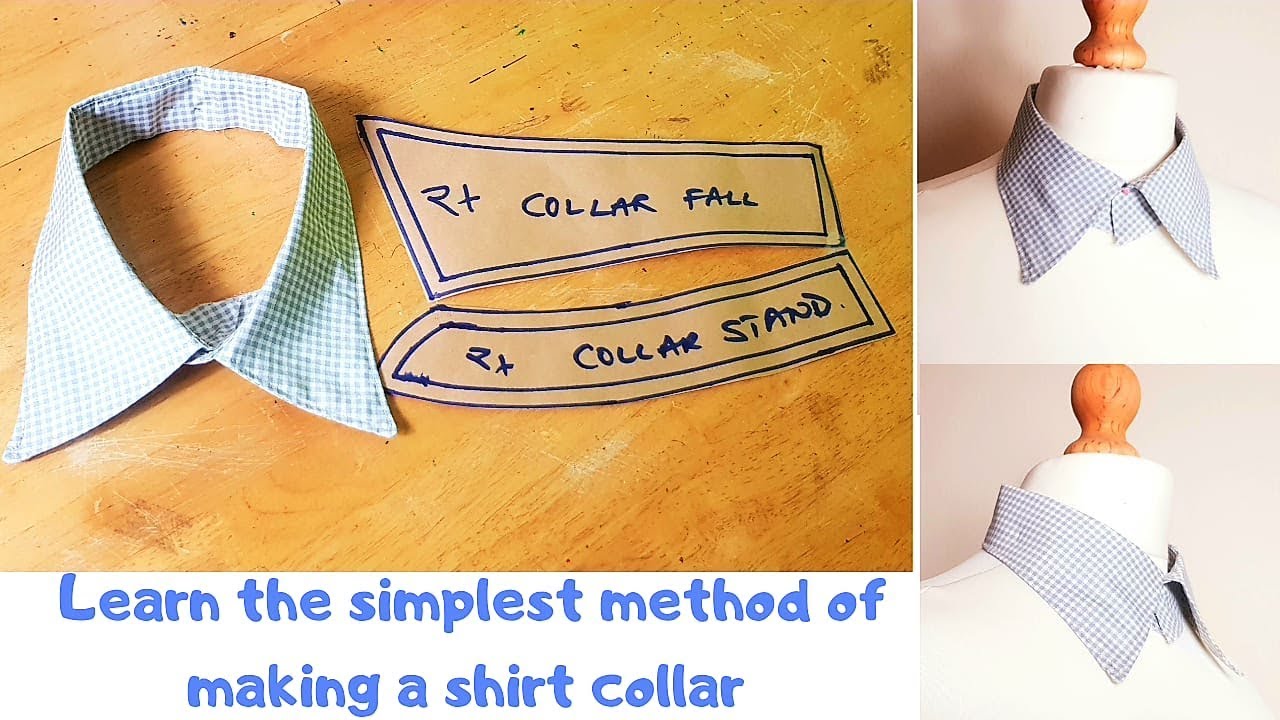
The collar on a shirt can be different sizes and shapes depending on how it’s made! Web drawing shirt collars for your projects is super easy with these handy tips! This is the border of the shirt collar. Web for this illustration, we will be adding a shirt underneath the notched collar jacket. This line should never be too wide,.
Shirt Collar Drawing at GetDrawings Free download
Drop down a vertical straight line for the button line of the shirt. Adding details is a crucial step in drawing shirts, as it contributes to the overall authenticity and realism of your artwork. Drawing a collar in illustrator is actually trickier than you might think, and before you set out to draw a collar shirt, you f. Web the.

Shirt Collar Drawing at GetDrawings Free download
The collar on a shirt can be different sizes and shapes depending on how it’s made! Web learn how to draw collars with these simple and creative techniques. This is the border of the shirt collar. The best way to draw a collar is to start with a diagonal line that begins at the left shoulder and moves down towards.

Collared Shirt Reference Drawing
Html provides several ways to do this including hex values, rgb or rgba. The neckline should connect smoothly with the collar. By incorporating buttons, pockets, and other unique features, you can transform a simple shirt into a visually interesting and captivating piece. Web how to draw a shirt collar. That way, you will have a great drawing base for you.
Web Finish By Drawing The Back Of The Collar With A Slightly Curved Line Connecting The Two Collar Points.
Now add the jacket collar. Connect the open ends of one triangle to the open ends of the other triangle using curved lines. Web thank you so much for watching my videos ♥♥♥📌 contact me at: Start by mapping the shirt collar on both sides of the neck.
This Part Of The Shirt Is Called The Placket.
This completes the outline of the collar. Adding details is a crucial step in drawing shirts, as it contributes to the overall authenticity and realism of your artwork. Connect the two sides of the collar with a short line as well. You can also connect the two sides of the collar with a short line.
Next Steps We Draw This Outline By A Marker Pen.
Connect the lines at the bottom using a short line. This line should never be too wide, as this will make the. This will depend on the type of shirt you are drawing and the style of the collar. The neckline should connect smoothly with the collar.
By Incorporating Buttons, Pockets, And Other Unique Features, You Can Transform A Simple Shirt Into A Visually Interesting And Captivating Piece.
When you are drawing a collar, make sure that you make it as simple as possible. Drop down a vertical straight line for the button line of the shirt. This is the border of the shirt collar. Web draw a curved line starting from the bottom left corner of the collar and extend it to the right, creating the neckline of the shirt.