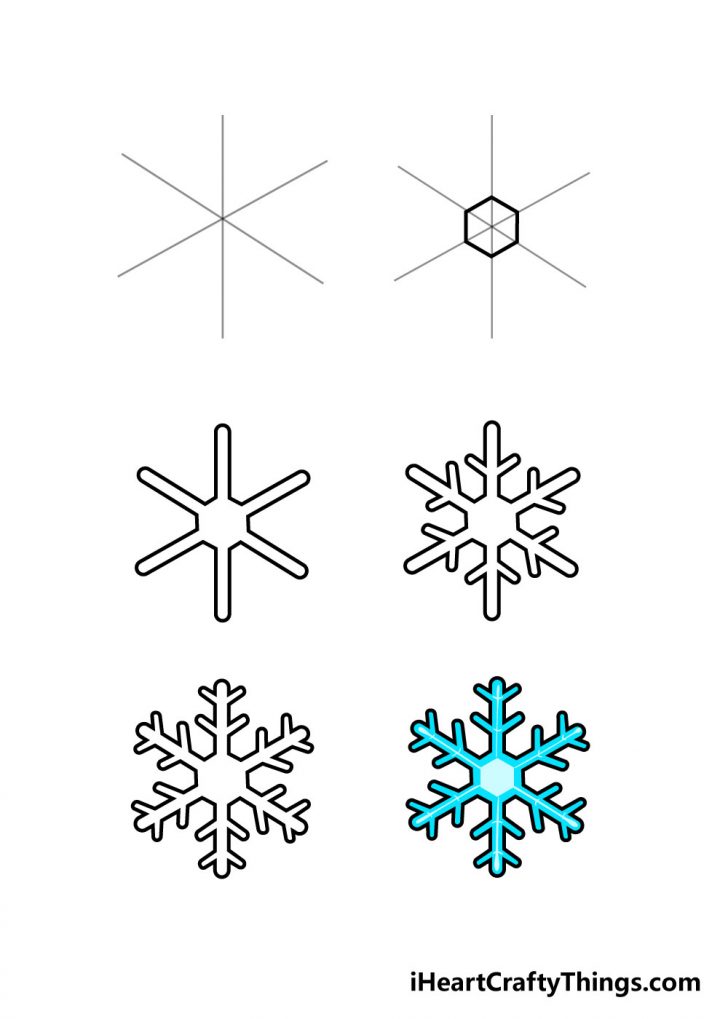
Drawing Of Snow Flake
Drawing Of Snow Flake - On each arm of the snowflake, extend two sets of straight, parallel lines at diagonal angles as compared to the arm. Build the skeleton of your snowflake drawing. Start by drawing a v at the top of the center line. Web follow along with us and learn how to draw a simple snowflake! Remember to start with an x and cross the middle of it to create the first step with 6 lines. The basic construction is ready, so we can now build on it to create a beautiful snowflake. Web learn how to draw a simple snowflake! Then, draw a second line from the circle’s center to its edge, but this time at a different angle. Repeat this pattern around the circle at the top of every line. Add a second, smaller v.
If you have students ready to take on a bigger drawing challenge, encourage them to try snowflake options 4 through 7 below. Perfect for capturing the beauty of the winter season, this guide will teach you how to. Learn how to create your own snowflake drawing with our easy guide. We now begin to add the signature arms on our easy snowflake drawing. Draw a third vertically to intersect the first two lines. Now draw another line from left to right. You can use the reference image as a. On each arm of the snowflake, extend two sets of straight, parallel lines at diagonal angles as compared to the arm. Also included is a printable version of this snowflake drawing tutorial. Ideal for art teachers and homeschoolers looking to instruct kids how to draw their own.
This is the most simple design. Outline the body of the snowflake. Begin with the intersecting line you drew in the last step, adding two sets of extending arms just before the ends. With the pencil lines drawn, we will be adding another shape to help with drawing the final snowflake. Also included is a printable version of this snowflake drawing tutorial. Web follow along with us and learn how to draw a simple snowflake! Included are 6 easy steps to follow, children will enjoy making their own snowflake on paper. Draw a line from each corner of the hexagon to the corner across from it. Ideal for art teachers and homeschoolers looking to instruct kids how to draw their own. Add the outline based on the lines you made earlier.

Learn How to Draw Snowflakes (Christmas) Step by Step Drawing Tutorials
Also included is a printable version of this snowflake drawing tutorial. The first thing to do is draw a small circle in the center of the page. The bigger you make the hexagon, the bigger your snowflake will be. The snowflake pattern begins with a series of circles rippling outwards from the middle. You can use a ruler, or you.

How to Draw a Snowflake Really Easy Drawing Tutorial
You can use a ruler, or you can let the kids draw free hand. On each arm of the snowflake, extend two sets of straight, parallel lines at diagonal angles as compared to the arm. Try and make these close in length to the first one and also try and keep the distance between each one roughly the same to.
How to Draw a Snowflake · Art Projects for Kids
Tweak it a bit, and you’ve got a snowflake that’s not just a doodle, but a masterpiece! You can use a ruler, or you can let the kids draw free hand. Web 1 7 easy steps to draw a snowflake. Learn how to create your own snowflake drawing with our easy guide. For this one, start by drawing a straight.
Snowflake Drawing How To Draw A Snowflake Step By Step!
Web learn how to draw a simple snowflake! Draw 3 lines that cross each other. A few neat tricks up your sleeve, and bam! Follow along this simple step by step tutorial to learn how to draw a snowflake. Start with easy peasy shapes, like a hexagon and a star.

How to draw a snowflake easy yet graceful Let's Draw That!
Repeat this pattern around the circle at the top of every line. Draw 3 lines that cross each other. On the arms closest to the circles, draw two more, smaller arms. You can put a new sheet of paper over the guide lines to create a clean drawing, or just take a darker tool to create the final lines. You.
How to Draw a Snowflake MediBang Paint the free digital painting
Try and make these close in length to the first one and also try and keep the distance between each one roughly the same to so that the snowflake looks symmetrical. This can be done with a pencil or a drawing program on a computer. Web follow along with us and learn how to draw a simple snowflake! #howtodraw #artforkidshub🎨.
How to Draw a Snowflake Easy Drawing Tutorial For Kids
You can use the reference image as a. Also check out all of our other winter lessons. Start by drawing a line at an angle, and then another line to form an x. Web drawing a beautiful snowflake is a lot easier than you might think! Web creatives will enjoy learning how to draw a snowflake in 6 simple illustrative.

How to Draw a Snowflake HelloArtsy
Web join us in a winter wonderland with our snowflakes drawing tutorial! Start by drawing a line at an angle, and then another line to form an x. Enclose the shape with a small, curved line on each end. Learn how to create your own snowflake drawing with our easy guide. Tweak it a bit, and you’ve got a snowflake.
Snowflake Drawing How To Draw A Snowflake Step By Step!
Now, drawing a snowflake might seem like climbing everest, but hang on. If you have students ready to take on a bigger drawing challenge, encourage them to try snowflake options 4 through 7 below. The next step is to draw the lines that give your snowflake its shape. I like asking the kids to say words that have the letter.

How to Draw a Snowflake Really Easy Drawing Tutorial
I like asking the kids to say words that have the letter ‘x’ in them as a fun vocabulary exercise. Draw another line slanted from one side to the other of the first line. Web grab your coloring pencils, drawing tablet, or favorite paint pot and let us start to draw a snowflake. With the pencil lines drawn, we will.
Draw A Hexagon On A Piece Of Paper.
On the arms closest to the circles, draw two more, smaller arms. This is the most simple design. Draw 3 lines that cross each other. This can be done with a pencil or a drawing program on a computer.
Remember To Start With An X And Cross The Middle Of It To Create The First Step With 6 Lines.
Follow along this simple step by step tutorial to learn how to draw a snowflake. Web learn how to draw a simple snowflake! Creating the first circle for your snowflake drawing. Add a second, smaller v.
Draw Those 3 Intersecting Lines Again But This Time Draw Small V Shapes At The End Of Each Line.
Repeat this pattern around the circle at the top of every line. Now draw another line from left to right. The next step is to draw the lines that give your snowflake its shape. Outline the body of the snowflake.
With The Pencil Lines Drawn, We Will Be Adding Another Shape To Help With Drawing The Final Snowflake.
Now, drawing a snowflake might seem like climbing everest, but hang on. Also check out all of our other winter lessons. The basic construction is ready, so we can now build on it to create a beautiful snowflake. Now, it’s time to add details.