Easy Bows To Draw
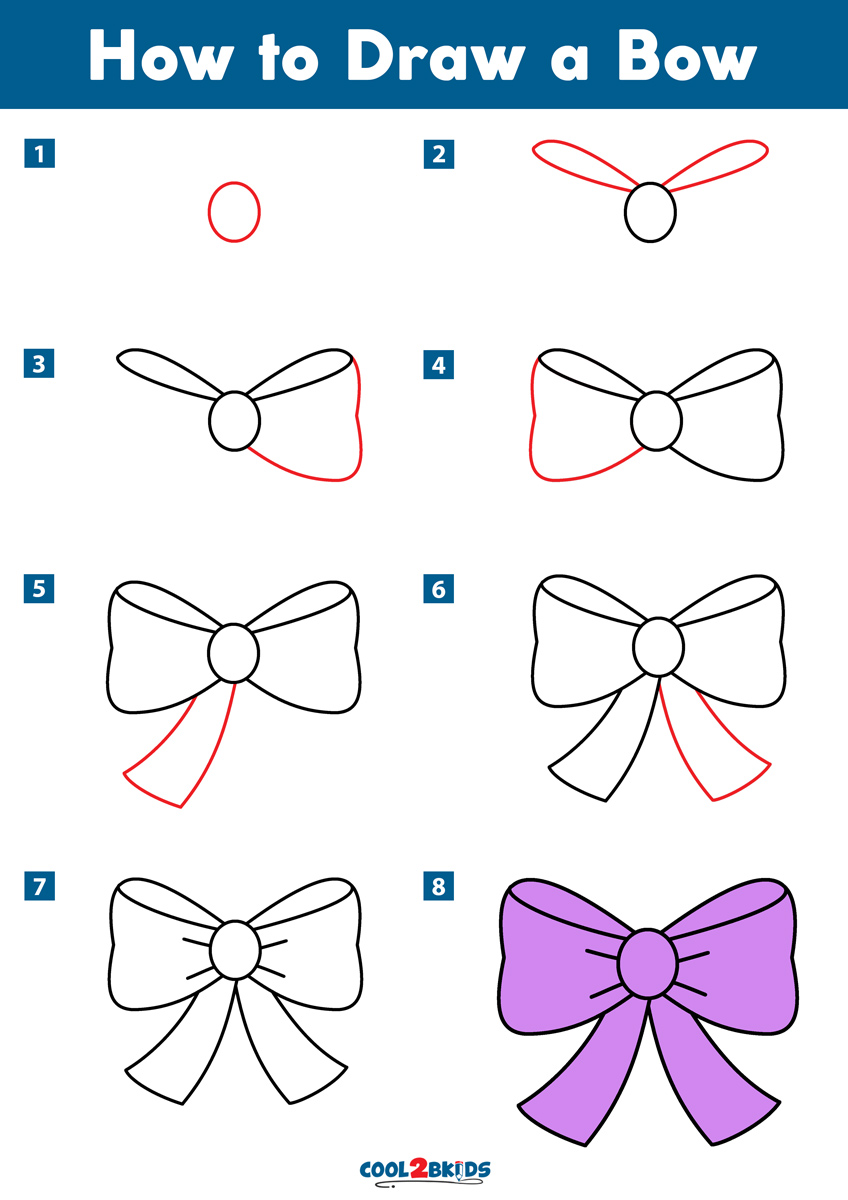
Easy Bows To Draw - Start by drawing a square for the knot of your bow. Follow me on other social. Web learning how to draw a bow tie is very simple! Web try a creative way to showcase your bows! Trace and color the shadows with dark crayon. Next, draw another curved line underneath the first one. Allow them to meet at a point, forming the arrowhead. Then, create the loops by drawing a rectangular shape with rounded corners on either side. If you stand correctly, you will be doing this automatically. Show, with light lines, the general proportions of it.
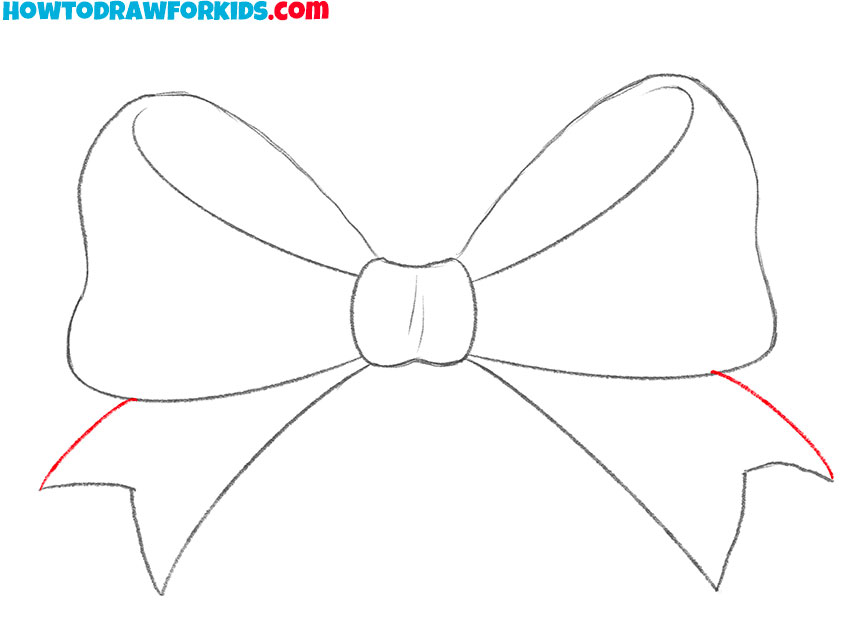
Draw the bottom of the loop on the right. Make sure the loops look the same on both sides and are all nice and even! Draw the bottom outline of the bow loops. Draw a guideline for the bow. First, nock the arrow onto the bowstring securely. Then go ahead and outline the other side of the bow by doing the same thing you had just done. Web to draw the bow, you start pulling the bow towards your anchor point. Repeat the above instructions on the left side. Make it’s middle sections fairly straight followed by a pair of bends and then again straight areas (on both sides) followed by small curves (in the opposite direction of the first two) near the tips. In the same way that a bow is useless without a string, it also doesn’t serve much of a purpose without an arrow to shoot, so we shall draw one in now for your bow drawing.
Outline the shape of the bow. You can do so by drawing two curved lines on either side of the shapes from before. Continue the lines you drew in the previous step with slightly longer curved lines. Draw the bottom of the loop on the left. Mark off the width and height of the picture. Draw a knot and show, with smooth lines, the direction of the ribbon ends. Web ready to take your drawing to the next level!? Trace and color the shadows with dark crayon. Web connect the ends of the previously drawn lines with curved lines, and add lines in the middle. When you have reached your anchor point, your bow is at full draw.
How to Draw a Bow Easy Drawing Tutorial For Kids
Then go ahead and outline the other side of the bow by doing the same thing you had just done. Web learn how to draw this cute bow step by step. Your loops should narrow towards the center. Draw the bottom of the loop on the left. Da vinci eye is an app that allows you to draw using augmented.

How to Draw a Bow Tie Really Easy Drawing Tutorial
Web connect the ends of the previously drawn lines with curved lines, and add lines in the middle. When you have reached your anchor point, your bow is at full draw. Make it’s middle sections fairly straight followed by a pair of bends and then again straight areas (on both sides) followed by small curves (in the opposite direction of.
How to draw a Bow In Pencil, Simple and three options
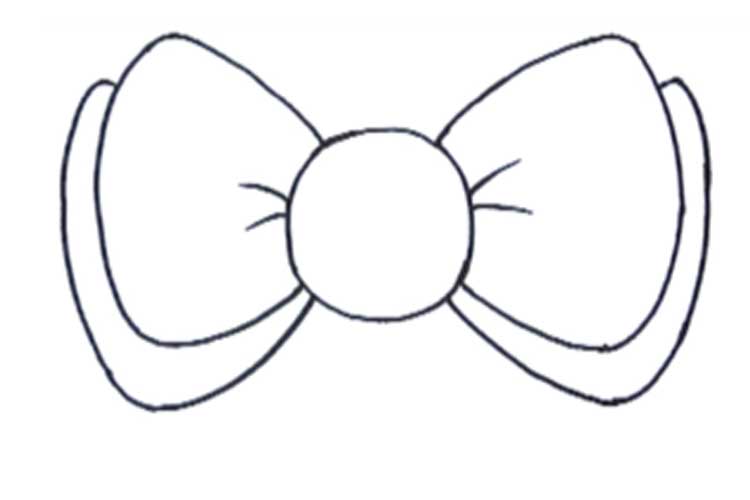
Next, draw another curved line underneath the first one. Make sure the loops look the same on both sides and are all nice and even! Then, draw a curved line at the top of the rectangle, extending beyond its sides. On the right, connect both lines with a single outwardly rounded line. Add the top outline of the bow loops.

How to draw a bow Step by step Drawing tutorials
Make two lines go down from the loops to make the tails of the bow. Your loops should narrow towards the center. Go ahead and add a bit more detail to make your bow look pretty. If you like my art !. To draw your bow, you should be using your back muscles.
How to Draw a Bow · Art Projects for Kids
Start the top of the right loop. Next, draw two loops on either side of the rectangle, which will serve as the main body of the bow. Drawing a hair bow requires a combination of basic shapes and attention to detail. From each end of this line, extend a straight line. Start by sketching a rectangle shape for the center.
How to Draw a Bow Cool2bKids
Next, draw the main part of your bow. Web make the loops of the bow by drawing two curvy shapes that cross each other in the middle. First, nock the arrow onto the bowstring securely. By leaving a watch you will be able to see more artworks and other stuff from me, as you give me motivation to keep creating..
How to draw a Bow (Step by Step) YouTube
Start by sketching a rectangle shape for the center knot of the bow. Follow me on other social. Web step by step directions. Then, grip the bow with a relaxed yet firm hold, ensuring your fingers are correctly positioned. Continue the lines you drew in the previous step with slightly longer curved lines.

How to Draw a Christmas Bow Step by Step Super Easy! YouTube
Drawing a hair bow requires a combination of basic shapes and attention to detail. Web this first bow is going to be the easiest. Draw the center of the bow. Then, create the loops by drawing a rectangular shape with rounded corners on either side. Draw it thicker towards the middle and narrower towards the ends.
Learn How to Draw a Bow (Everyday Objects) Step by Step Drawing Tutorials
Match with same shape on the left. It's free to download on apple devices but requires a $19.99 payment for android. Then, grip the bow with a relaxed yet firm hold, ensuring your fingers are correctly positioned. The app is available on ios, android, ipados, and visionos. In very little time, through a little repetition, you'll have the perfect bow.
How to draw a Bow In Pencil, Simple and three options
Start by drawing a square for the knot of your bow. Web to draw the bow, you start pulling the bow towards your anchor point. Outline the shape of the bow. Web this first bow is going to be the easiest. Now draw two straight lines, connecting the top and bottom curves.
First, Sketch An Oval Shape For The Center Of Your Bow Sketch.
From that point, you can start aiming and fire the bow. On the right, connect both lines with a single outwardly rounded line. It’s up to you if you want them to be symmetrical or not. Then, create the loops by drawing a rectangular shape with rounded corners on either side.
Continue The Lines You Drew In The Previous Step With Slightly Longer Curved Lines.
Now draw two straight lines, connecting the top and bottom curves. And there are several different ways you could draw the sides of your bow. Mark off the width and height of the picture. This will be the top of the bow.
Plan For This Drawing To Take About 20 Minutes, But The Drawing Process May Actually Take More Time If A Background Is Included In Addition To The Subject Matter.
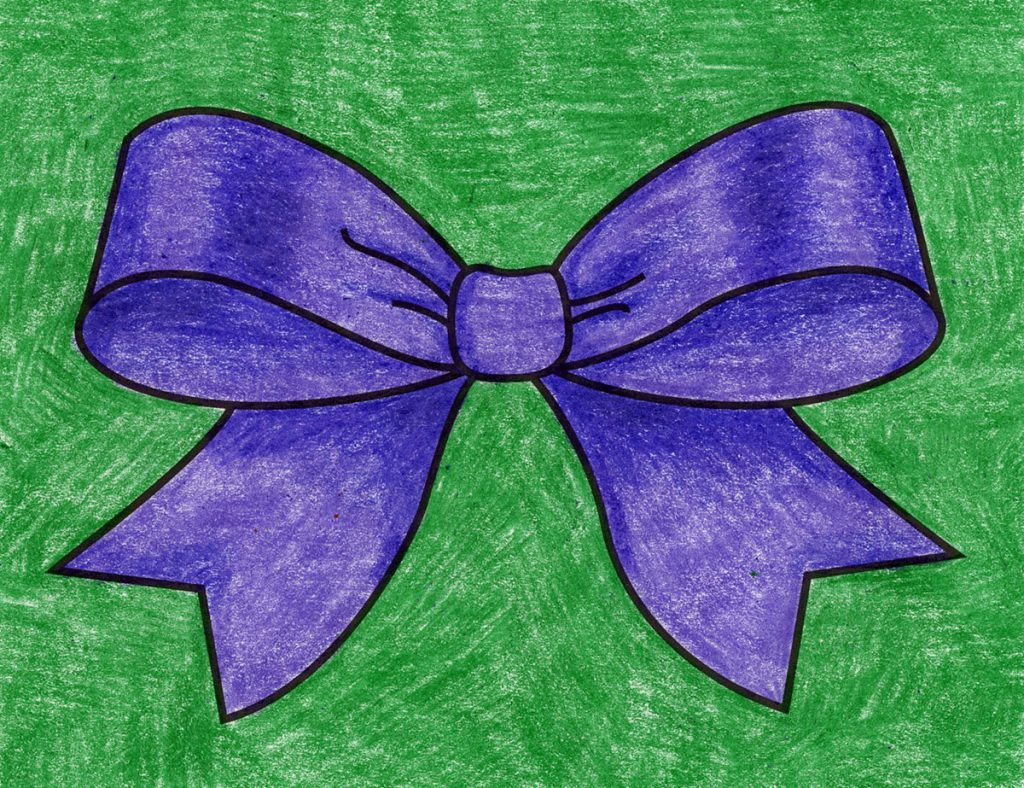
Trace and color the shadows with dark crayon. Moreover, you will always be informed about my new drawings, art plans and challenges!. Draw her on a gift or anything that needs a cute accessory. Make sure the loops are symmetrical and of equal size.
Web This First Bow Is Going To Be The Easiest.
Emojis help to capture and illustrate our mood without even having to express ourselves verbally. Add ribbon end on the left and the wrinkles. Draw the center of the bow. Add the top outline of the bow loops.