Easy Chibi Drawing
Easy Chibi Drawing - The top part is going to be your torso, you'll want to split that into a shoulder and chest area and a stomach and hip area. Web take the space you have to draw your body and split it in half. Use shorter pairs of lines, again meeting at jagged points, to texture the hair at the sides of the face, on top of the head, and at. Follow the steps and create your own cute characters in different poses. For each ear, use curved lines to form curved triangles. Sketch 2 wide eyes on the horizontal line in the circle. “you don’t have to use black for line art, necessarily,” says larson. Sketching softly helps, as you can adjust proportions easily before adding in defining features and expressions. Finally, use curved lines to indicate whiskers extending from below the nose. For coloration in general, avoid the deeper, harsher ends of the spectrum.
Web get 2 months of illustration classes free on skillshare: You can learn how to draw chibi features all day long with some paper and a pencil. Web let’s turn this fan art character that i drew into a chibi! Mastering a chibi drawing step by step takes patience. Complete the cartoon cat's face. Web that extends even to line art. Web be a sweet! Click here to save to pinterest! ^u^btoday let's learn to draw 3 easy chibi poses! Start adding cleaner outlines by making a new layer above the sketch layer.
Add details to your outlines. Draw the sharps locks of hair surrounding the face using pairs of curved lines that meet at points. Usually, this oval is a bit taller than it is wide. In addition, you can bring out more of the character’s personality by drawing various hairstyles with a strong emphasis. Web make the eyes neater and add some more detail compared to the previous simple eyes. Add flat colors by making a new layer below the outlines. Ideally, the ratio between the body and the head should be 1:1 or 1:4, the head being the bigger part, and the legs being distinctively short. The outside edge should hang out from the oval; For coloration in general, avoid the deeper, harsher ends of the spectrum. When drawing a chibi character, simply compress the character’s body.

How to Draw a Chibi Boy with Hood On Drawing Cute Chibi Boys Easy
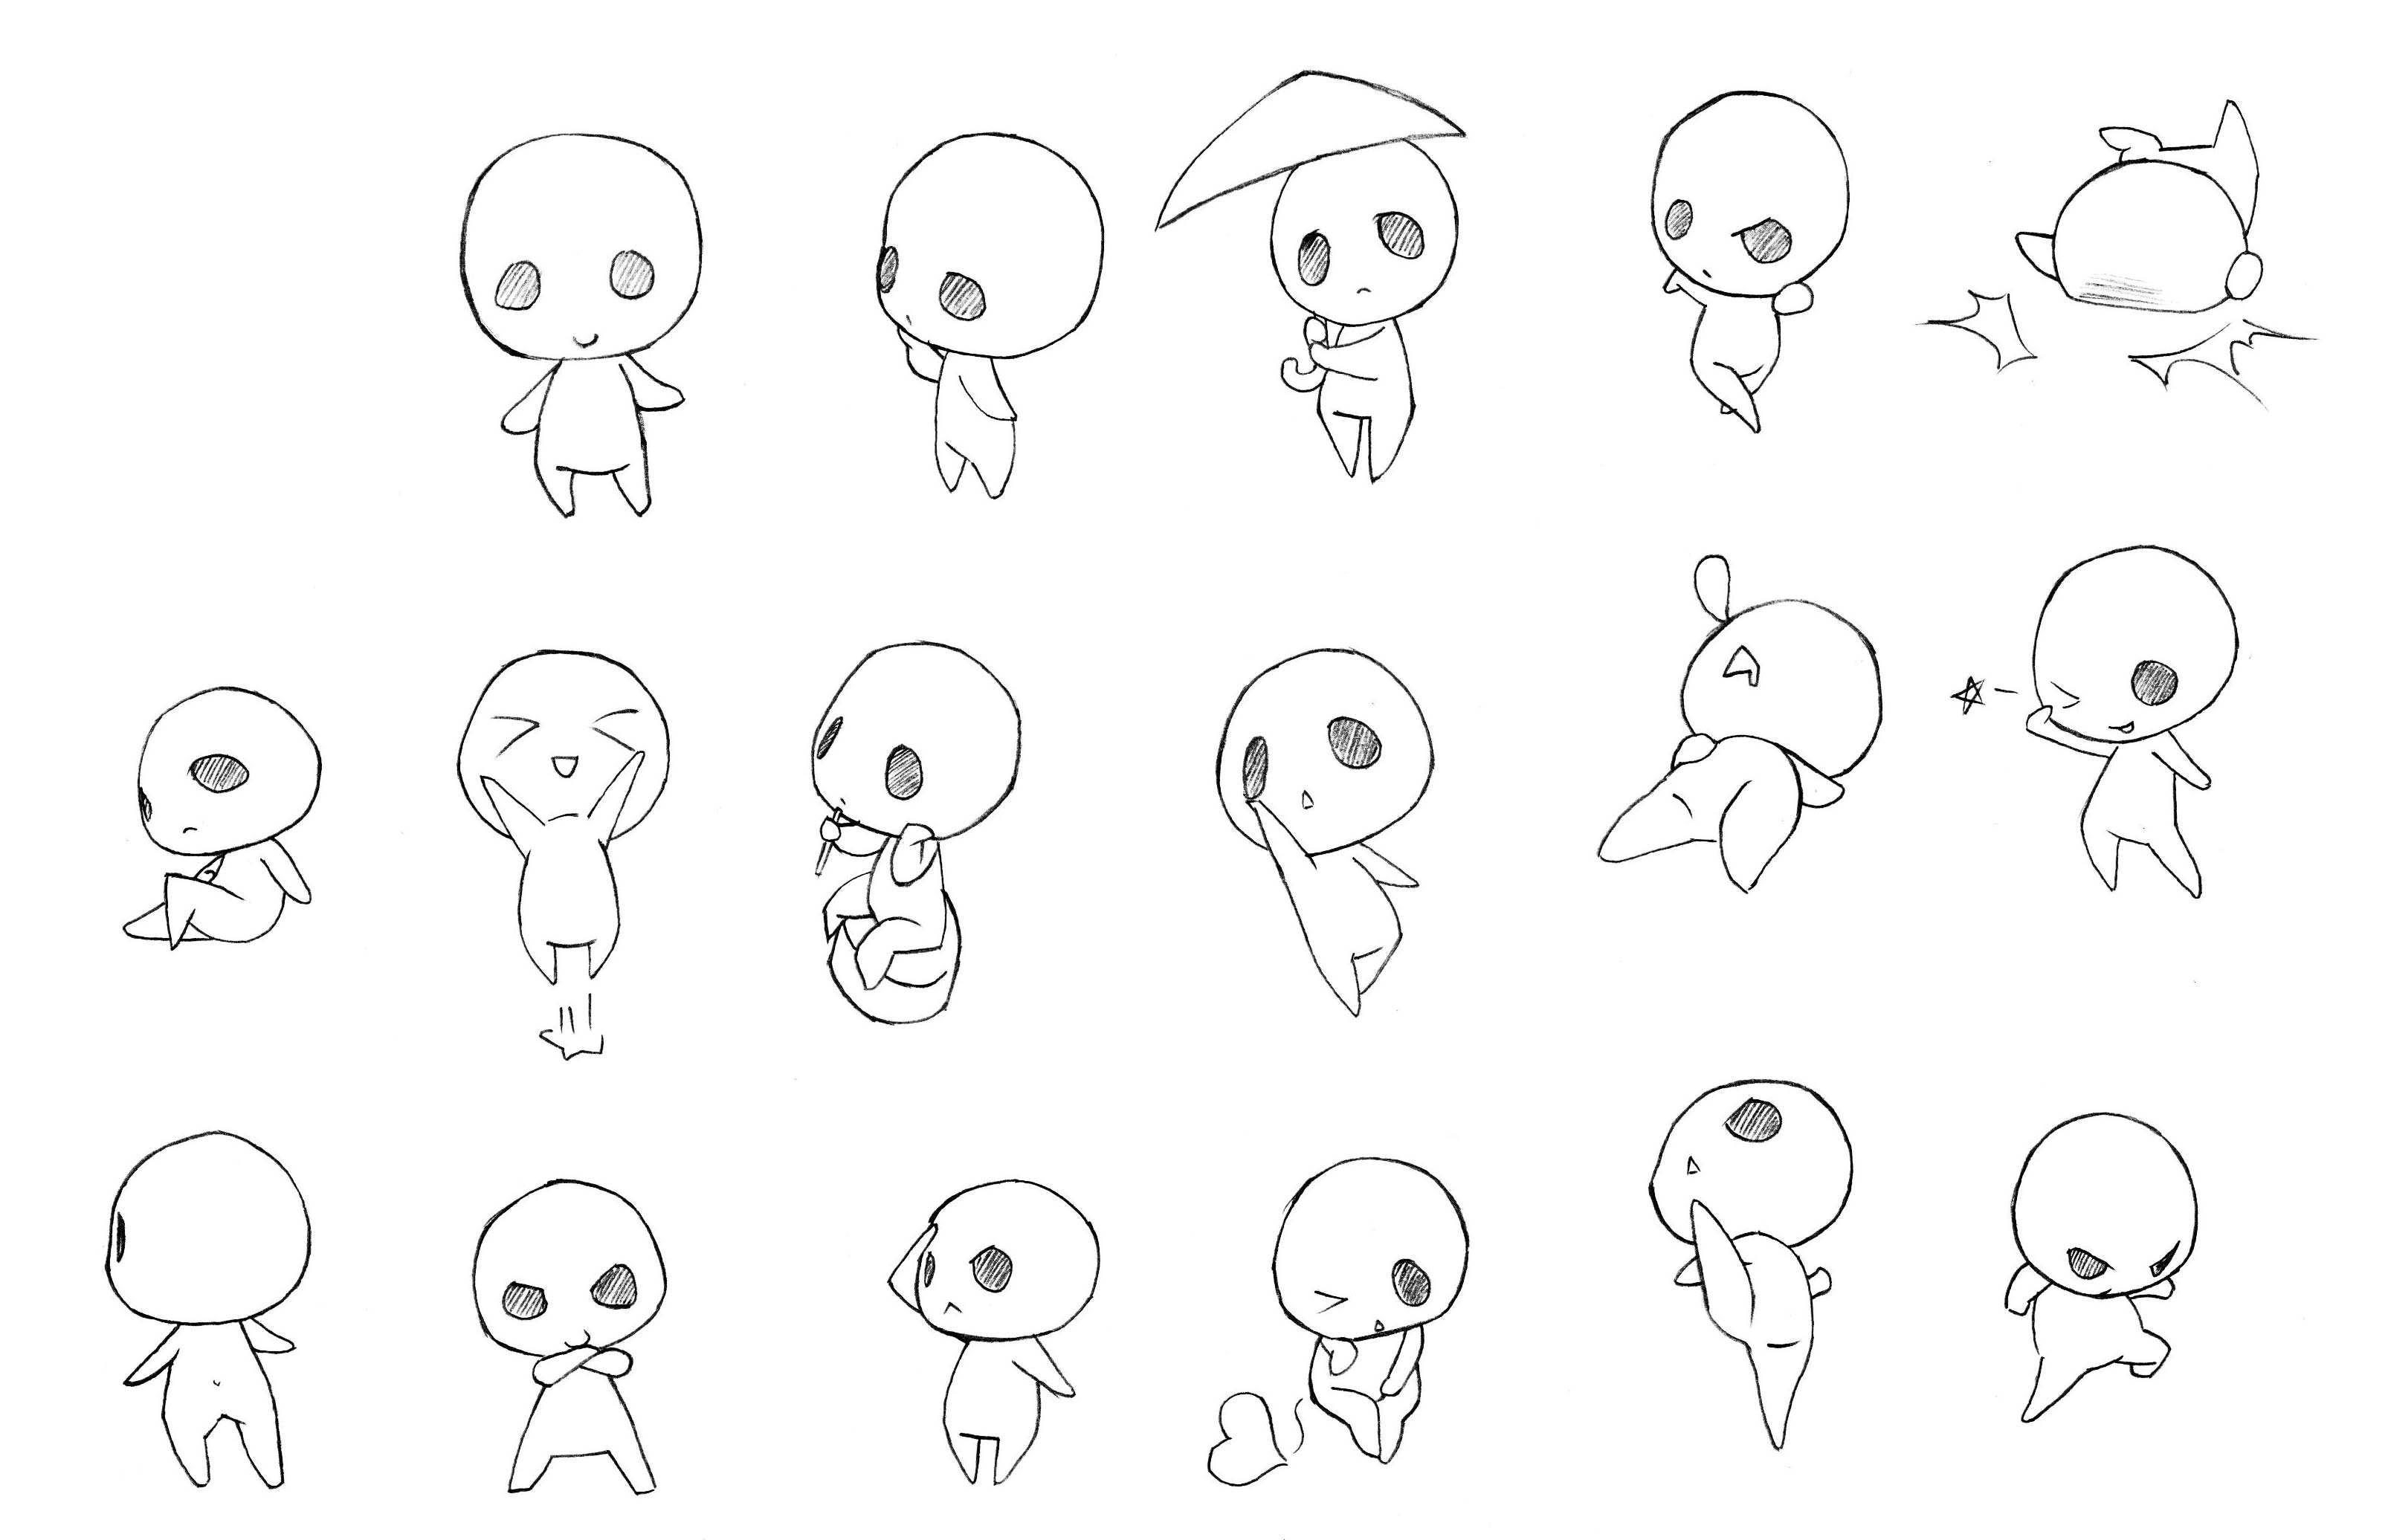
For coloration in general, avoid the deeper, harsher ends of the spectrum. Web let’s turn this fan art character that i drew into a chibi! You can learn how to draw chibi features all day long with some paper and a pencil. This leaves room for the sclera. When drawing chibi characters you can use a range of different poses.

How to draw Naruto Chibi Drawings step by step tutorials
Start adding cleaner outlines by making a new layer above the sketch layer. Draw a cute roaring tiger. You could draw an anime girl bowing or a chibi holding something. How to draw simple cute animals in chibi style: Begin with a large, round head for that signature cute look, followed by a small body.
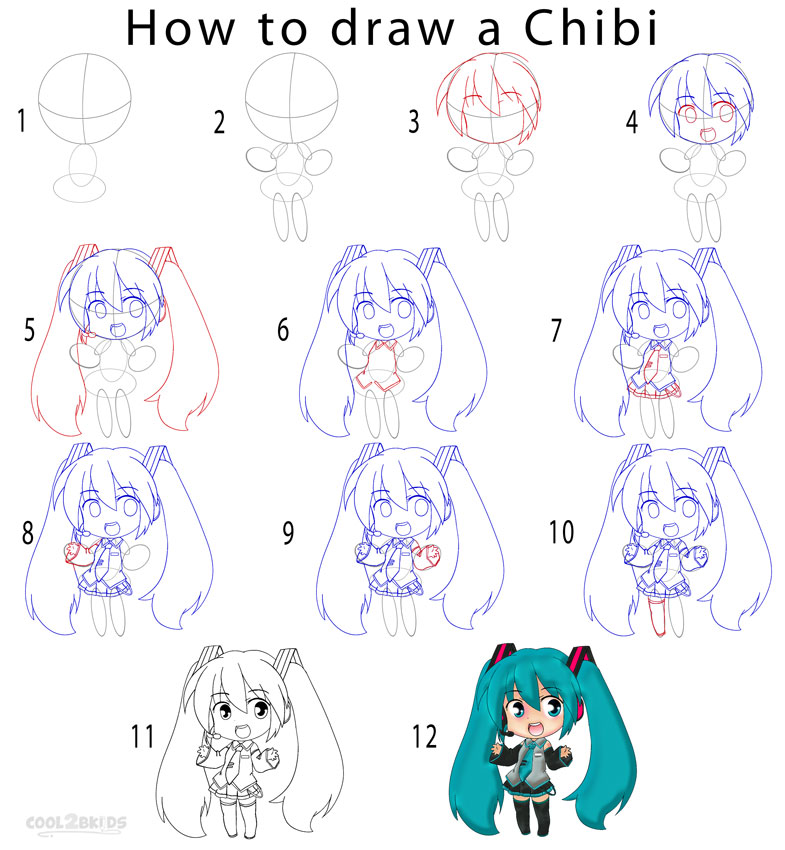
How to Draw a Chibi (Step by Step Pictures) Cool2bKids
When drawing chibi characters you can use a range of different poses. Dark blues or purples usually suffice for chibi line art and can give the character a sweeter feel. Web that extends even to line art. The outside edge should hang out from the oval; Sketch 2 wide eyes on the horizontal line in the circle.

How to Draw Chibi Miku, Step by Step, Chibis, Draw Chibi, Anime, Draw
Sketch 2 wide eyes on the horizontal line in the circle. When drawing chibi characters you can use a range of different poses. “good colors for chibi are very soft, pastel colors,” says. Web make the eyes neater and add some more detail compared to the previous simple eyes. Draw an oval on each cheek, and a small, inverted, rounded.
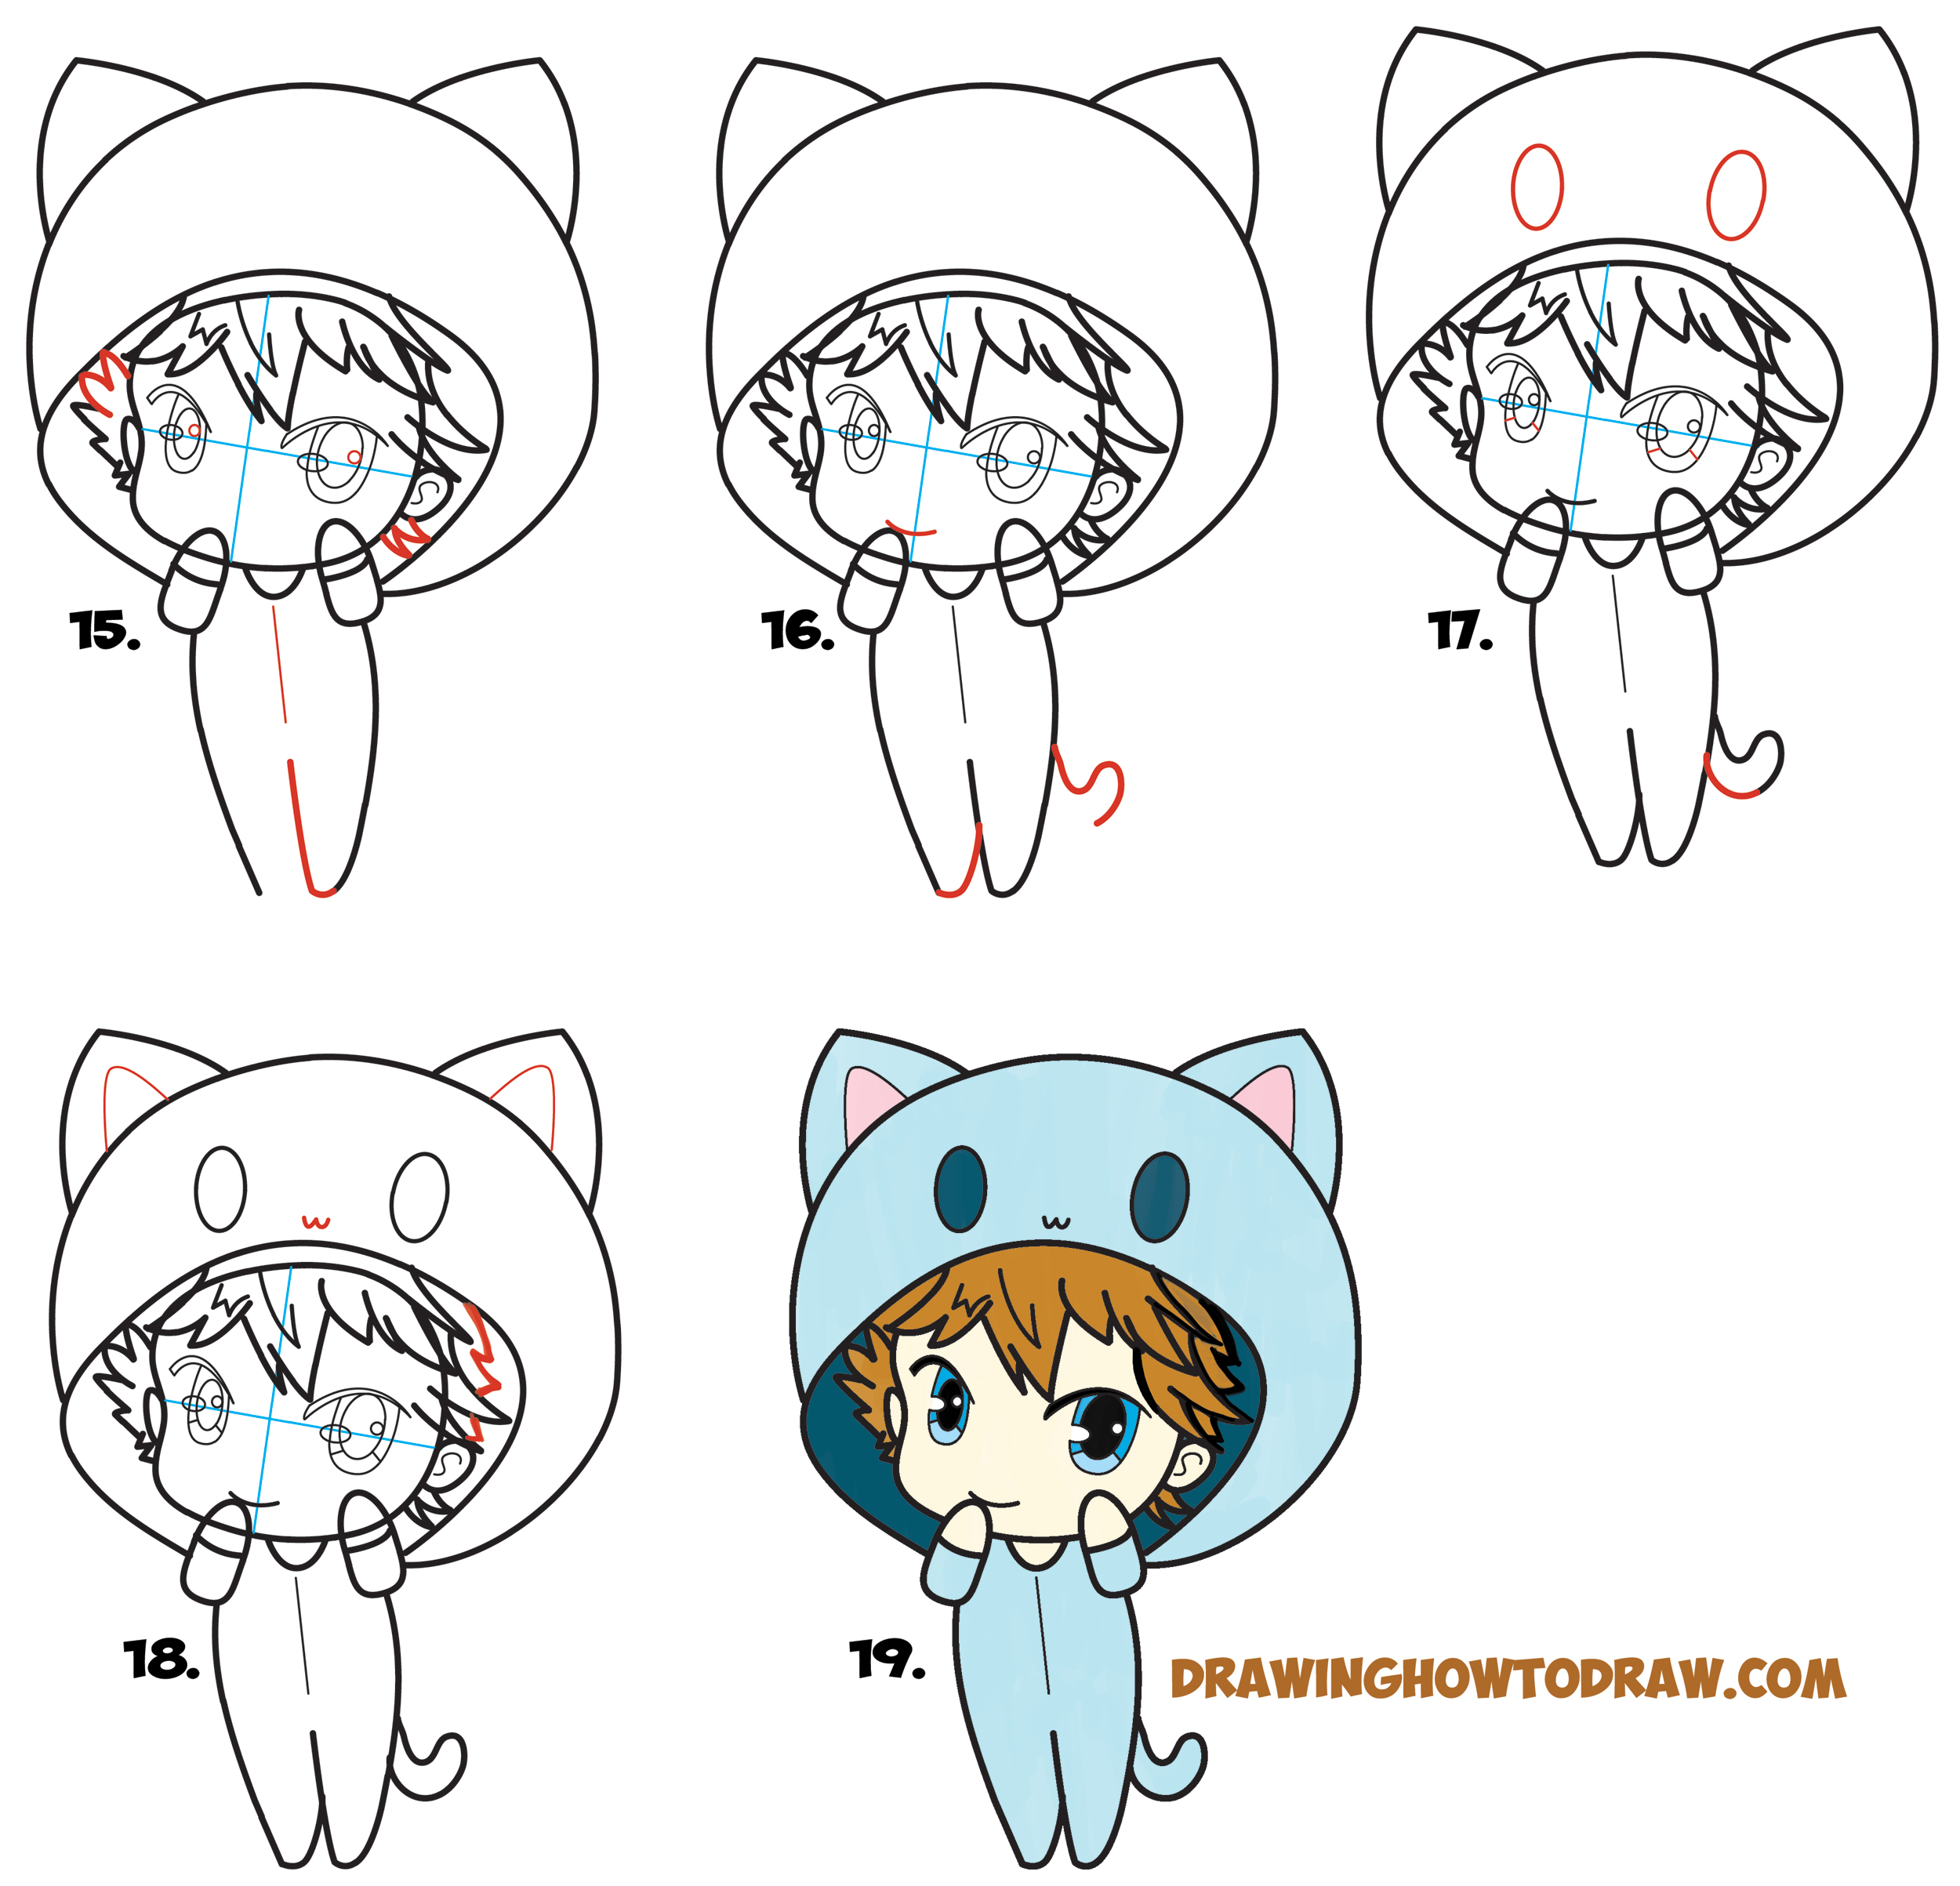
How to Draw a Chibi Boy with Hood On Drawing Cute Chibi Boys Easy
So you wanna go digital and start drawing awesome chibi art on your computer. Web that extends even to line art. How to draw a chibi step by step. Draw the sharps locks of hair surrounding the face using pairs of curved lines that meet at points. When drawing a chibi character, simply compress the character’s body.
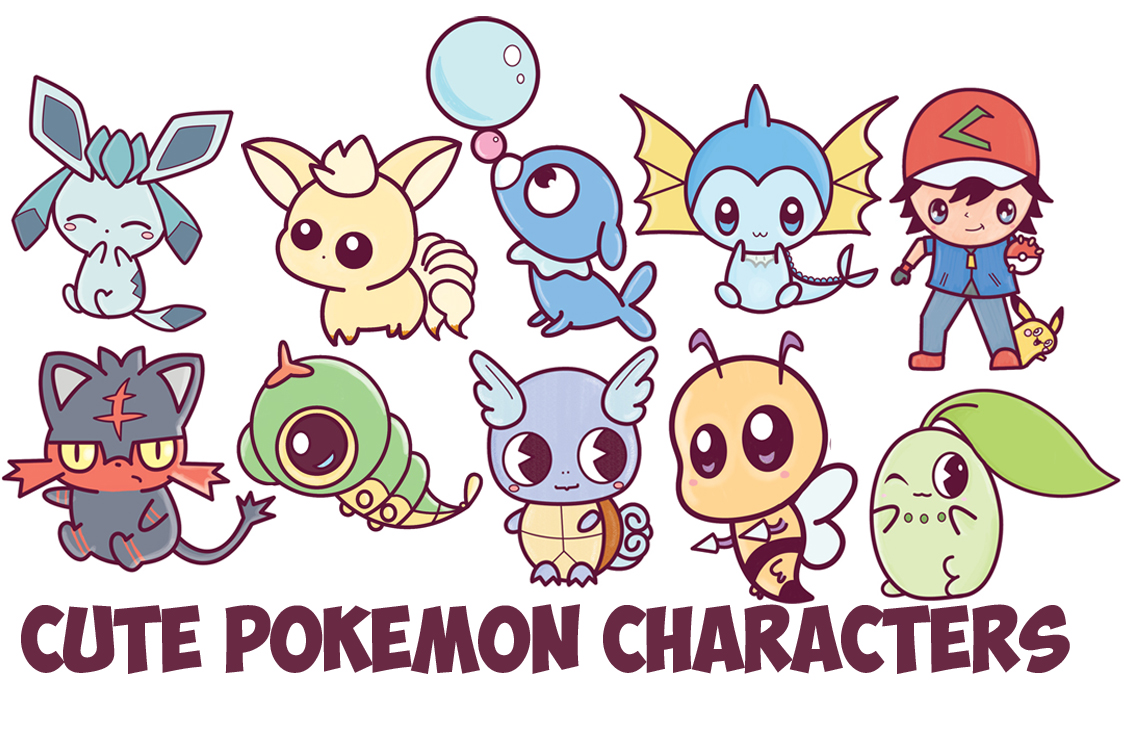
Learn How to Draw Cute Chibi Kawaii Pokemon Characters with Easy Step
Draw large pupils and irises so only a sliver of white is visible in each eye. Click here to save to pinterest! When drawing chibi characters you can use a range of different poses. “good colors for chibi are very soft, pastel colors,” says. Web be a sweet!
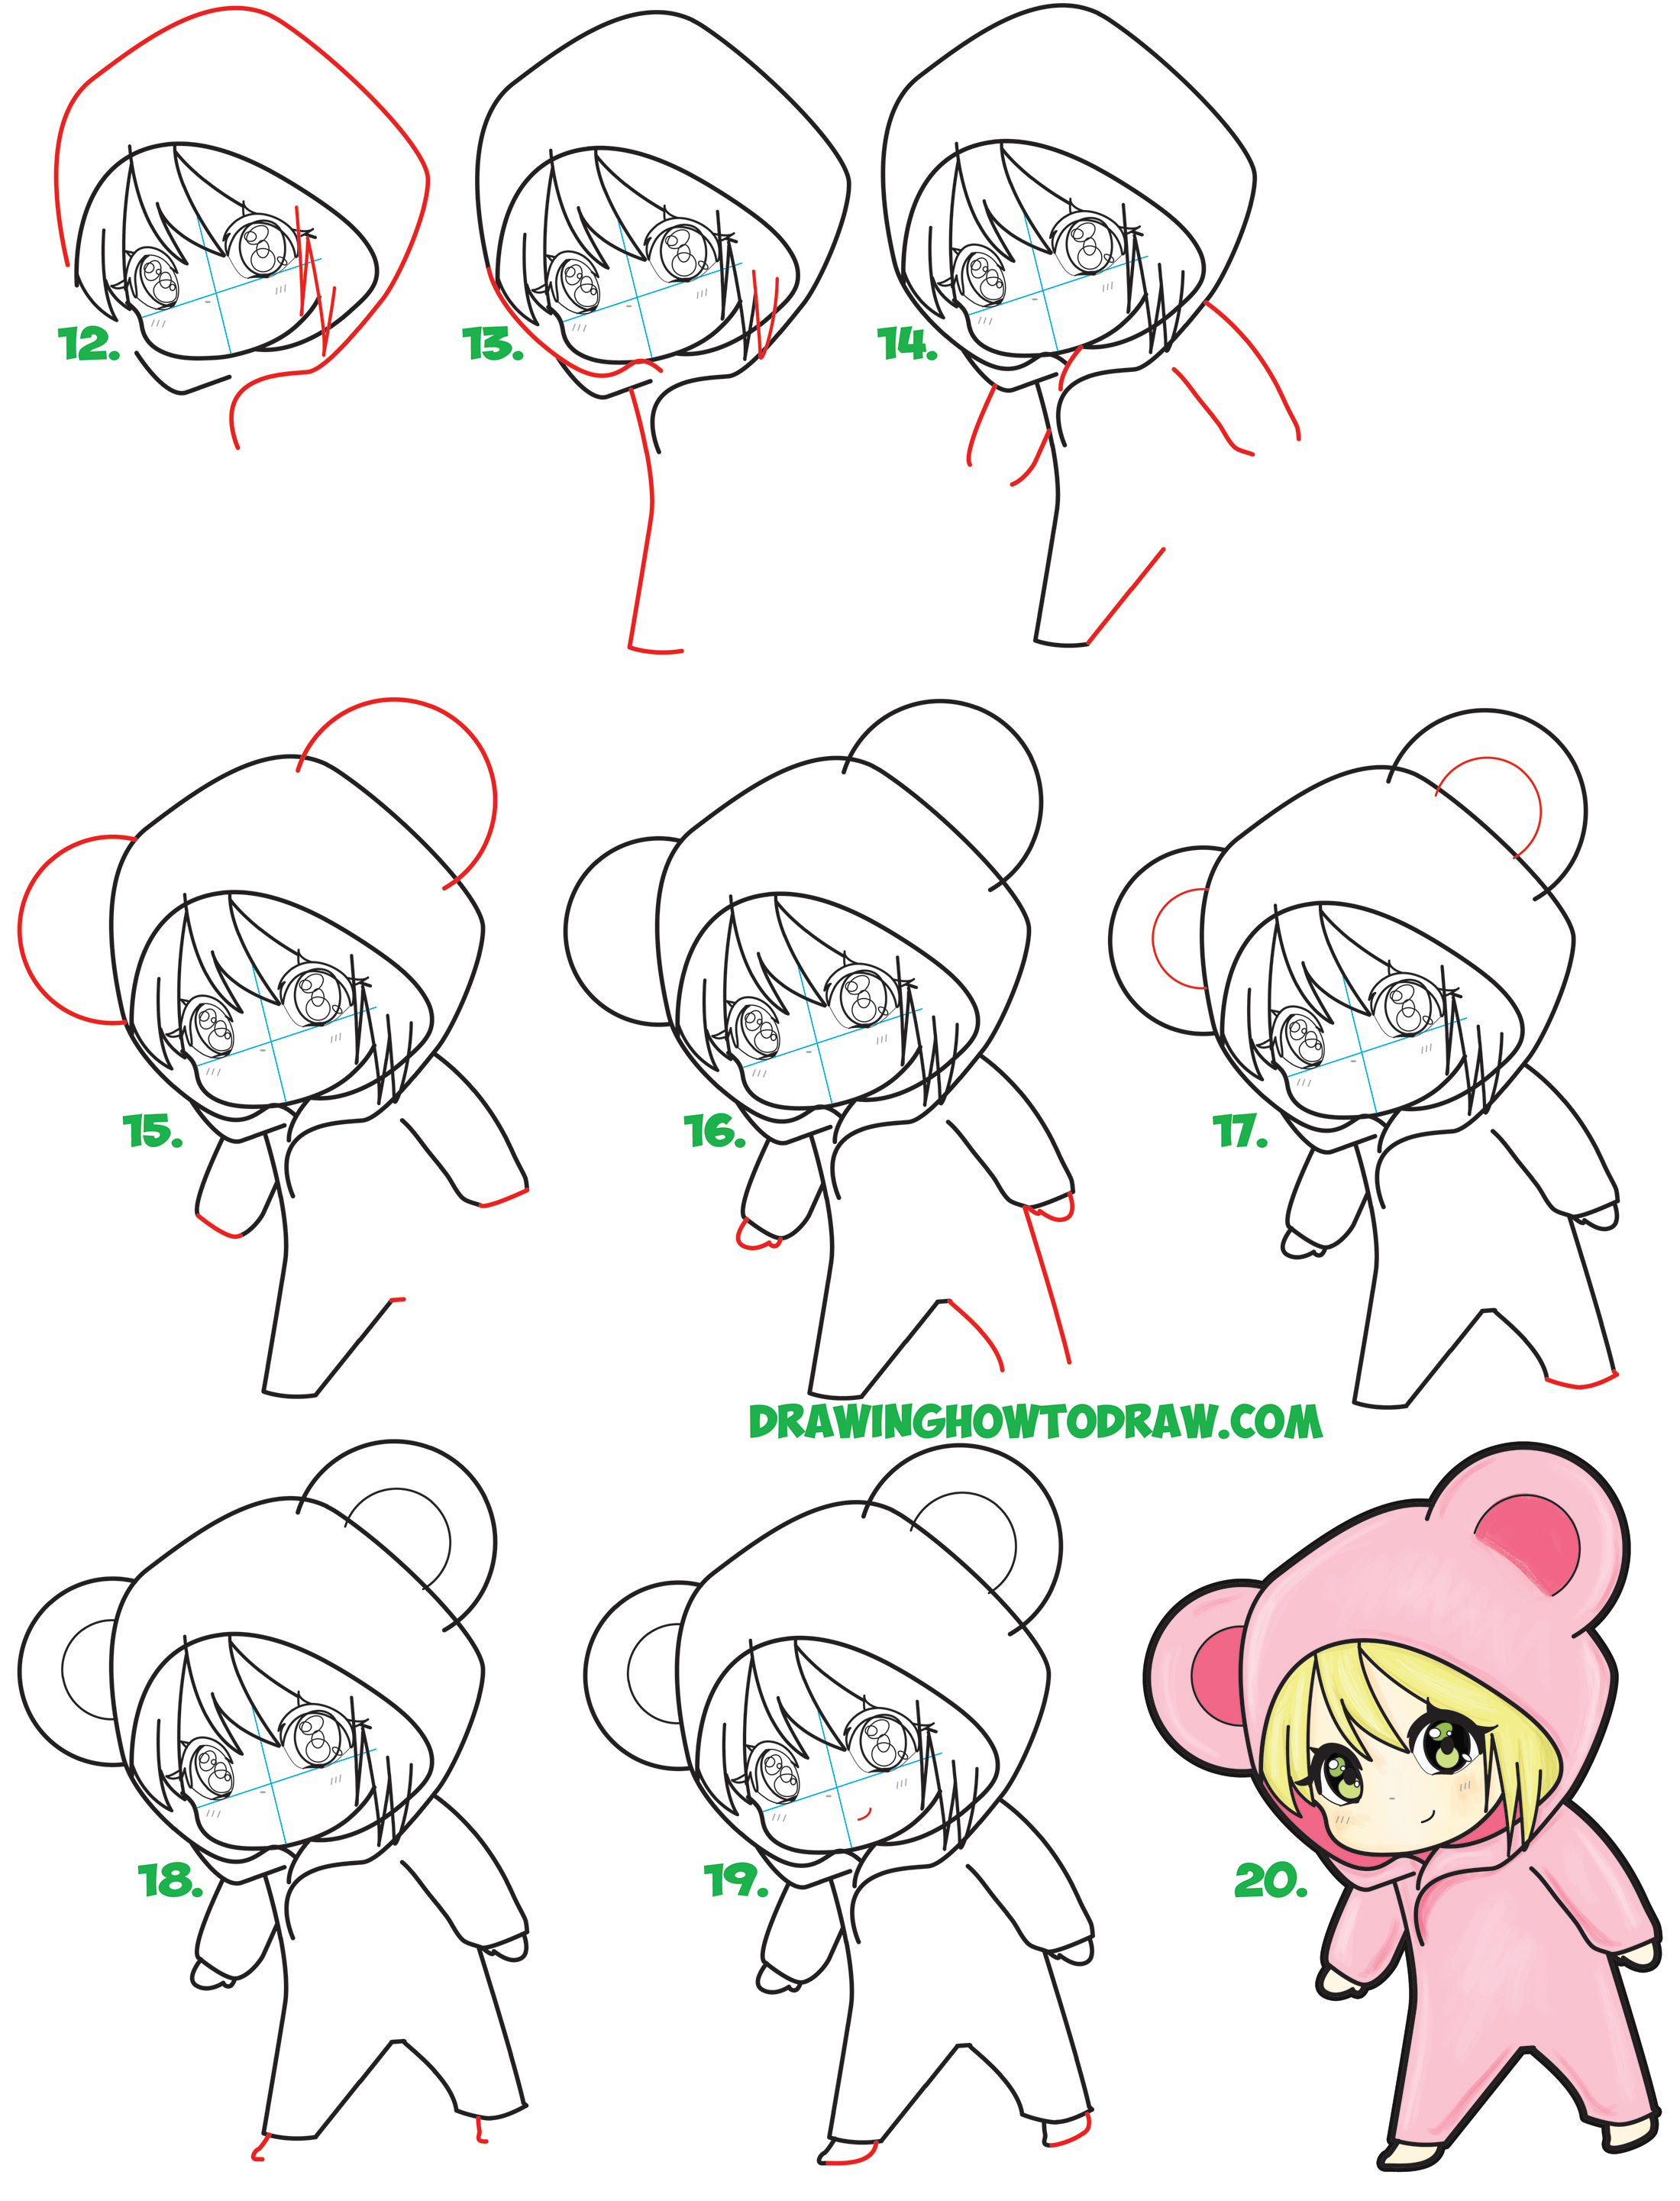
Learn How to Draw a Cute Chibi Girl Dressed in a Hooded Bear Onesie
The outside edge should hang out from the oval; Web make the eyes neater and add some more detail compared to the previous simple eyes. Web draw a circle under the neck—this will be the torso. Draw large pupils and irises so only a sliver of white is visible in each eye. Draw the wolf's ears, completing the outline of.
How To Draw A Chibi Character Step By Step Chibis Dra vrogue.co
This leaves room for the sclera. Then, make the upper lid of each eye bold and very curved so the tops of the eyes are round. When drawing chibi characters you can use a range of different poses. Web that extends even to line art. Follow the steps and create your own cute characters in different poses.
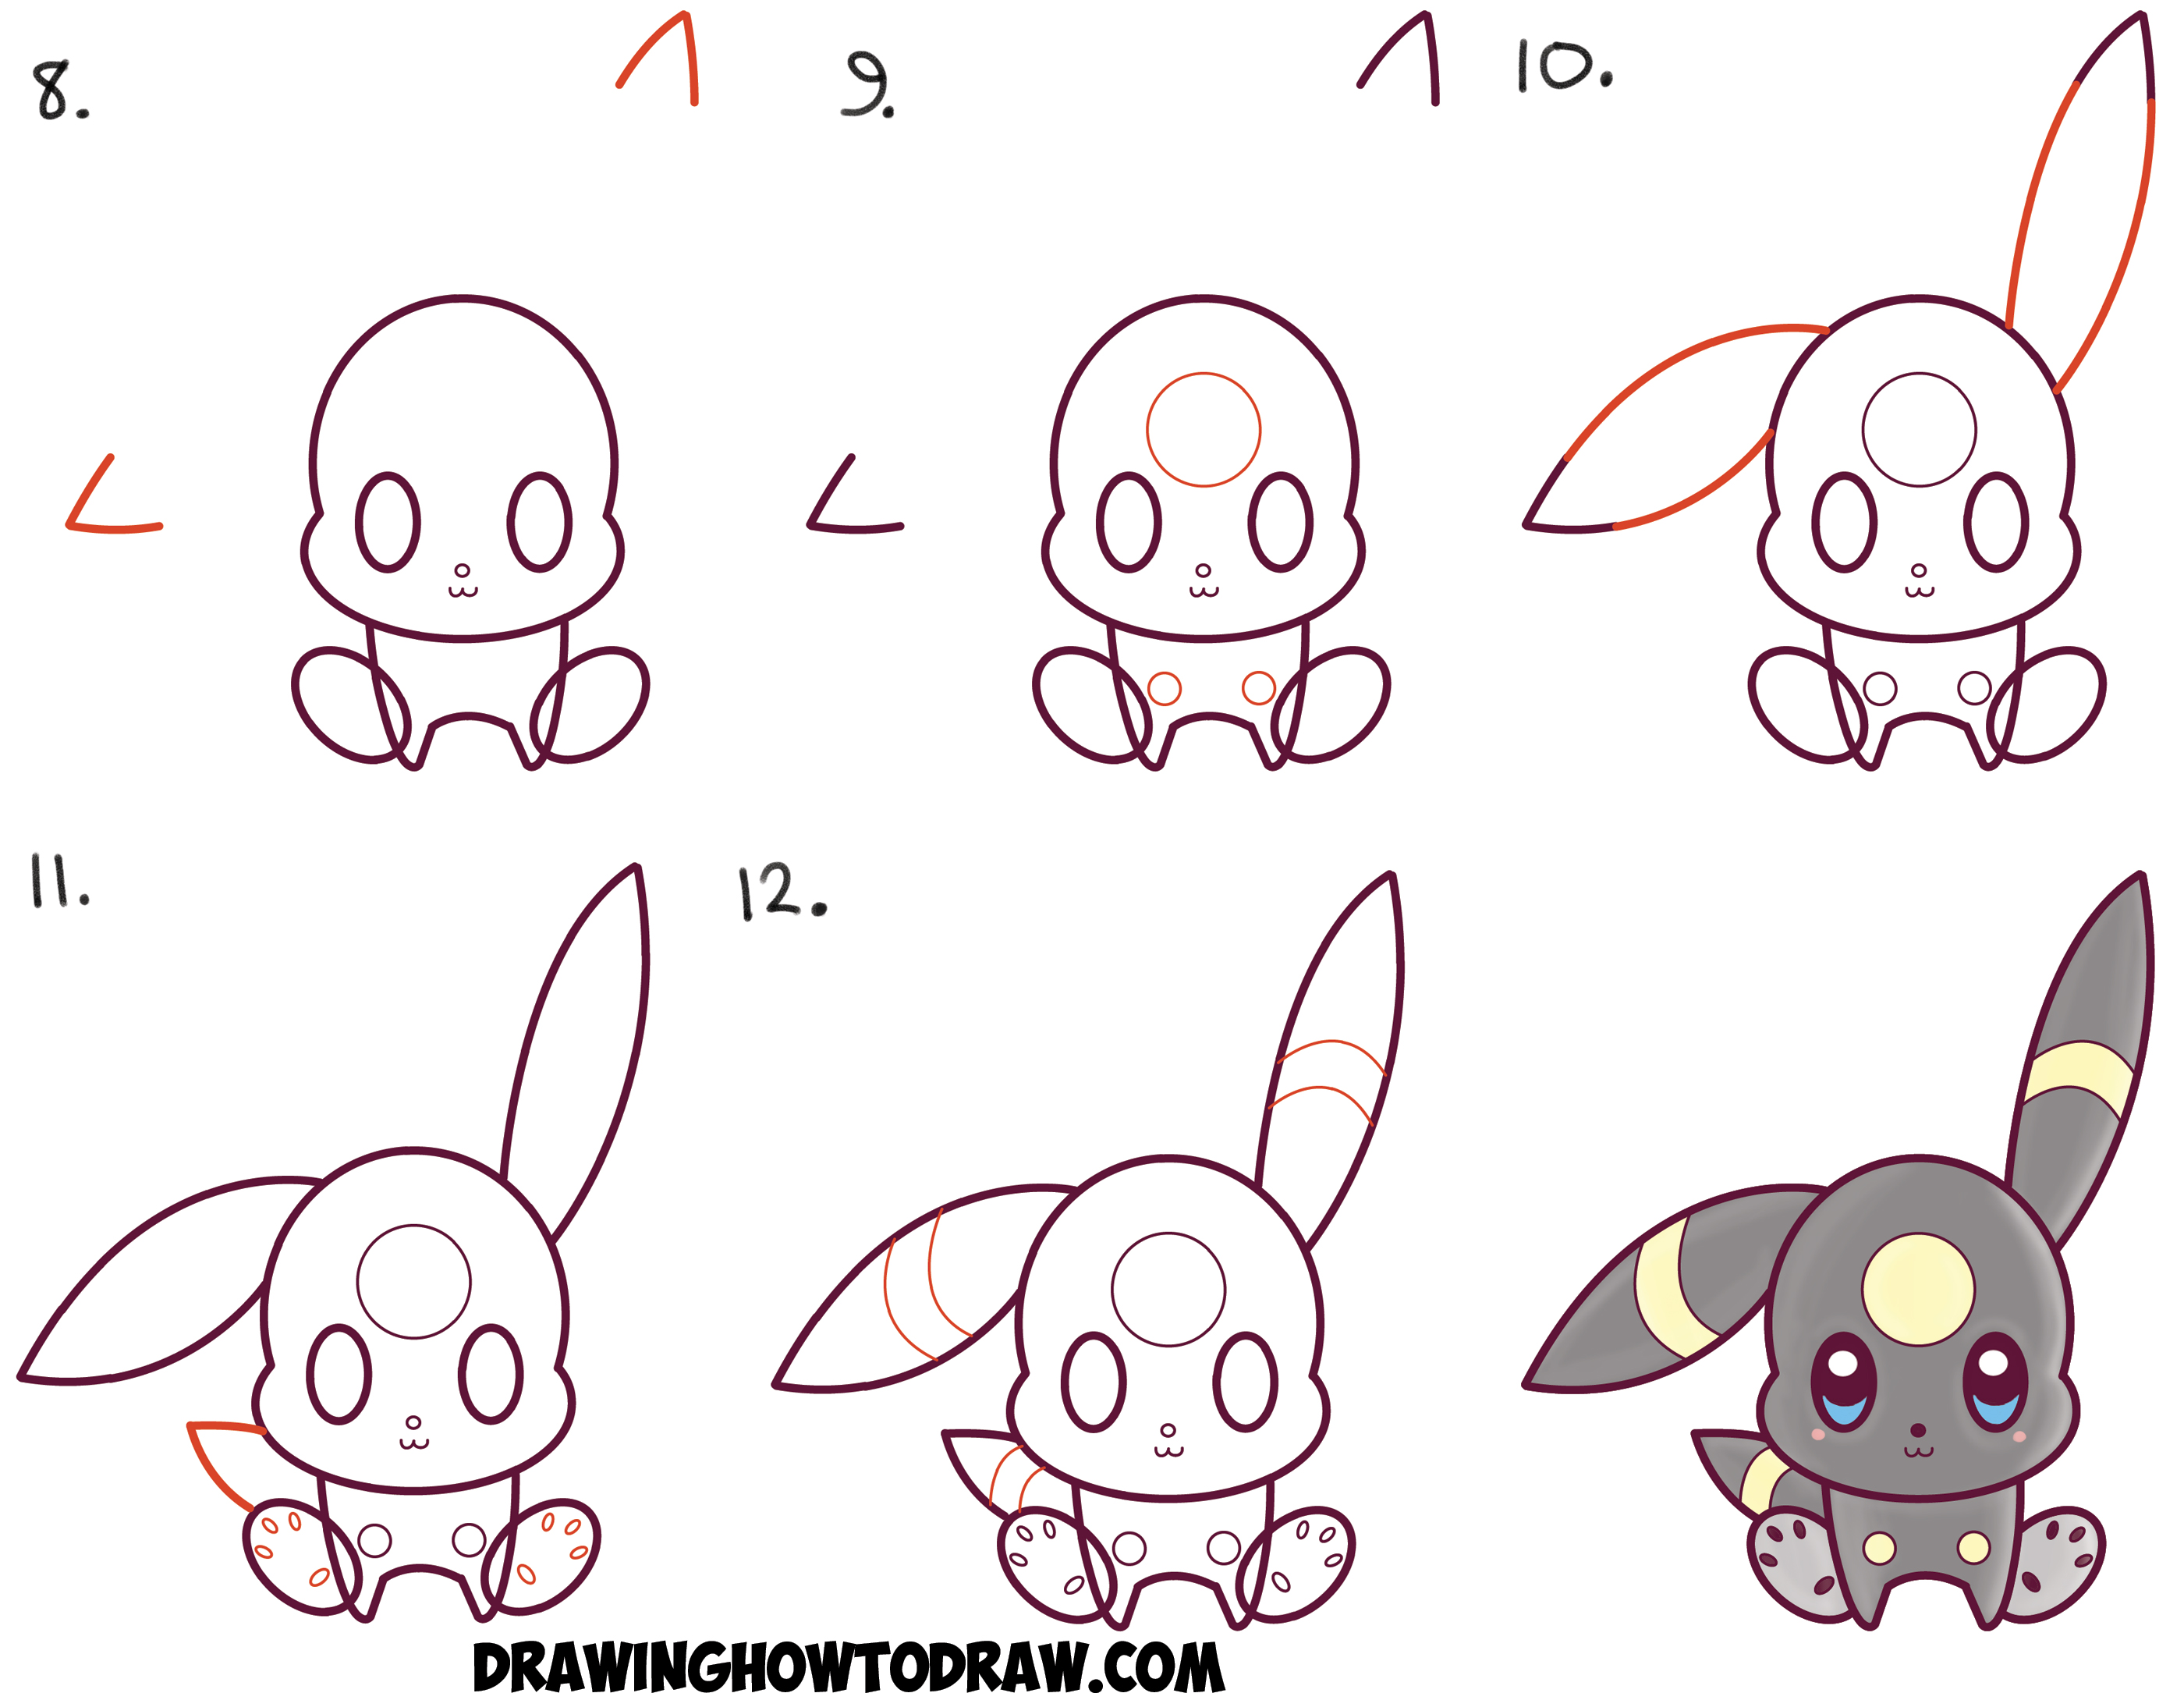
How to Draw Cute Kawaii Chibi Umbreon from Pokemon Easy Step by Step
🦆🎧 #drawing #illustration #doodle #sketch #duck #그림 #드로잉 pinterest. The top part is going to be your torso, you'll want to split that into a shoulder and chest area and a stomach and hip area. Connect the ears using a series of curved lines, forming the top of the head and a tuft of fur. Add flat colors by making.
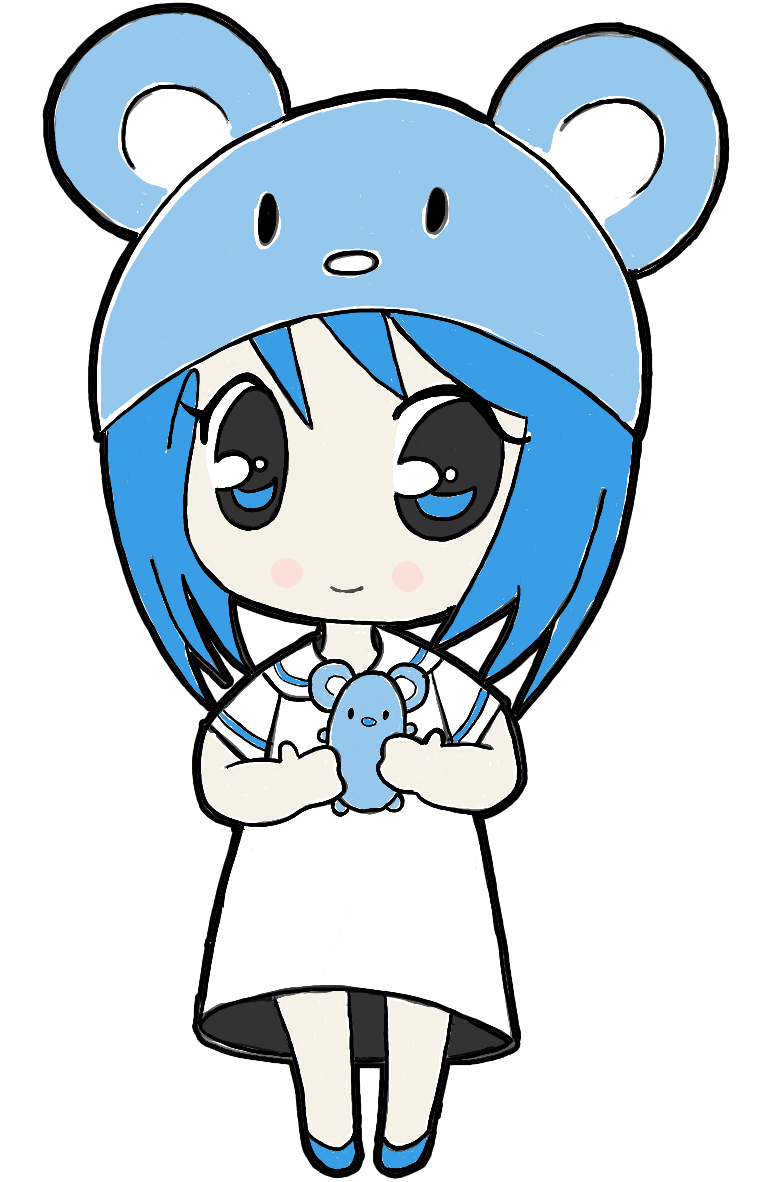
How to Draw a Chibi Girl with Cute Mouse Hat Easy Step by Step Drawing
The outside edge should hang out from the oval; Beneath it, draw a rounded w shape to form the mouth. “you don’t have to use black for line art, necessarily,” says larson. Add flat colors by making a new layer below the outlines. Draw large pupils and irises so only a sliver of white is visible in each eye.
In Addition, You Can Bring Out More Of The Character’s Personality By Drawing Various Hairstyles With A Strong Emphasis.
Just remember that a chibi eye is large and round! Draw two curves under the hips to close the shape of the stumpy legs. The triangle of the near ear should have no base. Click here to save to pinterest!
Draw The Wolf's Ears, Completing The Outline Of The Wolf's Head.
When drawing a chibi character, simply compress the character’s body. 🦆🎧 #drawing #illustration #doodle #sketch #duck #그림 #드로잉 pinterest. Then, make the upper lid of each eye bold and very curved so the tops of the eyes are round. Dark blues or purples usually suffice for chibi line art and can give the character a sweeter feel.
Complete The Cartoon Cat's Face.
Web after this, you can focus on the chibi anatomy. Web take the space you have to draw your body and split it in half. Then, enclose the hair, sketching the top of the head. This will help you with posing later.
How To Draw A Chibi Step By Step.
Add details on your sketch. First, draw a voluminous shape of the hair around the outline of the head. Use straight lines to enclose a large v shape above the face. Use shorter pairs of lines, again meeting at jagged points, to texture the hair at the sides of the face, on top of the head, and at.