Easy Way To Draw A Pumpkin
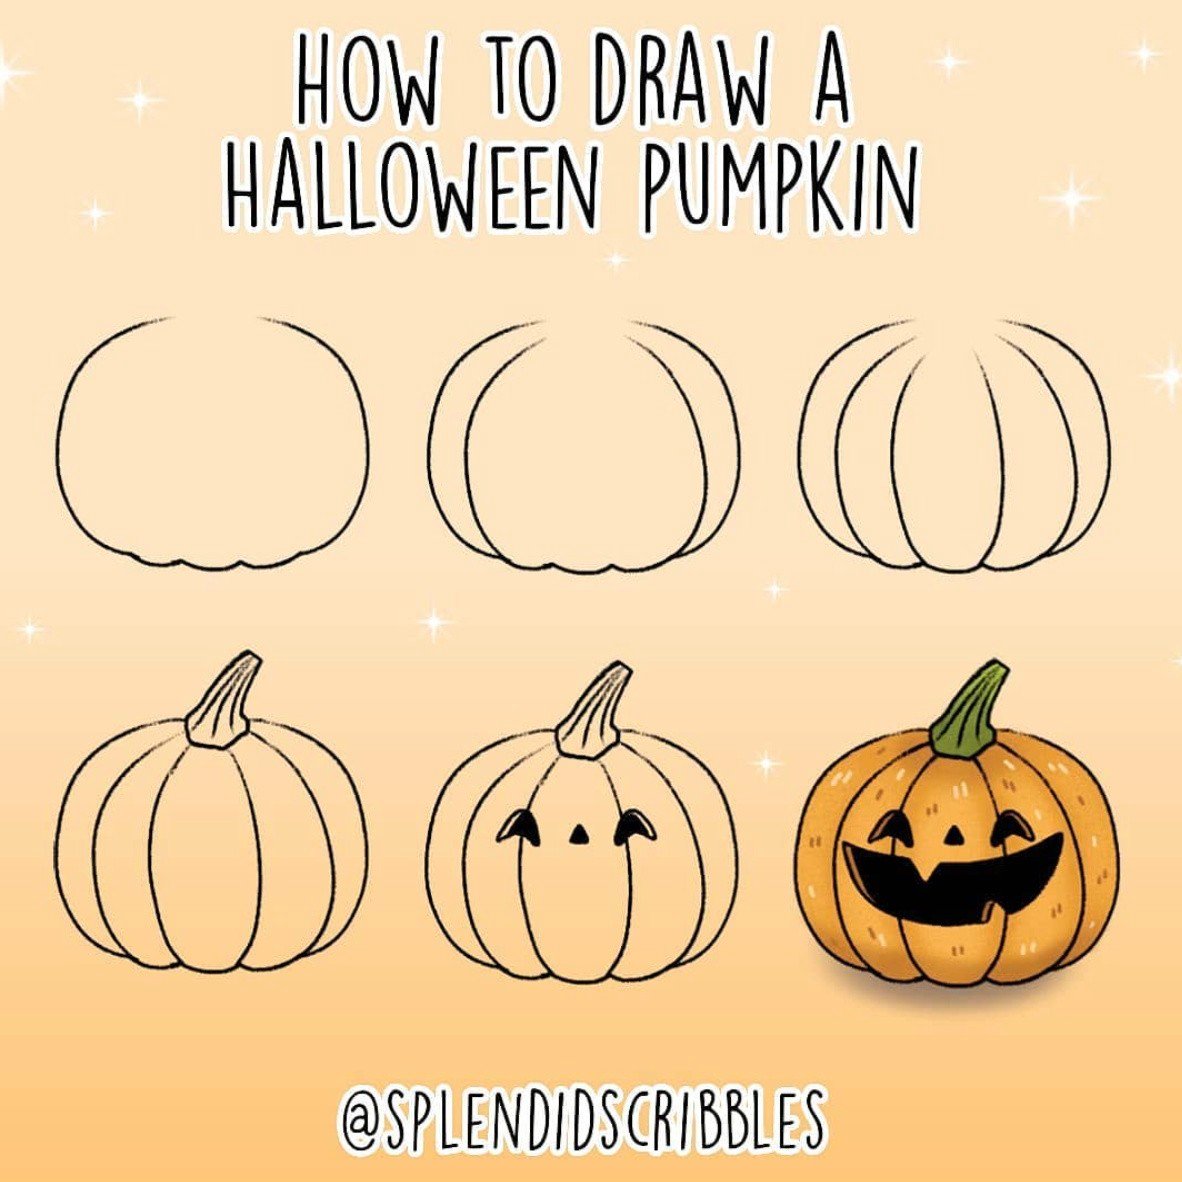
Easy Way To Draw A Pumpkin - First, we are going to roughly sketch the outline shape of a pumpkin. Web an easy way to get in a lot of repetitions is by filling up a couple of sketchbook pages with pumpkins. Coming out of the top of the pumpkin add the stem. Web after you've gone over the basic linework of the pumpkin, consider adding texture to key areas, like the leaf and stem. Draw the stalk and the ribs. Web easy step by step tutorial on how to draw a pumpkin, pause the video at every step to follow the steps carefully. Fall season is still here to enjoy and we're. Use additional short lines to begin enclosing the ribs visible behind the stem. Web draw some cracks with light, dotted lines and thicker cracks with heavier lines. Web here's a super simple way to draw a pumpkin for halloween or the fall season!
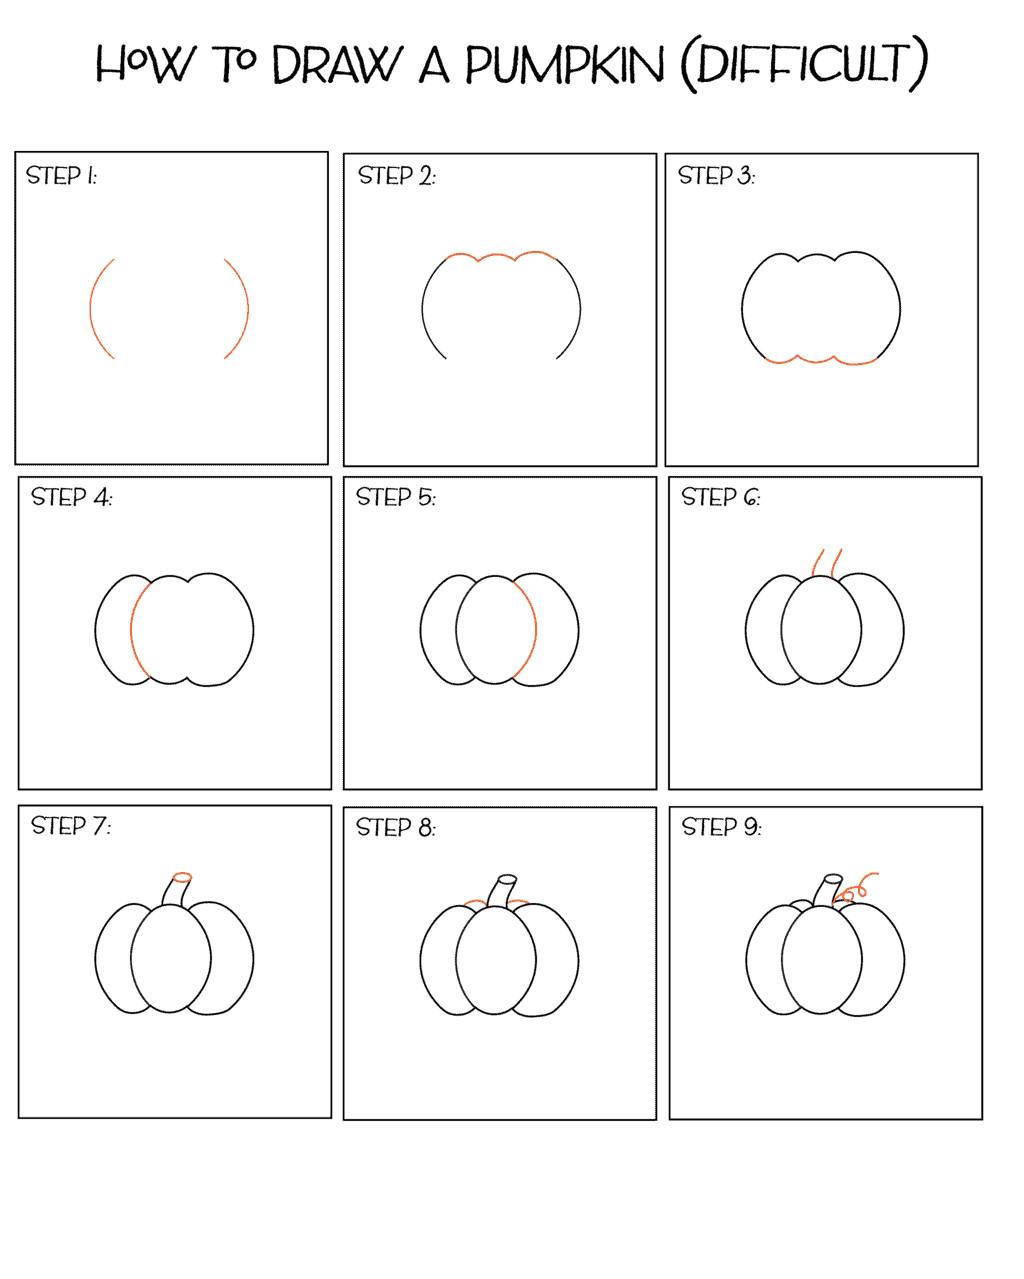
Then draw some curved lines behind the stem to make your pumpkin look more dimensional. On the left and right sides of the rectangular, draw two curved lines to form the pumpkin’s ridges. Next, from each of the bumps on the top outline, create curving lines down the front of your pumpkin. Use a curved line to enclose the end of the stem. Coming out of the top of the pumpkin add the stem. Draw a circle connecting the two lines. Come draw along an orange pumpkin in this drawing video for kids! The easiest way to draw is by using a pencil, but you may also like using markers for drawing. Now that the outline of your pumpkin drawing is complete, you can add in the stalk of the pumpkin. We are going to do two things in this step.
Connect the dots 3 times. This is going to help you with the placement of the ribs. Start by drawing the overall shape of your pumpkin with a two curved lines. Draw 2 curved lines at the top. Web easy step by step tutorial on how to draw a pumpkin, pause the video at every step to follow the steps carefully. Then, texture the stem with curved lines. Now we will add a little line at the top of the stem to give it some depth. Web be it a fall or halloween drawing lesson, this how to draw a pumpkin step by step drawing tutorial will make the task easy peasy.get template here: We are going to do two things in this step. Use additional short lines to begin enclosing the ribs visible behind the stem.

how to draw a pumpkin easy step by step Kina Gladney
Coming out of the top of the pumpkin add the stem. Begin by drawing a vertical oval on your. First, draw a small curving stalk that extends from the center of the top of your pumpkin. One of my favorite ways to practice drawing something is by. To do this, draw 100 pumpkins in your sketchbook of all different shapes.
How to Draw an Easy Pumpkin · Art Projects for Kids
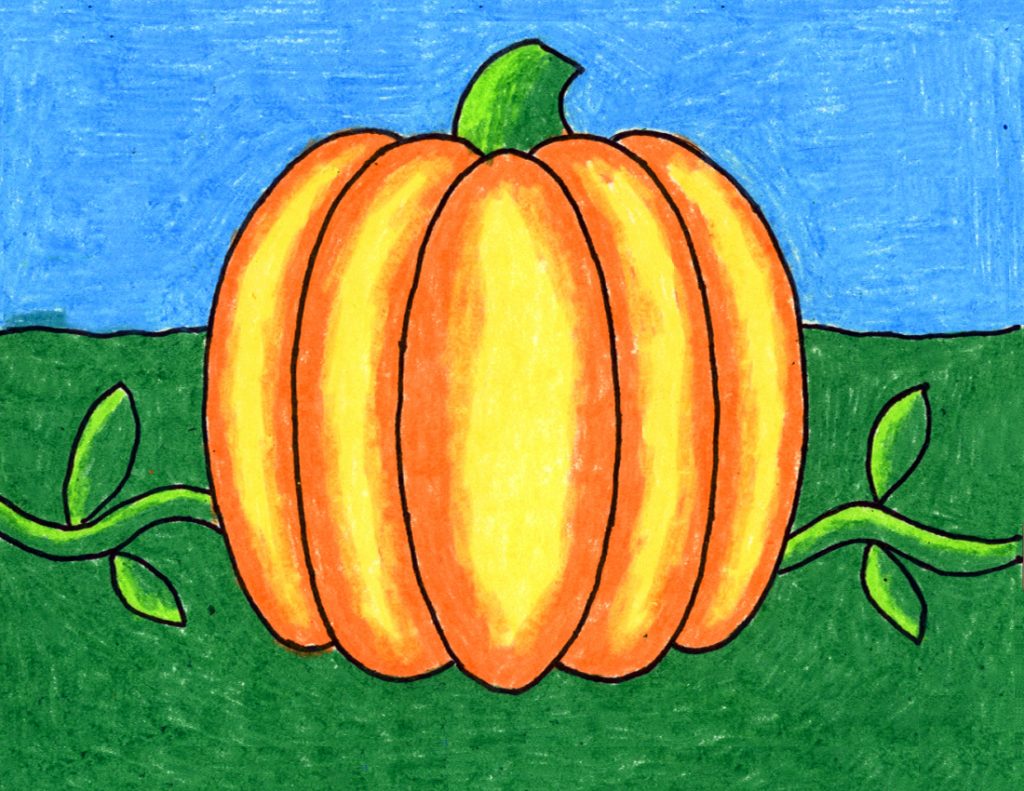
Web here's a super simple way to draw a pumpkin for halloween or the fall season! Coming out of the top of the pumpkin add the stem. If you follow the picture closely, you can replicate the shape of the stalk to fit nicely atop. Divide the oval into 5 parts using curved lines. Add some curved lines all around.

How To Draw A Pumpkin StepByStep & Free Printables So Festive!
Try this easy drawing tutorial and let me know how it goes :)this requires hard. Step by step pumpkin drawing instructions step 1. Now that the outline of your pumpkin drawing is complete, you can add in the stalk of the pumpkin. Web you might thing that they are tricky to draw, especially because of their ribs, but with our.

How to draw pumpkin step by step The Smart Wander
Web you might thing that they are tricky to draw, especially because of their ribs, but with our tutorial you will be drawing pumpkins in no time. Start small at the top and make it bigger as you go down. Start sketching circular rings around the top surface of the stump. Draw 2 curved lines at the top. Draw the.
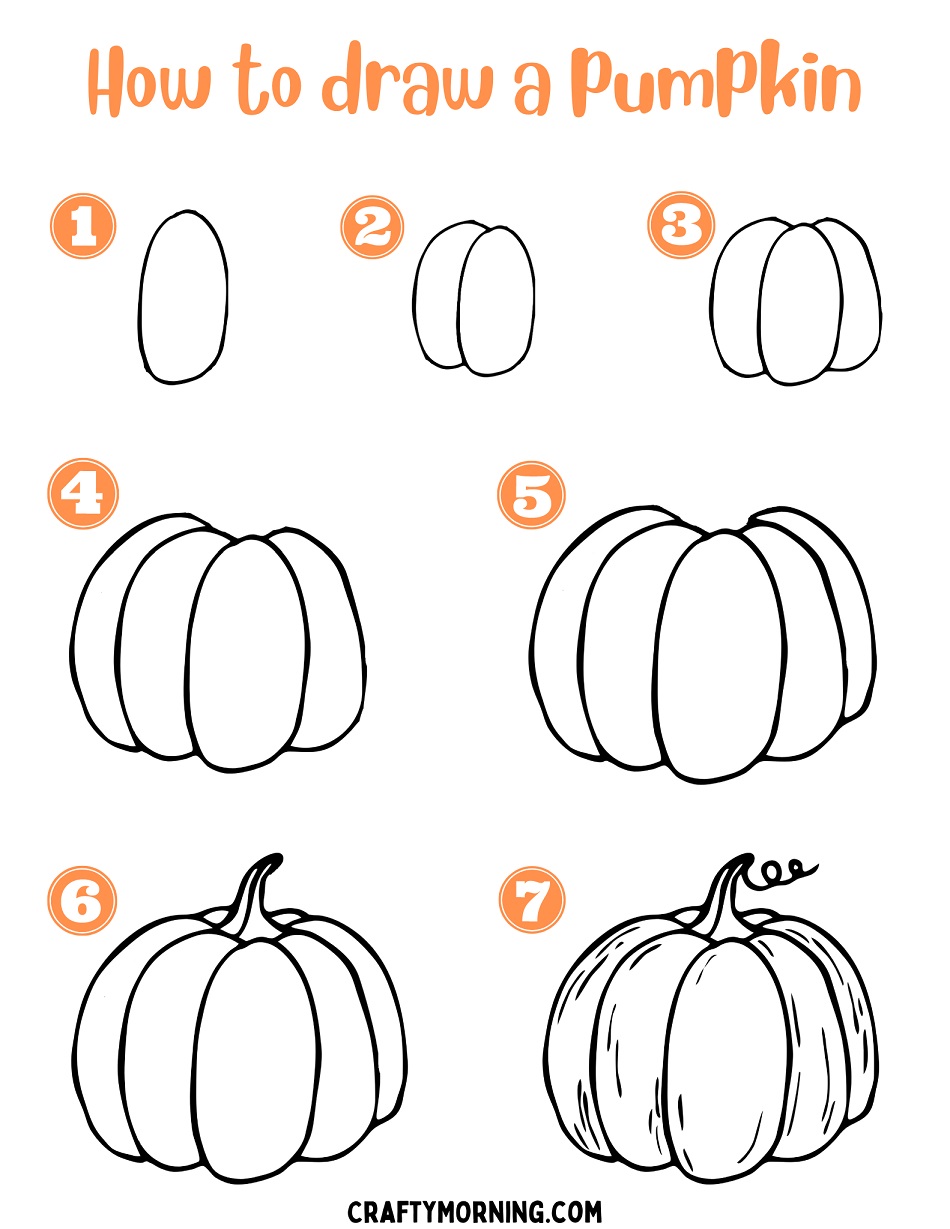
How to Draw a Pumpkin (Easy Step by Step) Crafty Morning
Divide the oval into 5 parts using curved lines. Start sketching circular rings around the top surface of the stump. For reference see the image above. Make the it wider towards it’s base and narrower towards the top with a light curve in it’s shape. Then draw some curved lines behind the stem to make your pumpkin look more dimensional.
How To Draw A Pumpkin StepByStep So Festive!
Draw the stalk and the ribs. Draw a large vertical rectangular shape. Add a smiling mouth below the eye. Wipe the pumpkin clean with a soft damp cloth and dry. Use a curved line to enclose the end of the stem.

20+ Easy Things To Draw On A Pumpkin
On the left and right sides of the rectangular, draw two curved lines to form the pumpkin’s ridges. Web draw some cracks with light, dotted lines and thicker cracks with heavier lines. These lines will create sections on your pumpkin. Add some curved lines all around to add ridges to your pumpkin. Then draw some curved lines behind the stem.
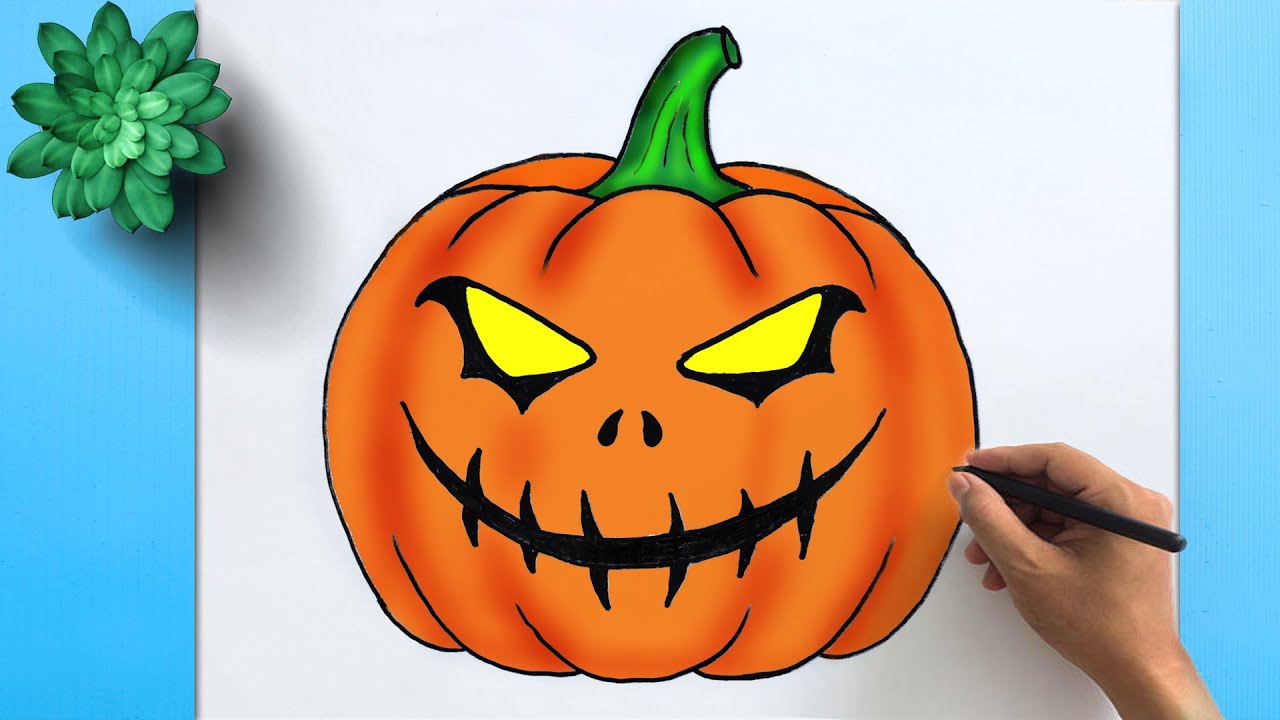
Halloween pumpkin drawing easy 👻 How to Draw Halloween Pumpkin Easy
Don’t forget to leave spaces between each line you draw. The simplest pumpkin drawing method uses just circles and basic curved lines. Just a few more details. Use a curved line to enclose the end of the stem. Web draw some cracks with light, dotted lines and thicker cracks with heavier lines.
How to draw halloween stuff step by step The Smart Wander
Web easy pumpkin drawing. Try this easy drawing tutorial and let me know how it goes :)this requires hard. If you start right away with the ribs you might end up with gaps or an uneven. Draw the stem right over top of the rest of the pumpkin and then erase the lines of the ribs that are now overlapped.

How To Draw A Pumpkin Step By Step at How To Draw
First, draw a small curving stalk that extends from the center of the top of your pumpkin. These lines should not extend all the way down to the bottom,. This notch will serve as a guide to replace. The easiest way to draw is by using a pencil, but you may also like using markers for drawing. Make the it.
Web Easy Step By Step Tutorial On How To Draw A Pumpkin, Pause The Video At Every Step To Follow The Steps Carefully.
Web now we’ll add ribbed sections to the pumpkin. Web after you've gone over the basic linework of the pumpkin, consider adding texture to key areas, like the leaf and stem. Draw four lines down the face starting at the top and down to the bottom point of the pumpkin. Web at the base of the stem create some more indentations.
Start By Drawing The Overall Shape Of Your Pumpkin With A Two Curved Lines.
Web an easy way to get in a lot of repetitions is by filling up a couple of sketchbook pages with pumpkins. You can draw in this aspect with some curved and pointy lines as you can see in the reference picture. Draw a circle connecting the two lines. Add some curved lines all around to add ridges to your pumpkin.
Step By Step Pumpkin Drawing Instructions Step 1.
These lines will create sections on your pumpkin. An easy way to do this is to use stippling and hatching. First, we are going to roughly sketch the outline shape of a pumpkin. Make the it wider towards it’s base and narrower towards the top with a light curve in it’s shape.
Divide The Oval Into 5 Parts Using Curved Lines.
Then draw some curved lines behind the stem to make your pumpkin look more dimensional. Web all you need are some curved lines and an eraser, just in case of a mistake. Wipe the pumpkin clean with a soft damp cloth and dry. We are going to do two things in this step.