Easy Witch Drawing Step By Step
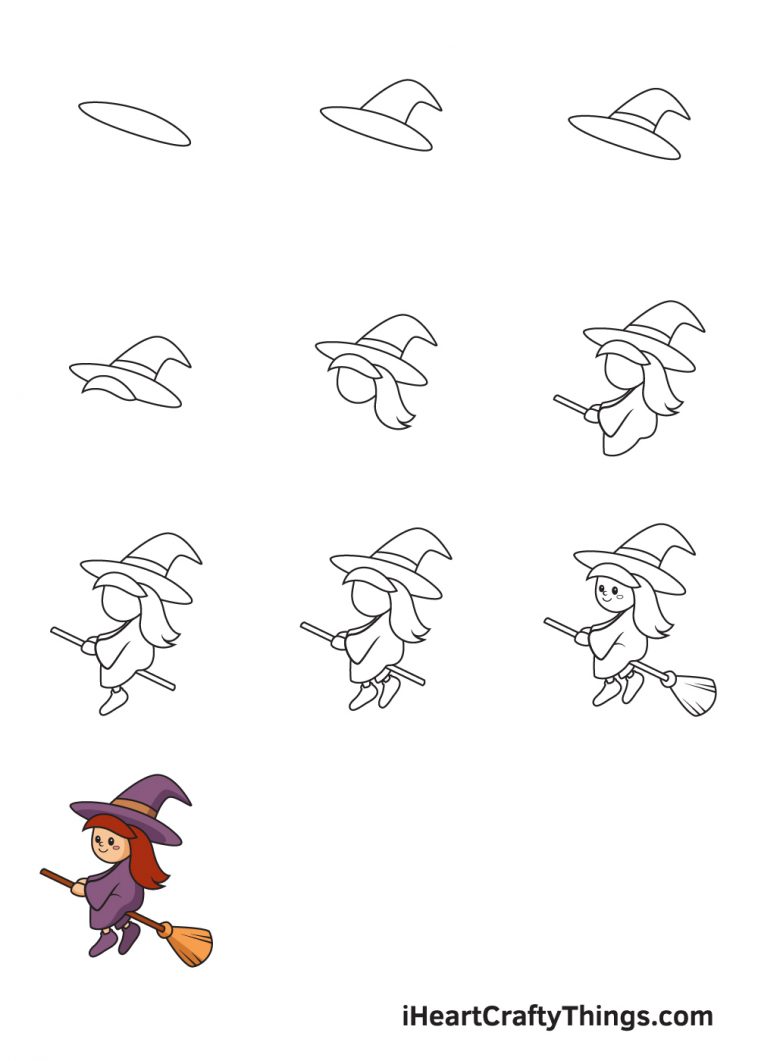
Easy Witch Drawing Step By Step - It’s time to add a few details to the witch’s face. Draw a vertical curve through each oval, and enclose a small circle; Web add a hatband and draw the very top leaning over as shown. Web start the right boot. Add a long, curved line for the body, which will form the witch’s hunched back. With a variety of animals, magical creatures, vehicles, foods, plants and more your kids will never get bored. In step two, draw the details on witch’s face. Connect to the boots with leg lines. Web how to draw a witch easy and step by step. Finish the toe and heel.
It’s time to add a few details to the witch’s face. Web to do this step, draw the witch’s head as a circle, and the torso with a straight and curved line. ️ subscribe for more drawing fun! Let’s start the witch drawing with a very simple base body shape sketch as usual. Use a curved line to form the smiling mouth, with tiny squiggles adding depth at each end. Finish the toe and heel. Observe that the blue outlines are used to show the newest parts being drawn in each in each of the steps. We kept the hairstyle of the witch pretty simple, as shown in the illustration above. Draw a hemline on the top of the page. Imagine bringing a witch to life on paper, step by step.
Make sure the brim of the hat is wide and curved. The shape and proportion of each of the drawn parts will be observed in each step of the tutorial. Add an oval for the wart, then draw curves on either side of the witch face. Web how to draw a ice cream drawing for kids and toddlers colouring painting |ice cream drawing easy step #ice cream #ice creamfriends, welcome to our you tube. Draw the evil shirt behind her. Use a small c shaped line for the nose. One of the final details on the face is to add an eye and an eyebrow. It is perfect for artists seeking a balance of simplicity and detail. Use a curved line to form the smiling mouth, with tiny squiggles adding depth at each end. Observe that the blue outlines are used to show the newest parts being drawn in each in each of the steps.
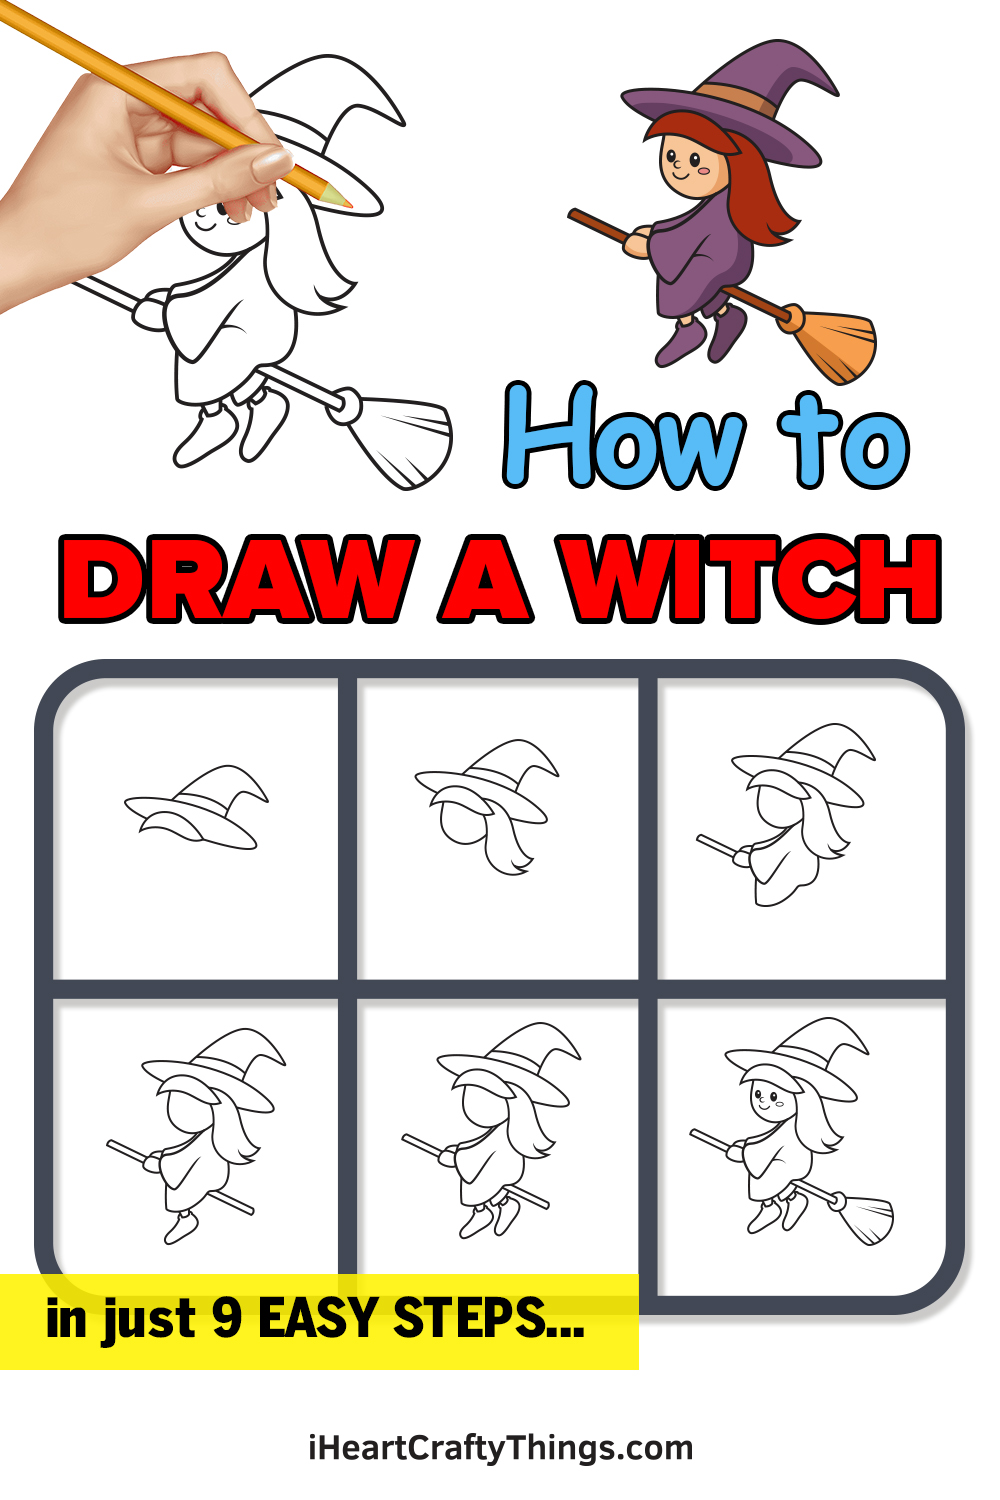
How to Draw a Witch Easy Drawing Tutorial For Kids
Add stripes to the legs. This guide is your magical ingredient for creating a compelling witch, blending traditional elements with your flair. Web hello little artist today we're learning how to draw a witch easy step by stepi hope you have fun drawing along with me!this lesson is meant for little artis. Web follow my step by step drawing tutorial.
How to Draw a Witch Step by Step Drawing Tutorial Easy Peasy and Fun
Use a rounded triangle with an oval at the bottom for the ear. Enjoy the pdf coloring printables at home, school, or anywhere you go. Draw the shoelaces and a spider. Make sure the brim of the hat is wide and curved. Draw the rest of the witch.

How to Draw a Witch for Kids Archives How to Draw
One of the final details on the face is to add an eye and an eyebrow. Sketch the head and body shapes. Imagine bringing a witch to life on paper, step by step. Web below the head, draw the witch's body. Connect to the boots with leg lines.
How to Draw a Cute Cartoon Kid Dressed Up as a Witch for Halloween
Sketch the head and body shapes. See full tutorial begin by drawing an irregular circle, a bit flattened on. Web follow my step by step drawing tutorial and make your own witch drawing easy!👇 su. Enclose two large eyes using ovals. Web draw a pointy hat on top of the head.
Cartoon Witch Drawing How To Draw A Cartoon Witch Step By Step
Use a curved line to form the smiling mouth, with tiny squiggles adding depth at each end. This forms the head of the witch. Finish the toe and heel. Finish the toe and heel. Web below the head, draw the witch's body.
Witch Drawing How To Draw A Witch Step By Step
Sketch a dash on the right side of the mouth. Add stripes to the legs. Add a wart to her nose, add a small smile with a snaggle tooth. How to draw witch drawing easy step by step drawing witch tutorial drawing for beginners witch fan art drawing tutoria. The shape and proportion of each of the drawn parts will.

Easy Witch Drawing HelloArtsy
Draw the shoes the witch is wearing. Outline the chin with another dip beneath the mouth. Add a heart shape for the chin, and outline the face with a curve on the right. Trace with a marker and color. Imagine bringing a witch to life on paper, step by step.

How to Draw a Witch Step by Step Easy Drawing Guides Drawing Howtos
Web add a hatband and draw the very top leaning over as shown. Let’s start the witch drawing with a very simple base body shape sketch as usual. Make it plump and round. Web our how to draw book is here! Web learn how to draw gojo satoru from jujutsu kaisen | how to draw anime step by step |.
Witch Drawing — How To Draw A Witch Step By Step
Web learn how to draw a witch for kids easy and step by step. Finish the toe and heel. Web draw a semicircle right underneath the bangs. Use a rectangle for the jagged tooth. Enclose two large eyes using ovals.

How To Draw A Witches Hat Step By Step at Drawing Tutorials
Add stripes to the legs. Web unicorn horse drawing,how to draw a unicorn step by step,clouds painting #drawing #kidsart #unicorn#coloringpages #preschoollearning #paintingtutorial #kidsa. Add a long, curved line for the body, which will form the witch’s hunched back. Web our how to draw book is here! Draw a circle for the head.
Sketch A Dash On The Right Side Of The Mouth.
The shape and proportion of each of the drawn parts will be observed in each step of the tutorial. It’s time to add a few details to the witch’s face. Add an oval for the wart, then draw curves on either side of the witch face. Add stripes to the legs.
Starting At The Forehead Sketch The Eyebrow Arching Up Almost To The Brim Of The Hat.
Web how to draw a ice cream drawing for kids and toddlers colouring painting |ice cream drawing easy step #ice cream #ice creamfriends, welcome to our you tube. How to draw witch drawing easy step by step drawing witch tutorial drawing for beginners witch fan art drawing tutoria. Web learn how to draw a witch for kids easy and step by step. Finish the toe and heel.
In Step Two, Draw The Details On Witch’s Face.
Add a wart to her nose, add a small smile with a snaggle tooth. Draw the broom that the witch is riding. ️ subscribe for more drawing fun! Under the hat draw an oval face and spikey short hair hanging down below the hat.
It Is Perfect For Artists Seeking A Balance Of Simplicity And Detail.
Add a long, curved line for the body, which will form the witch’s hunched back. We also have over 1,900 free coloring pages that you can download or color online. Web you too can easily draw a witch by following the simple steps. Use a curved line to form the smiling mouth, with tiny squiggles adding depth at each end.