How Draw A Rose Step By Step
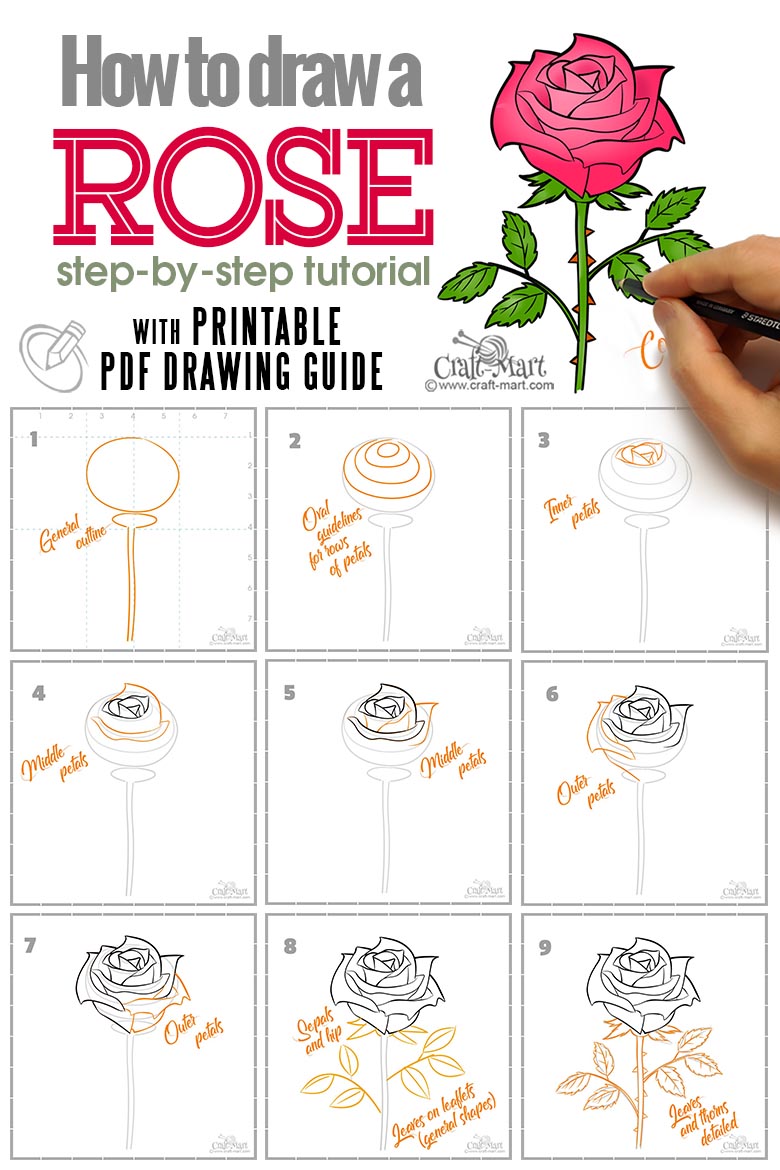
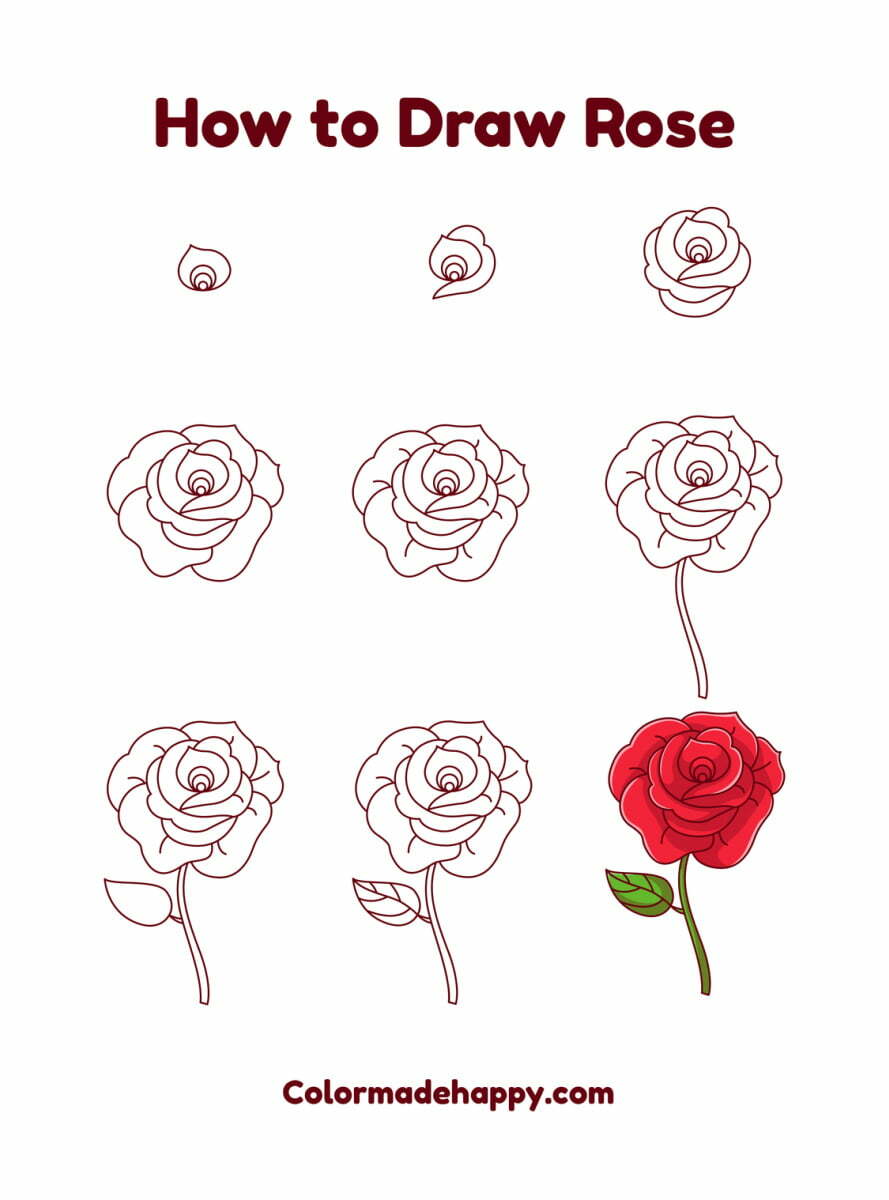
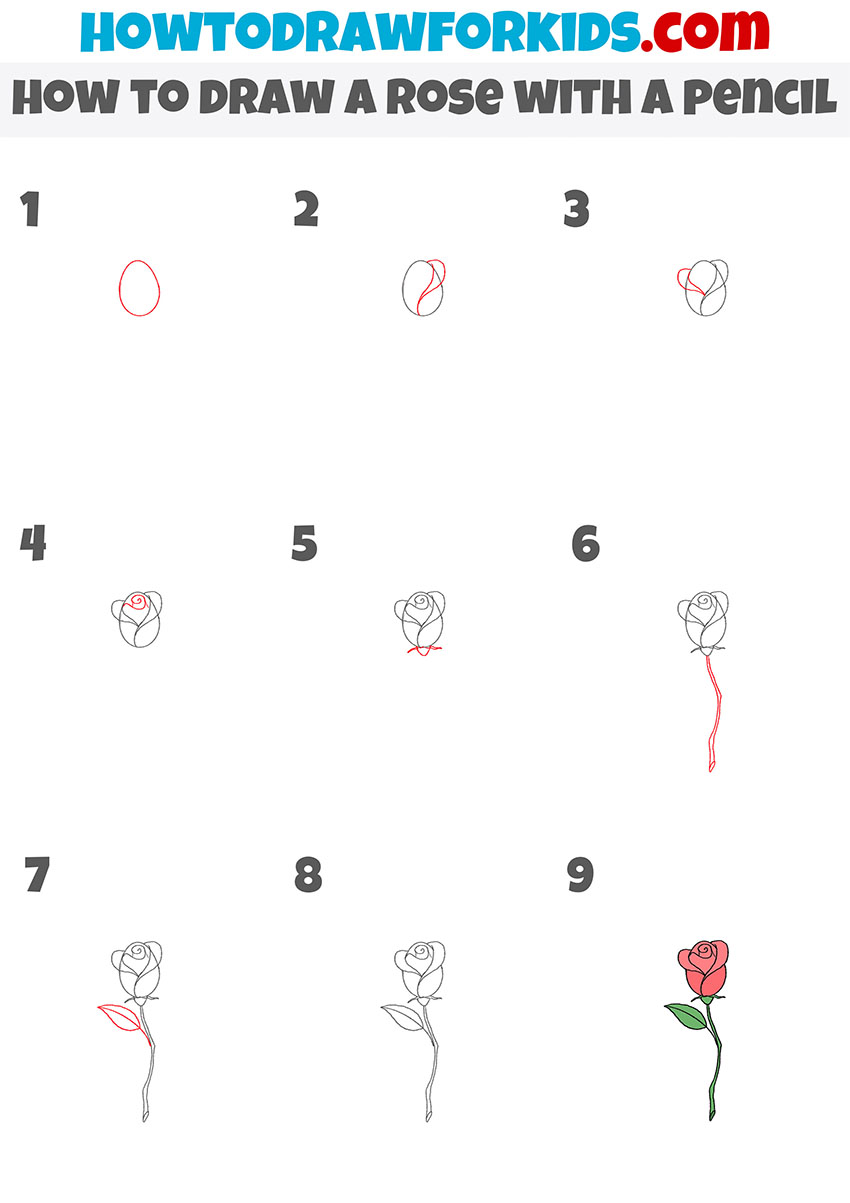
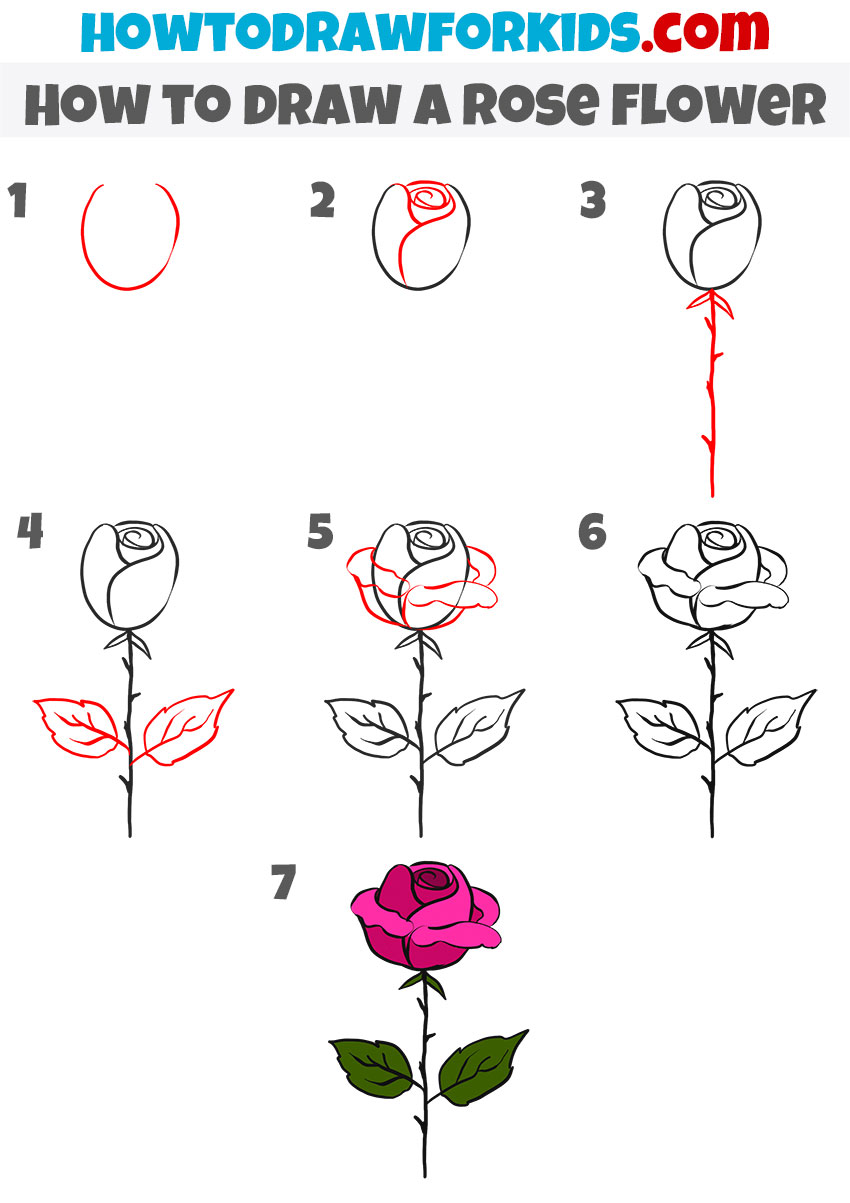
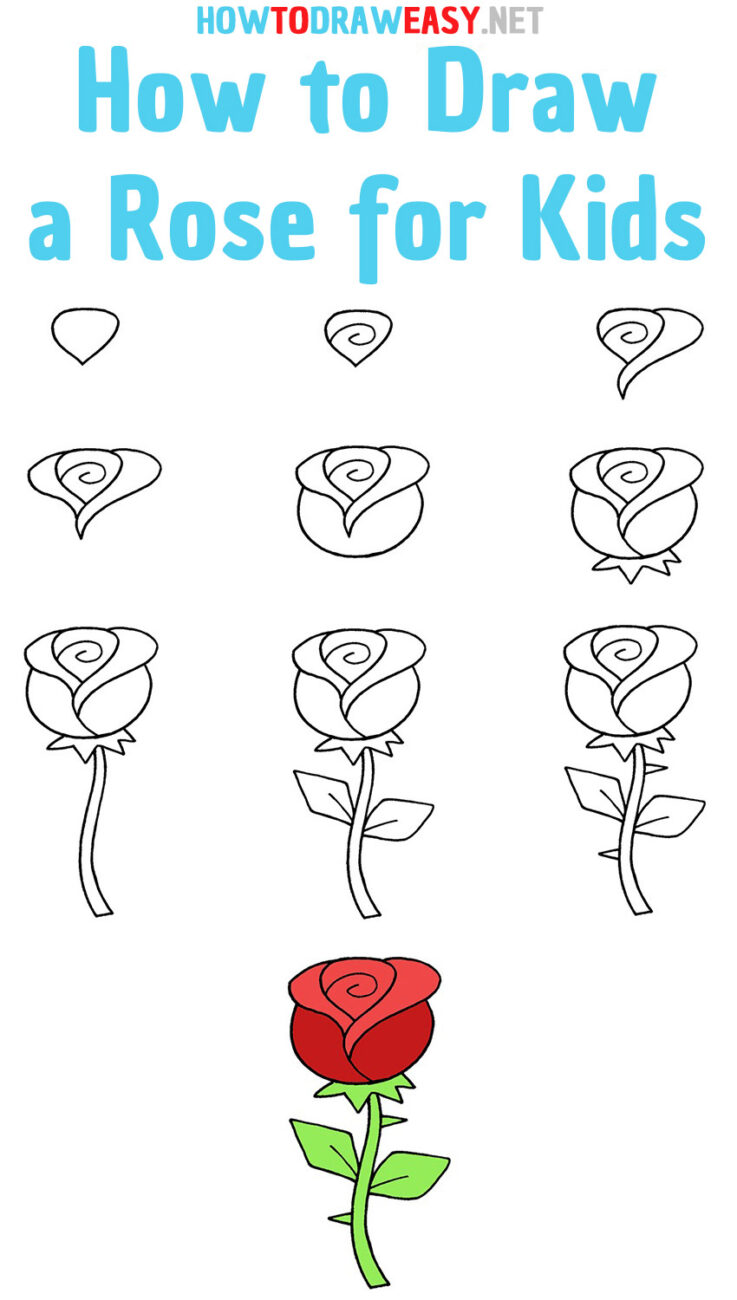
How Draw A Rose Step By Step - Draw a small freehand circle in the center of the page for the center of the rose. Draw the core shape of the rose and move to drawing the petals inside of it. Web the materials you need for this rose drawing step by step tutorial, are a 6b woodless pencil, canson drawing paper and a faber castel eraser. Lay down the basic shapes and simple lines that will make up your rose drawing. Web how to draw rose 🌹 step by step for beginners | rose drawing#art #drawing #rose Web hello,in this video i show you how to draw a rose step by step! Draw the very inner petals of the rose and clean up all of the guide lines. Now draw a small oval around the beginning oval, making the bottom of the second oval even with the first. Next, draw an oval around these, as in step 3. If you follow my drawing tutorial you can find out how you can make your own rose drawing eas.
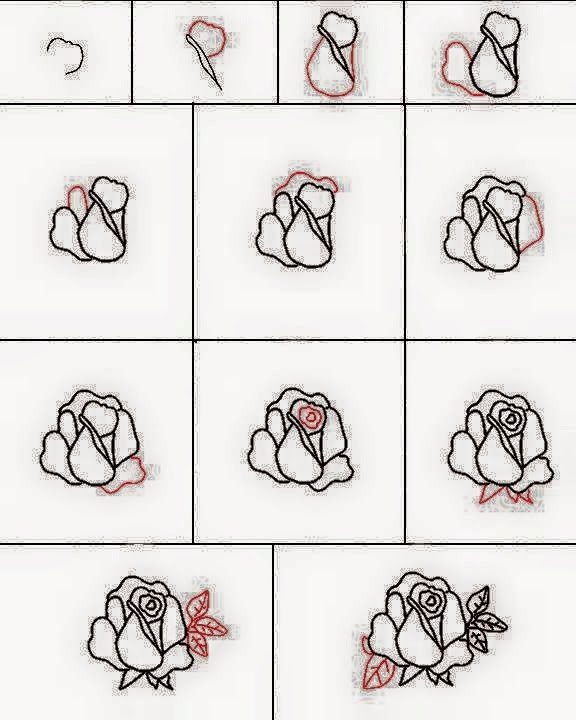
Now draw a small oval around the beginning oval, making the bottom of the second oval even with the first. These lines represent the inner petals. After all, a rose is a living thing, and maintaining that idea will. This is already a very recognizable rose flower. Design and draw a character. Web rose core shape drawing. Web follow along to learn how to draw this realistic rose easy, step by step. Learn how to draw a rose for beginners step by step easy. Start your rose drawing by first choosing one petal. Connect the realistic rose flower outline drawing with the rest of the bud, creating a petal shape.
Lay down the basic shapes and simple lines that will make up your rose drawing. Web simply copy the rose tutorial from your tablet or mobile device or print onto paper. To recap, there are 4 main techniques at work to create this rose drawing: Other parts of the heart don’t need to touch the oval shape, but there is nothing wrong if they do. Draw little petals inside the realistic rose outline illustration. With a variety of animals, magical creatures, vehicles, foods, plants and more your kids will never get bored. This is already a very recognizable rose flower. The shape and proportion of each part will be considered in each step of the tutorial. Draw the core shape of the rose and move to drawing the petals inside of it. Web in today’s post, we will learn how to draw a rose step by step on paper.

How To Draw A Rose For Kids Step By Step 2023 Get Latest How To Update
Next, draw an oval around these, as in step 3. Web how to draw rose 🌹 step by step for beginners | rose drawing#art #drawing #rose Draw another oval around the tiny shape, keeping the bottoms of the ovals. Web step 1 — what pencil to choose & a light touch. Add the front petal edge.
How to draw a rose stepbystep guide for beginners CraftMart
Web step 1 — what pencil to choose & a light touch. When you are done you should have an outline drawing of the. Sketching the outline of the rose. Draw the very inner petals of the rose and clean up all of the guide lines. To recap, there are 4 main techniques at work to create this rose drawing:
How To Draw A Rose Easy, Step by Step Learn To Draw And Paint
Lay down the basic shapes and simple lines that will make up your rose drawing. Rose flower in full bloom. Note that the blue pencil lines are used to indicate the new lines being drawn in each in each of the steps. Web watch more scenery drawing: Close those petals into a heart shape—this will be the flower outline drawing.

How to Draw a Red Rose Step by Step Easy Drawing Guides Drawing
A dull pencil works best, as it glides across the paper more easily when sketching out basic shapes. Draw the very inner petals of the rose and clean up all of the guide lines. The shape and proportion of each part will be considered in each step of the tutorial. Sketching the outline of the rose. This step is red.
How to Draw a Rose A Step by Step Guide
It is a good idea to start with a light pencil such as a 2h or 3h. Tweak any of the smaller details if needed. Web simply copy the rose tutorial from your tablet or mobile device or print onto paper. These lines represent the inner petals. Then draw the form of your one chosen petal as seen in the.
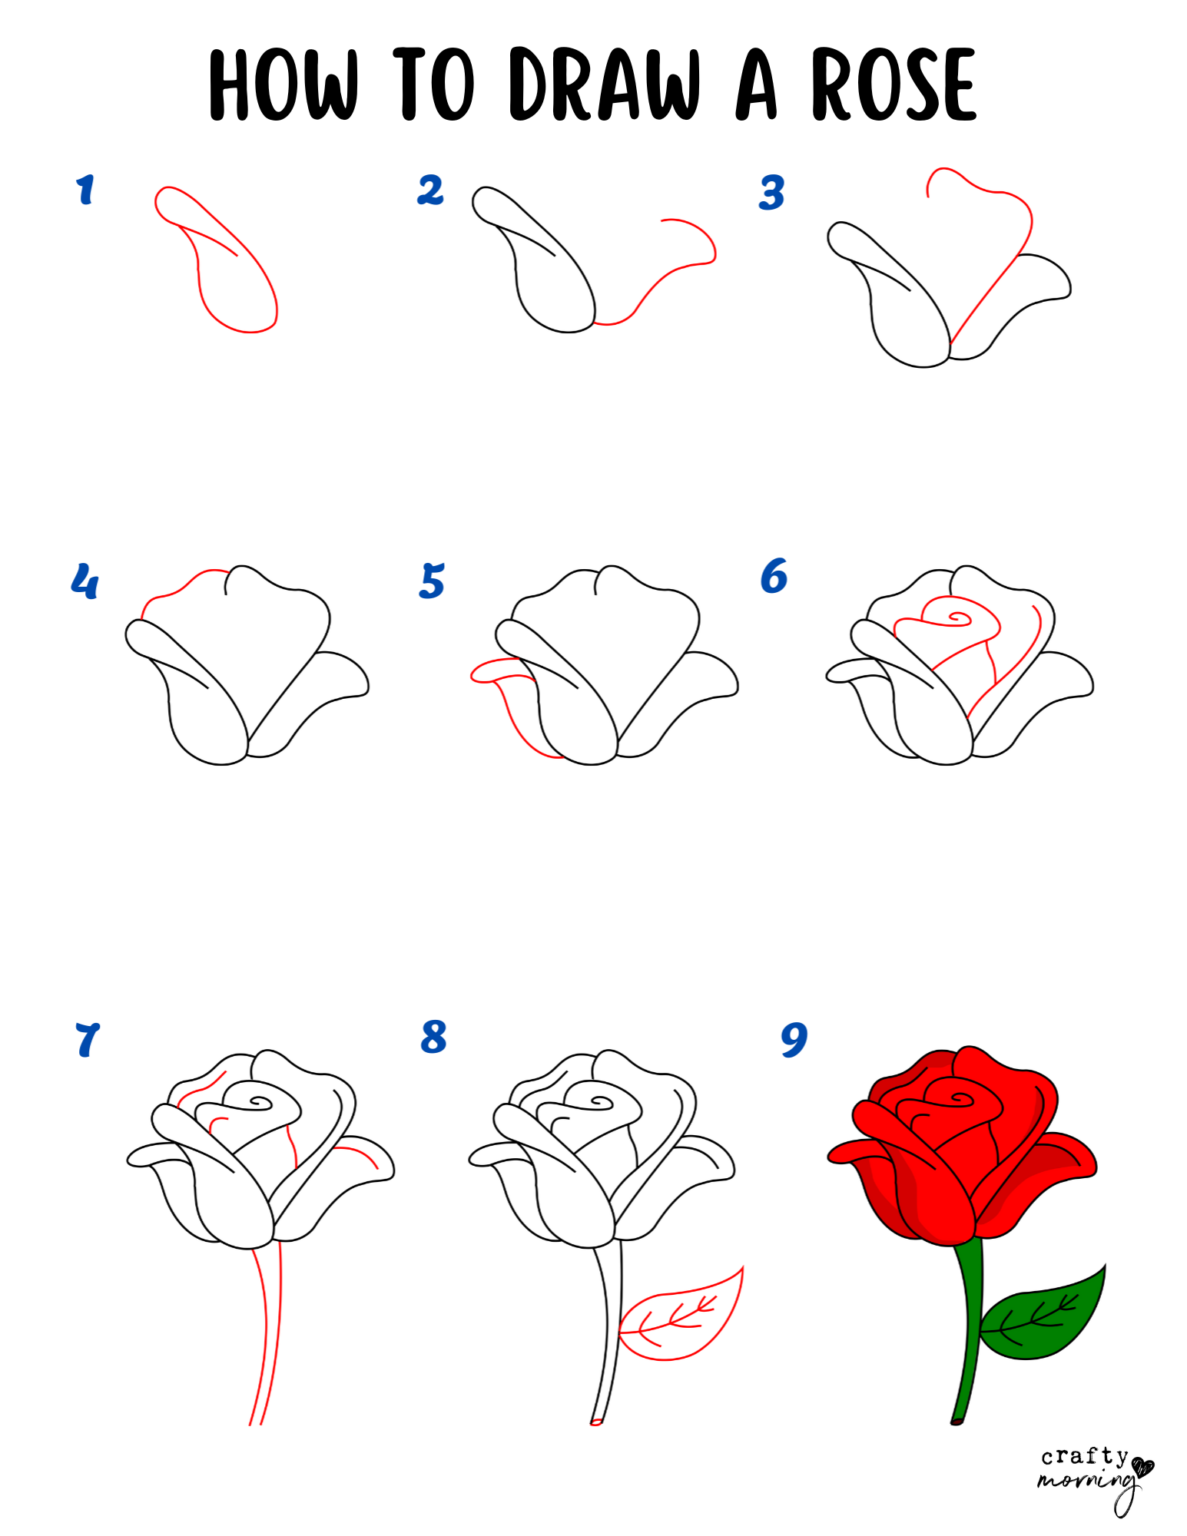
How to Draw a Rose Step by Step (Easy) Crafty Morning
Again don’t worry about the shape of the heart, the left and right sides don’t have to look the same. Note that the blue pencil lines are used to indicate the new lines being drawn in each in each of the steps. Web in today’s post, we will learn how to draw a rose step by step on paper. Web.
How to Draw a Rose With a Pencil Easy Drawing Tutorial For Kids
With your 2h pencil, sketch a pentagon. Other parts of the heart don’t need to touch the oval shape, but there is nothing wrong if they do. Next, sketch a heart connected to the swirl. With a variety of animals, magical creatures, vehicles, foods, plants and more your kids will never get bored. Web in today’s post, we will learn.
How to Draw a Rose Flower Easy Drawing Tutorial For Kids
This step is green in the following image. Draw another oval around the tiny shape, keeping the bottoms of the ovals. Web today, hadley and i are learning how to draw a rose! Again don’t worry about the shape of the heart, the left and right sides don’t have to look the same. Draw the very inner petals of the.

How To Draw A Simple Rose Step By Step The Hippest
Sketching the outline of the rose. Draw the core shape of the rose and move to drawing the petals inside of it. The shape and proportion of each part will be considered in each step of the tutorial. If you follow my drawing tutorial you can find out how you can make your own rose drawing eas. Web step 1.
How to Draw a Rose for Kids How to Draw Easy
Draw another oval around the tiny shape, keeping the bottoms of the ovals. Web how to draw a rose step by step. This step is green in the following image. Join a curved line from the small circle to the oval shape for the second petal. Web to draw a rose, start by drawing a small circle in the center.
Draw The Very Inner Petals Of The Rose And Clean Up All Of The Guide Lines.
Web create a layer of basic shapes. Draw little petals inside the realistic rose outline illustration. Art supplies ~ this is a list of the suppl. Add another irregular oval shape at a diagonal base of the above circle for the first petal.
Web In Fact, When You Are Shading It Is Better To Use A Pencil That Is Dull Rather Than Sharp, Because This Makes For Easier Coverage.
Web the texas lottery offers multiple draw games for those aiming to win big. Step by step instructions to draw a rose step 1. Web watch more scenery drawing: Close those petals into a heart shape—this will be the flower outline drawing of other petals.
These Lines Should Be Slightly Longer And More Tapered At The Ends To Give The Petals A More Realistic Shape.
Draw few petals that resemble a heart shape bordering your innermost petals. Learn a simple method for developing an original character, from mind map to finished drawing. This pentagon will be the size of your rose, so make it as big as you want your rose to be. When you are done you should have an outline drawing of the.
Drawing The First Rose Petal.
Leave some space for the leaves on the sides as well. This step is red in the following image. Draw another oval around the tiny shape, keeping the bottoms of the ovals. Add the front petal edge.