How To Draw A Baby Bunny
How To Draw A Baby Bunny - Web sketch a rough outline for the hands and feet. Darken the outline of the bunny’s body. Draw a series of three successively smaller ovals nested within each other to form each eye. Remember to take your time, be patient, and most importantly, have fun! Web follow along art tutorial on how to draw and color a cute cartoon baby bunny rabbit easy, step by step. Web learn to draw a cute bunnystore: To do this, make an upside down 'u' shape and add a horizontal line at the bottom right, a bit longer than the ear is thick. This construction line will help you place the baby bunny's facial features later. Make a curved line, connected to the ear, and extend it so it ends in roughly the same. Add the bunny’s whiskers and two short lines on each of the bunny’s limbs.
Web start the details with layers. Web draw a cute little bunny #simplestrokes #draw #simpledrawing #us #digitalpainting join us for an enchanting drawing adventure as we learn how to sketch a del. This construction line will help you place the baby bunny's facial features later. Web learn to draw a cute bunnystore: Start by using the 0.7mm marker to draw the bunny ear on the left. On the right side of the head, draw a long, curved line as a guide for the muzzle. Darken the outline of the bunny’s body. Remember to take your time, be patient, and most importantly, have fun! They serve as the individual canvases on which you will create the details of your bunny. Draw a sloping line across the whole head.
Web shapes and proportions are the foundation of your cute bunny drawing. You can adjust its position as needed. On top of the head, near the left side, draw tall, thin arc as a guide for the first ear. Use long, curved lines to outline the fur around the cheeks and eyes. Once you have the shape down, go in and add details, such as. It’s easy to create new layers in fresco. Draw the eyes using small circles, add the nose by sketching an inverted triangle, sketch the mouth and add the tooth. Web follow along art tutorial on how to draw and color a cute cartoon baby bunny rabbit easy, step by step. Web start the details with layers. This new layer will appear at the top of all the others.
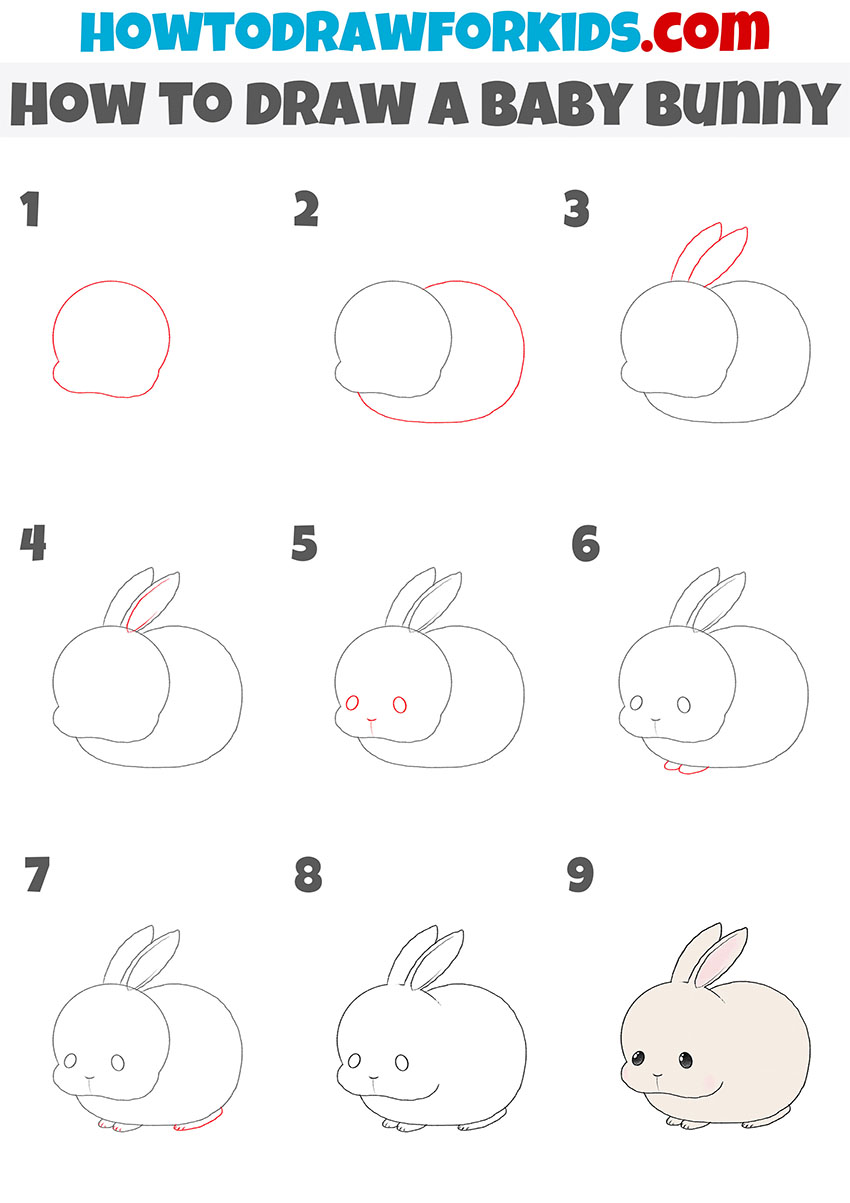
How to Draw a Baby Bunny Easy Drawing Tutorial For Kids
On top of the head, near the left side, draw tall, thin arc as a guide for the first ear. Make a curved line, connected to the ear, and extend it so it ends in roughly the same. Whether you’re a beginner or an experienced artist, this guide. Web drawing a baby bunny is a delightful way to express your.
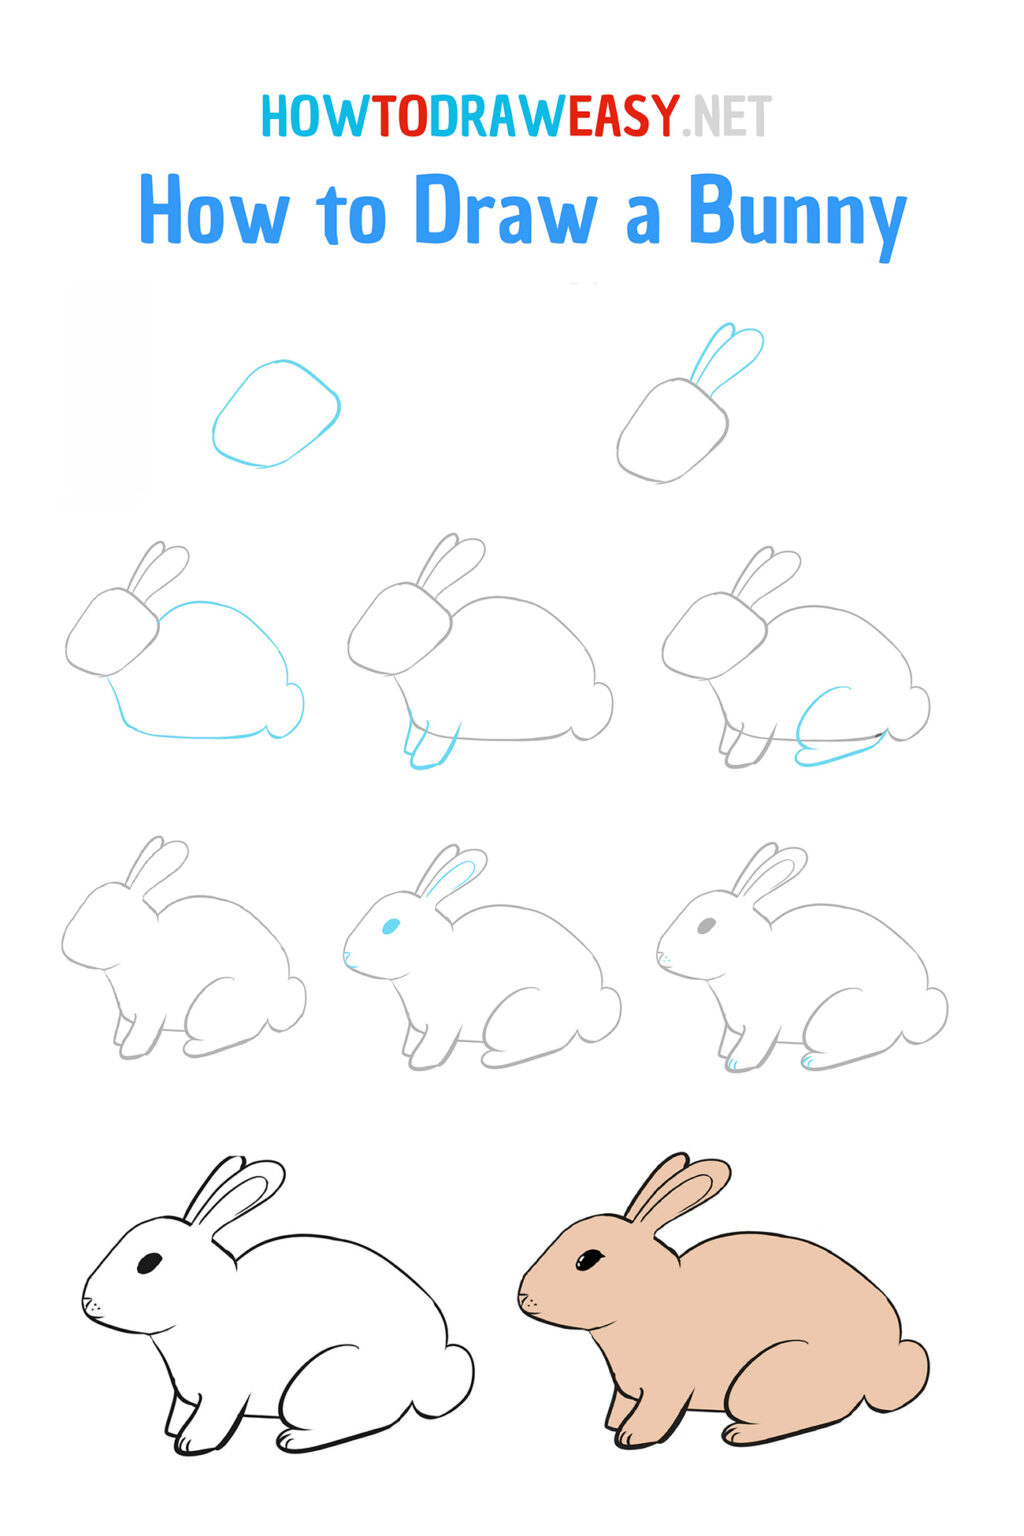
How to Draw a Bunny How to Draw Easy
Use long, curved lines to outline the fur around the cheeks and eyes. Draw the side of the bunny's face. To do this, make an upside down 'u' shape and add a horizontal line at the bottom right, a bit longer than the ear is thick. Web start the details with layers. Draw a sloping line across the whole head.
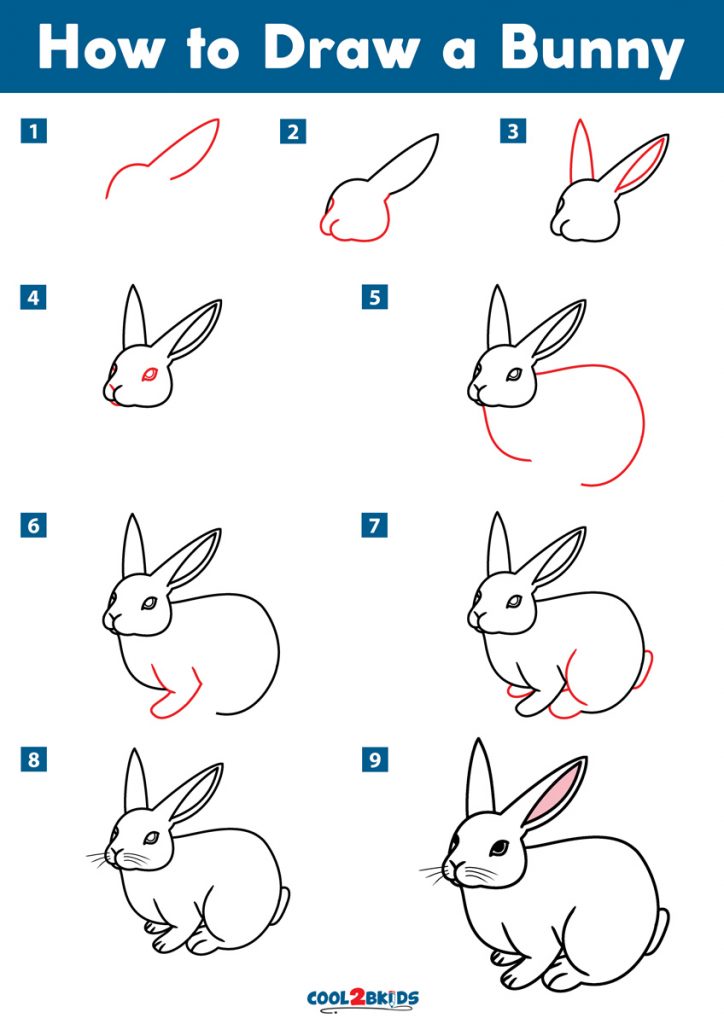
How to Draw a Bunny Cool2bKids
Kawaii bunny inspired by anirollz hotdog bunny mochi. Colors add depth and personality to your bunny drawing. This construction line will help you place the baby bunny's facial features later. Web shapes and proportions are the foundation of your cute bunny drawing. They serve as the individual canvases on which you will create the details of your bunny.
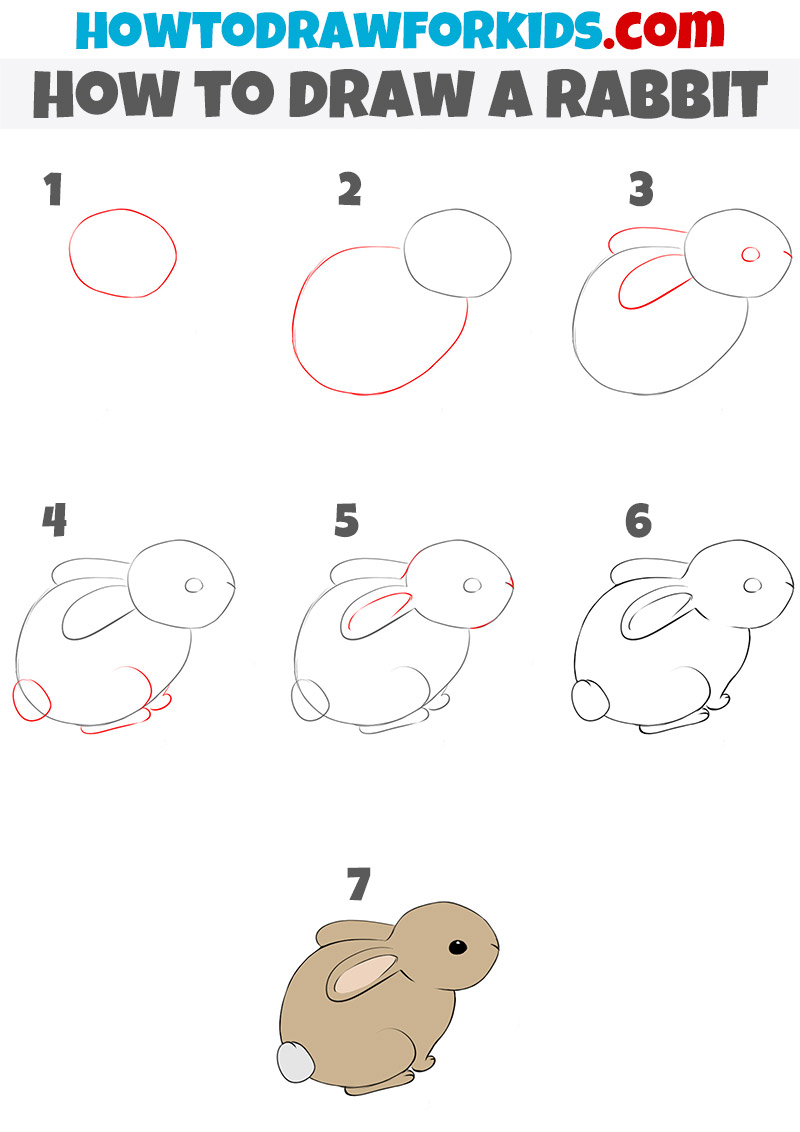
How to Draw a Rabbit Easy for Kids
Web sketch a rough outline for the hands and feet. Web shapes and proportions are the foundation of your cute bunny drawing. Make a curved line, connected to the ear, and extend it so it ends in roughly the same. Press the “+” button to create a layer. This construction line will help you place the baby bunny's facial features.

How to Draw A Cute Bunny Step by Step
Web follow along art tutorial on how to draw and color a cute cartoon baby bunny rabbit easy, step by step. Remember to take your time, be patient, and most importantly, have fun! Draw the eyes using small circles, add the nose by sketching an inverted triangle, sketch the mouth and add the tooth. Use long, curved lines to outline.

How To Draw A Bunny Printable
This construction line will help you place the baby bunny's facial features later. It’s easy to create new layers in fresco. Start by using the 0.7mm marker to draw the bunny ear on the left. This new layer will appear at the top of all the others. Draw an inverted triangle with rounded corners to indicate the nose.

How to Draw a Baby Bunny Really Easy Drawing Tutorial Drawing
Colors add depth and personality to your bunny drawing. Press the “+” button to create a layer. Draw a series of three successively smaller ovals nested within each other to form each eye. You can adjust its position as needed. Make a curved line, connected to the ear, and extend it so it ends in roughly the same.

How to Draw a Baby Bunny Really Easy Drawing Tutorial Drawing
Beneath it, enclose the mouth and large front teeth using several u shaped lines. On top of the head, near the left side, draw tall, thin arc as a guide for the first ear. Draw a series of three successively smaller ovals nested within each other to form each eye. They serve as the individual canvases on which you will.

How to Draw a Baby Bunny Step by Step Bunny drawing, Baby cartoon
Start by sketching the general structure of the bunny with simple shapes, such as ovals, circles, and rounded cs. Draw a sloping line across the whole head. Remember to take your time, be patient, and most importantly, have fun! You can adjust its position as needed. Once you have the shape down, go in and add details, such as.
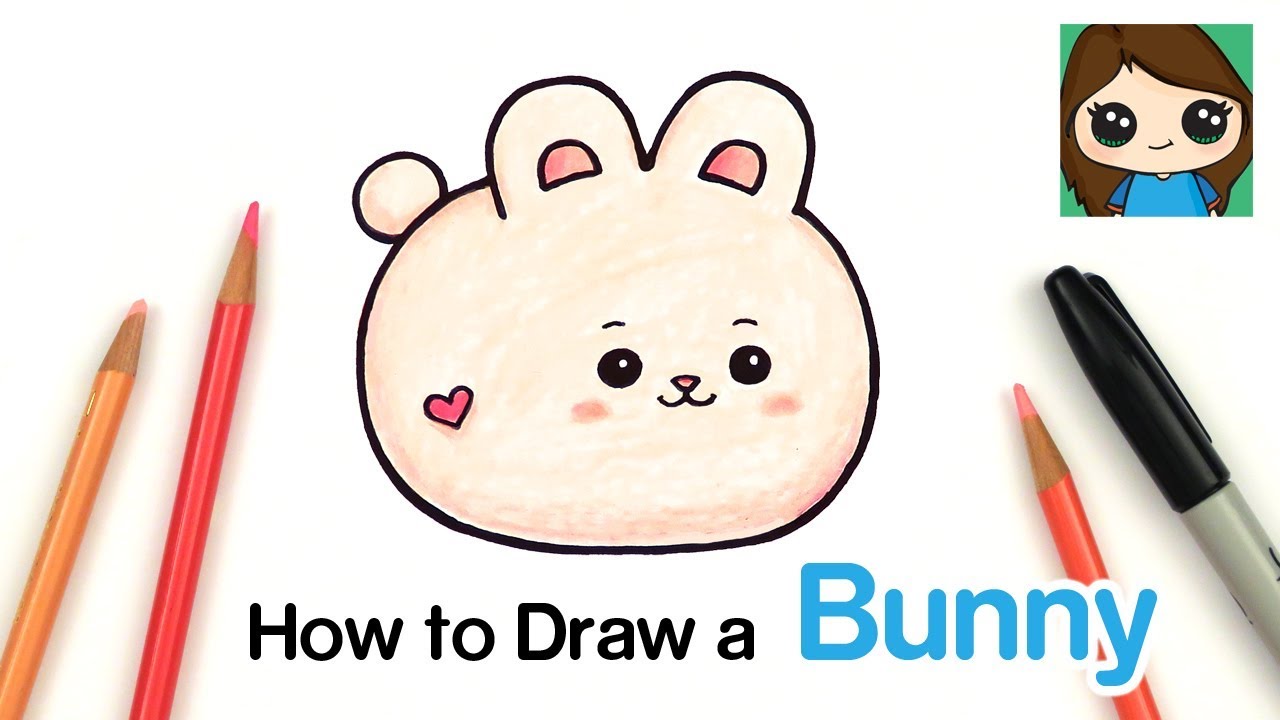
How to Draw a Baby Bunny Rabbit Anirollz
On top of the head, near the left side, draw tall, thin arc as a guide for the first ear. Web follow along art tutorial on how to draw and color a cute cartoon baby bunny rabbit easy, step by step. Colors add depth and personality to your bunny drawing. Kawaii bunny inspired by anirollz hotdog bunny mochi. Use long,.
Remember To Take Your Time, Be Patient, And Most Importantly, Have Fun!
Draw the side of the bunny's face. Make a curved line, connected to the ear, and extend it so it ends in roughly the same. Kawaii bunny inspired by anirollz hotdog bunny mochi. Draw a series of three successively smaller ovals nested within each other to form each eye.
Web Learn To Draw A Cute Bunnystore:
Colors add depth and personality to your bunny drawing. This construction line will help you place the baby bunny's facial features later. Web sketch a rough outline for the hands and feet. Web follow along art tutorial on how to draw and color a cute cartoon baby bunny rabbit easy, step by step.
Beneath It, Enclose The Mouth And Large Front Teeth Using Several U Shaped Lines.
Draw the eyes using small circles, add the nose by sketching an inverted triangle, sketch the mouth and add the tooth. To do this, make an upside down 'u' shape and add a horizontal line at the bottom right, a bit longer than the ear is thick. Start by sketching the general structure of the bunny with simple shapes, such as ovals, circles, and rounded cs. Web shapes and proportions are the foundation of your cute bunny drawing.
Web Start The Details With Layers.
Whether you’re a beginner or an experienced artist, this guide. On the right side of the head, draw a long, curved line as a guide for the muzzle. On top of the head, near the left side, draw tall, thin arc as a guide for the first ear. Once you have the shape down, go in and add details, such as.