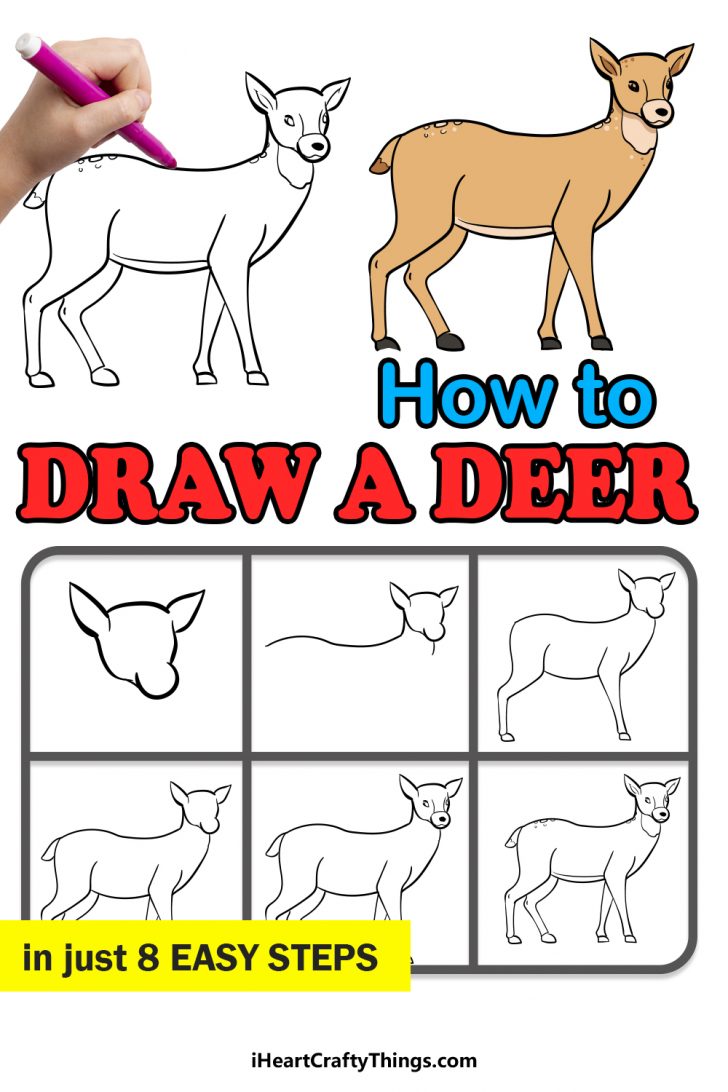
How To Draw A Deer Step By Step
How To Draw A Deer Step By Step - This will represent the hoof on each leg. Two of these circles are of the same size and represent the front and rear limbs and the deer’s body. Finally, connect all these lines to the smaller circle with a slight curve inwards. This step by step lesson progressively builds upon each previous step until you get to the final rendering of a deer. The fun part is here! Web learn how to draw a deer in this simple step by step drawing tutorial. Draw a smaller oval inside, close to the outer edge of the bigger one. Add the hooves and ears. Continue this step onto the back legs and add a thigh curve overlapping the rear body. Web how to draw a broken heart step by step||drawing of a broken heart #shorts#heart#broken#drawing#short#drawdraw sukuna jujutsu kaisen #short #draw #anime #dra.
Shade an inverted, curved triangle for the nose, then use curved lines for the snout and top of the head. This will represent the hoof on each leg. Shade and highlight the deer’s body. After you've drawn the legs, it's time to add the deer's hooves. Finally, connect all these lines to the smaller circle with a slight curve inwards. 💚 for drawing online videos visit my channel qwe art. After that, curve the line to the right for the nose. Draw the outline of the deer. For this step of your deer drawing, we shall be adding in the rest of the head outline underneath the ears. Use a small, soft brush with darker brown paint to darken beneath the neck, legs, and belly, repeating as needed or using black and dark brown paint.
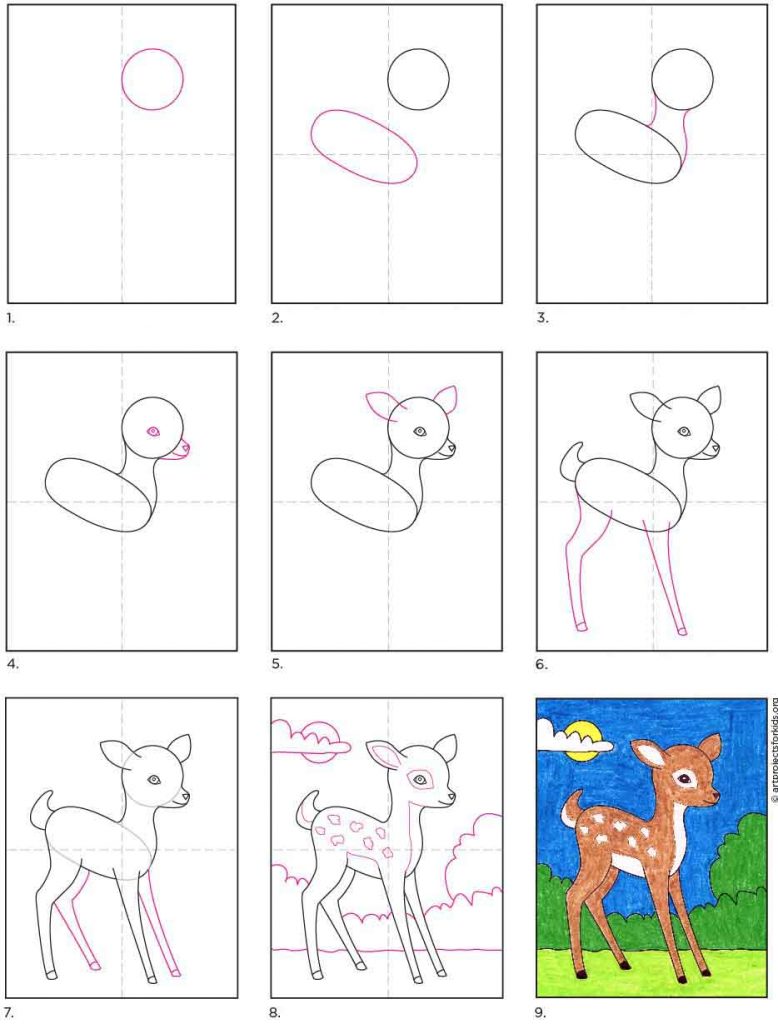
Attach two ovals to the sides, within the middle third. Then, at the front of the face, you can draw in a more rounded shape as you can see in the reference image. At the beginning of our creative adventure, draw an outline of the head and body of the future deer. Easy #deer_drawing tutorial step by step for kids and beginners. Learn a simple method for developing an original character, from mind map to finished drawing. Begin the deer outline by sketching the animal's face. You can also add a line separating the top part of his face from the bottom. Finally, connect all these lines to the smaller circle with a slight curve inwards. Add an eyebrow, eye, nose, mouth. Begin by drawing three circles as shown in the example.
Deer Drawing How To Draw A Deer Step By Step!
Web learn how to draw a deer {stag} a stag step by step. Now, let’s finish the deer drawing by coloring the inner part of the ear, the fur on the underside of the body, and the snout with a light orange crayon. At the beginning of our creative adventure, draw an outline of the head and body of the.
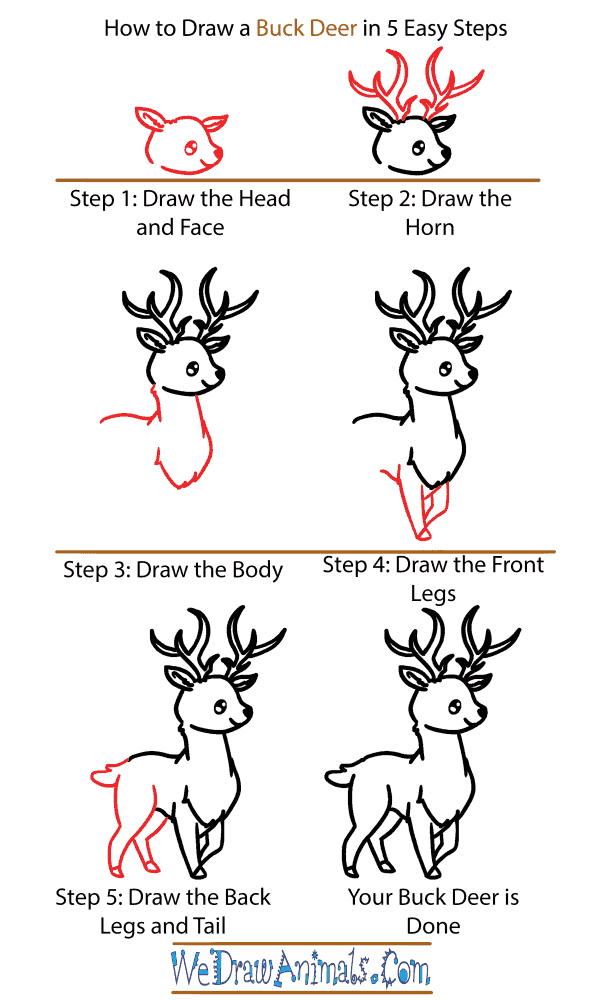
How to Draw a Cute Buck Deer
Draw the legs of your deer illustration. Web complete the deer drawing. Web learn how to draw a deer in this simple step by step drawing tutorial. Web how to draw titan tv man from skibidi toilet | skibidi toilet drawing step by step easy#skibiditoilet #drawing #howto #draw #cover #memes♥ thanks for watchin. Web follow my step by step drawing.

How to Draw a Deer Step by Step for Beginners
Divide the head into thirds. After you've drawn the legs, it's time to add the deer's hooves. Deer drawing easy, so where to start. Web in this drawing lesson we’ll show you how to draw a deer in 6 easy steps. Finally, connect all these lines to the smaller circle with a slight curve inwards.

How to Draw a Deer Step by Step for Beginners
Shade and highlight the deer’s body. Apply this shading to the face and ears, blending with a blending brush. After you've drawn the legs, it's time to add the deer's hooves. 💚 for drawing online videos visit my channel qwe art. Shade an inverted, curved triangle for the nose, then use curved lines for the snout and top of the.
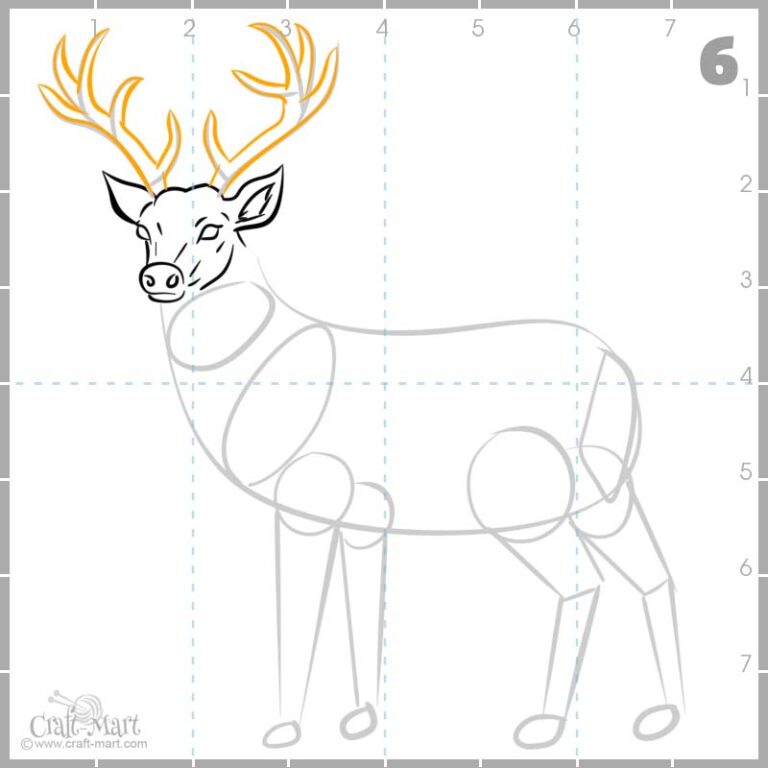
Drawing a deer in 10 steps easy tutorial CraftMart
Web learn how to draw a deer {stag} a stag step by step. Follow our step by step tutorial and be. This is where you get to add the details to the face of the deer. Web how to draw a broken heart step by step||drawing of a broken heart #shorts#heart#broken#drawing#short#drawdraw sukuna jujutsu kaisen #short #draw #anime #dra. Begin the.

Drawing a deer in 10 steps easy tutorial in 2024 Deer drawing easy
The third, slightly smaller circle, represents the head. 🦌🖍️ join us as we learn to draw and color a graceful deer step by step, perfect for young artists. Simply follow along with each step, drawing the portion shown in red for each step of the how to draw a deer tutorial. Continue this step onto the back legs and add.
Deer Drawing How To Draw A Deer Step By Step!
As you get to the bottom, curve the line to the left for the nose bridge. Now, let’s finish the deer drawing by coloring the inner part of the ear, the fur on the underside of the body, and the snout with a light orange crayon. Web thanks for visiting our drawing tutorial in 5 minutes. Two of these circles.
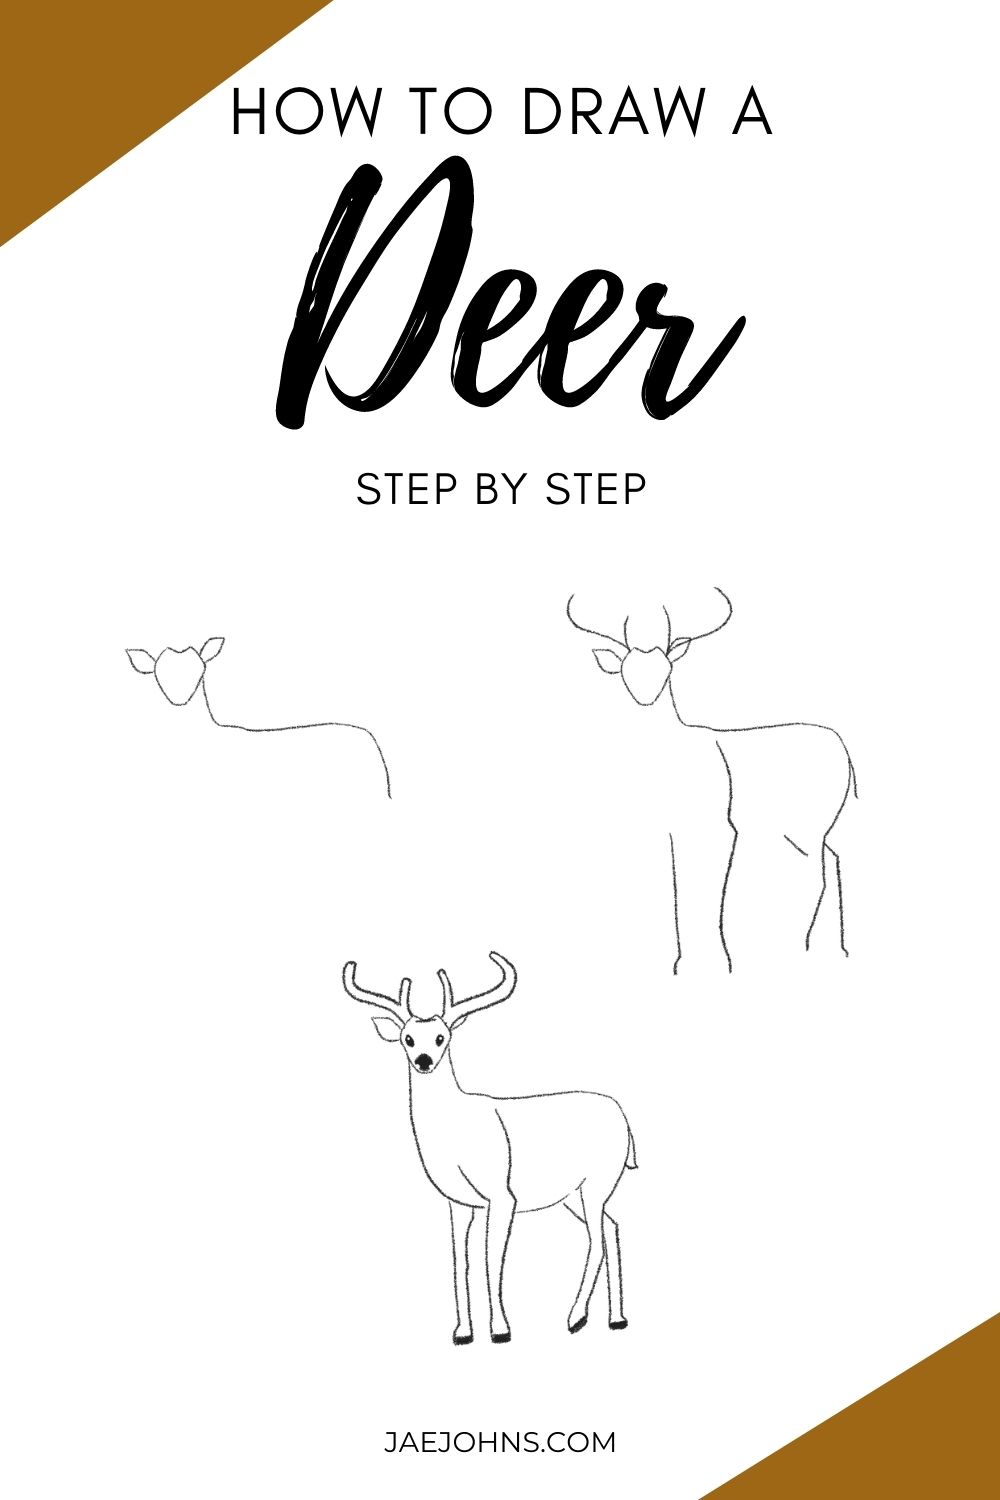
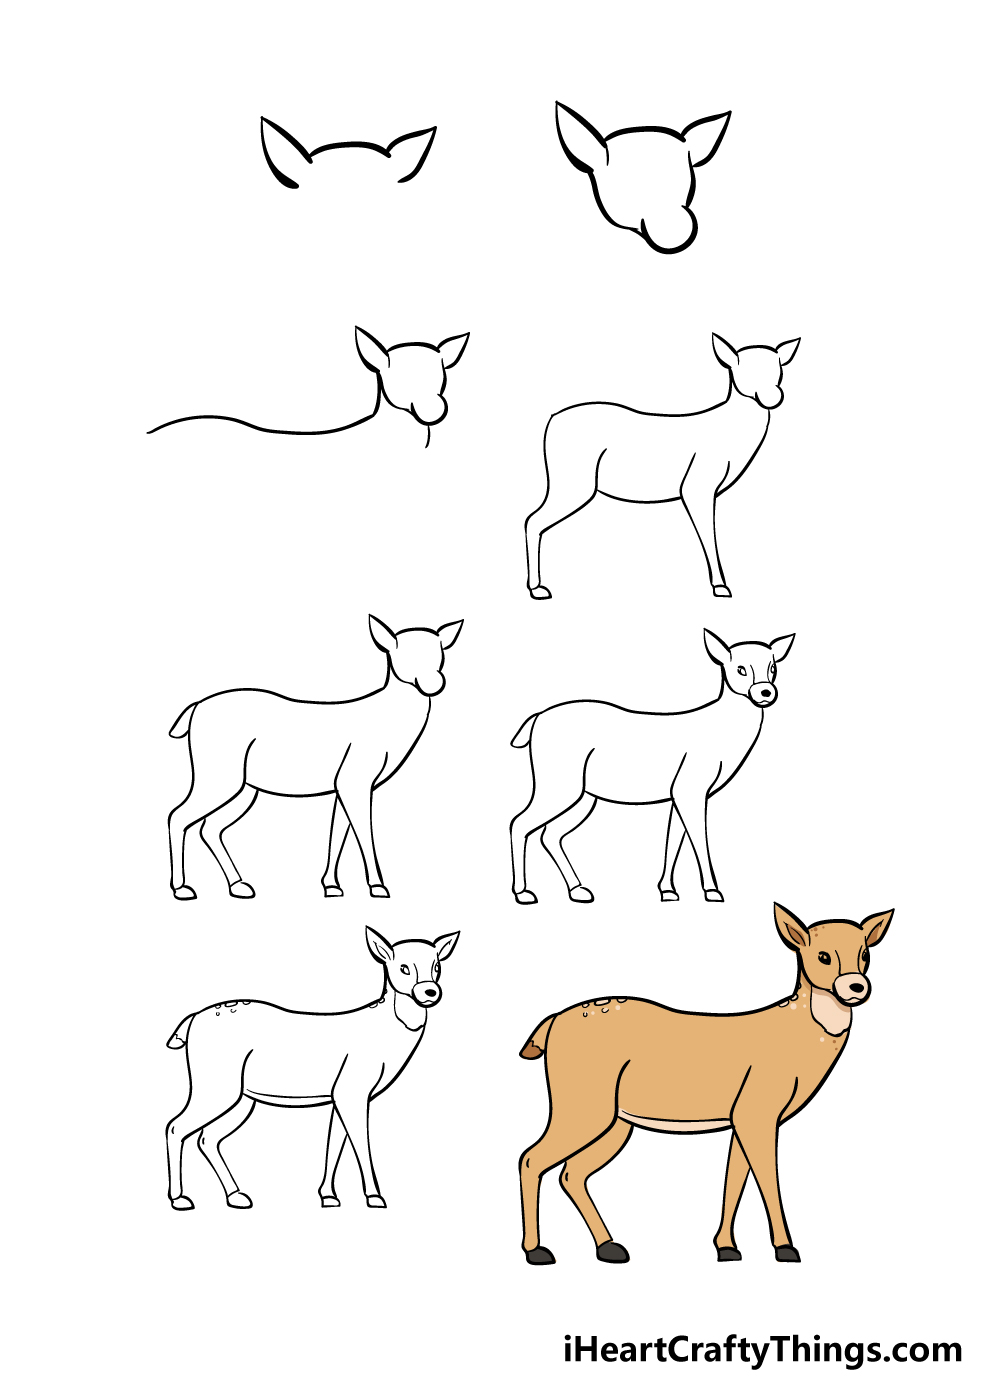
How to Draw a Deer (Easy Step by Step with Pictures) Jae Johns
Web learn how to draw a deer {stag} a stag step by step. Draw the ears, the fur on the head, and make the head more elongated towards the nose. Construct the legs by creating a linear structure. Draw the details of the head. This step by step lesson progressively builds upon each previous step until you get to the.

Drawing a deer in 10 steps easy tutorial in 2022 Drawings, Deer
Draw the legs of your deer illustration. Attach two ovals to the sides, within the middle third. Draw the outline of the deer. Hi everyone, in this video i show you how to draw a deer step by step 🦌. Shade an inverted, curved triangle for the nose, then use curved lines for the snout and top of the head.
Easy How to Draw a Deer Tutorial and Deer Coloring Page
From the right edge of the heart shape create a curved line going downward, then continue that line horizontally, finally curving. Web how to draw a deer step by step easy. Easy #deer_drawing tutorial step by step for kids and beginners. This is where you get to add the details to the face of the deer. Be an expert in.
After You've Drawn The Legs, It's Time To Add The Deer's Hooves.
After that, curve the line to the right for the nose. Connect the soft triangle on the left to this last curved line we made by adding another line. At the beginning of our creative adventure, draw an outline of the head and body of the future deer. Simply follow along with each step, drawing the portion shown in red for each step of the how to draw a deer tutorial.
Learn A Simple Method For Developing An Original Character, From Mind Map To Finished Drawing.
From the right edge of the heart shape create a curved line going downward, then continue that line horizontally, finally curving. Starting from the left side of the circle, draw a line straight down. Deer drawing easy, so where to start. On the right side, take the smaller bump down in a dip before adding a bump at the base of the ear.
Then, In Just A Few Minutes You.
The fun part is here! The third, slightly smaller circle, represents the head. Then, use an orange crayon for the antlers and a dark brown crayon for. Web learn how to draw a deer {stag} a stag step by step.
On Either Side Of That Blocky Heart Shape, Create A Leaf Shape, One Thinner Than The Other.
Draw the ears, the fur on the head, and make the head more elongated towards the nose. You can also add a line separating the top part of his face from the bottom. To begin this step, start with the front legs of your deer. Continue this step onto the back legs and add a thigh curve overlapping the rear body.