How To Draw A Easy Ice Cream
How To Draw A Easy Ice Cream - Complete the round shape of the third ice cream scoop using a curved line. This one will be very similar in shape and design to the upper layer, but because it is underneath the first one we won’t see the top of this layer. This forms the base of the ice cream. It wouldn’t be much of an ice cream cone drawing if it didn’t have any ice cream on it! Web place the coated ice cream balls in a covered container or muffin tin and freeze until solid. This crunchy, sweet, nutty chocolate bark packs so many amazing ice cream toppings into one. Easy, step by step kawaii ice cream dessert art. Grab a set of pencils with different lead grades, such as hb, 2b, and 4b and color markers. Let’s finish the ice cream drawing by completing the waffle cone. Try to draw this without using a ruler.
Draw the first ice cream layer like this. It can be any size you prefer, but make sure it’s large enough to accommodate your drawing. Grab a set of pencils with different lead grades, such as hb, 2b, and 4b and color markers. Draw a short curved line overlapping one end of the first line. This second layer will also have a portion dripping down to the portion. It’ll be the bowl of ice cream. Then draw the rest of the cone, slightly rounding off the sharp tip of the cone. Connect the lines from the previous step. Add another ice cream layer on top of it. Begin by drawing a long curved line.
It should nearly, but not completely, enclose an irregular round shape. This crunchy, sweet, nutty chocolate bark packs so many amazing ice cream toppings into one. It’ll be the bowl of ice cream. It can be any size you prefer, but make sure it’s large enough to accommodate your drawing. In a large bowl, combine one cup of heavy cream and one can of condensed milk. Choose a blank sheet of paper that is suitable for drawing. Learn how to draw a cute ice cream popsicle with sprinkles. I also add the upper and lower borders of the shape and mark the separating point. Web add the outline of the wafer cone top edge. Draw the first ice cream layer like this.
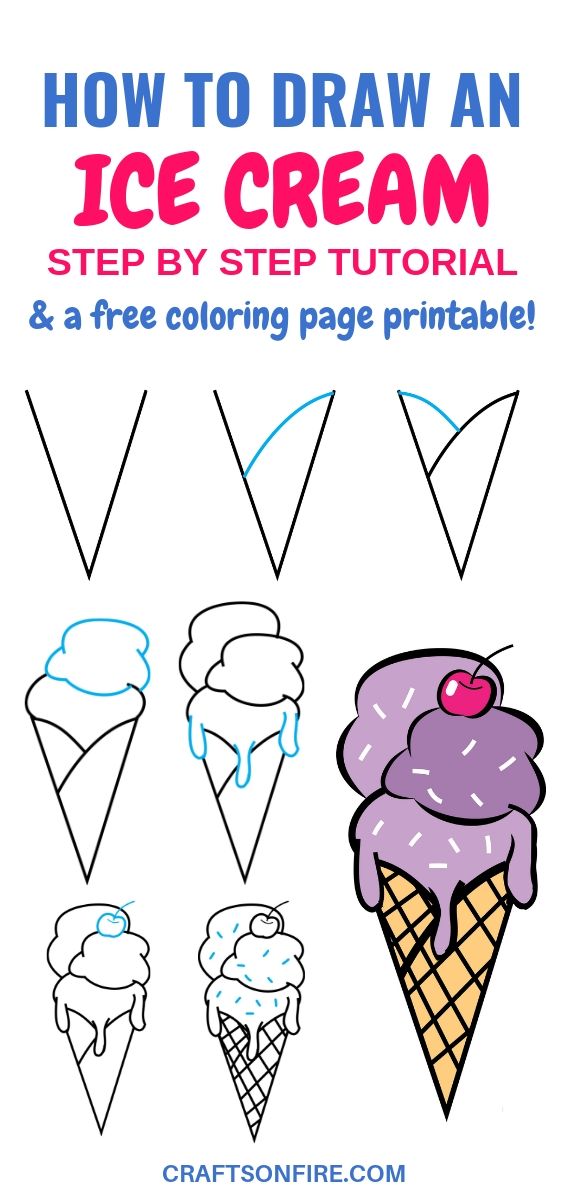
How To Draw An Ice Cream In 12 Steps Drawing Tutorial Craftsonfire
Draw another curved line just above it, parallel to the first. For that reason we shall add some to the image in this second step. It wouldn’t be much of an ice cream cone drawing if it didn’t have any ice cream on it! Draw a short curved line overlapping one end of the first line. 😎🍦 it’s going to.

How to Draw Ice Cream Really Easy Drawing Tutorial
Draw two parallel horizontal lines as in our example. With a graphite pencil, i draw a core line of the ice cream. Connect the lines from the previous step. Web in this video, you will learn how to draw a super cute and super easy cartoon ice cream step by step :) happy drawings : Draw the sides of the.
Easy How to Draw Ice Cream Tutorial & Ice Cream Coloring Page
This forms the base of the ice cream. Web draw the curved shape of the rim of the cone. Add a third ice cream shape with twist on top. Web in a large measuring cup, whisk the peanut butter, milk of choice, sugar or sweetener, salt, and pure vanilla extract. Web take the ice cream out of the refrigerator and.

How to Draw Ice Cream Easy Drawing for Kids YouTube
😋 learn how to draw a cute ice cream sundae summer art easy, step by step drawing lesson tutorial. Draw the sides of the top of the wafer cone. Then, once you have that top. This forms the next portion of the cone. To draw a nice big dollop of ice cream on top of the cone, we shall start.
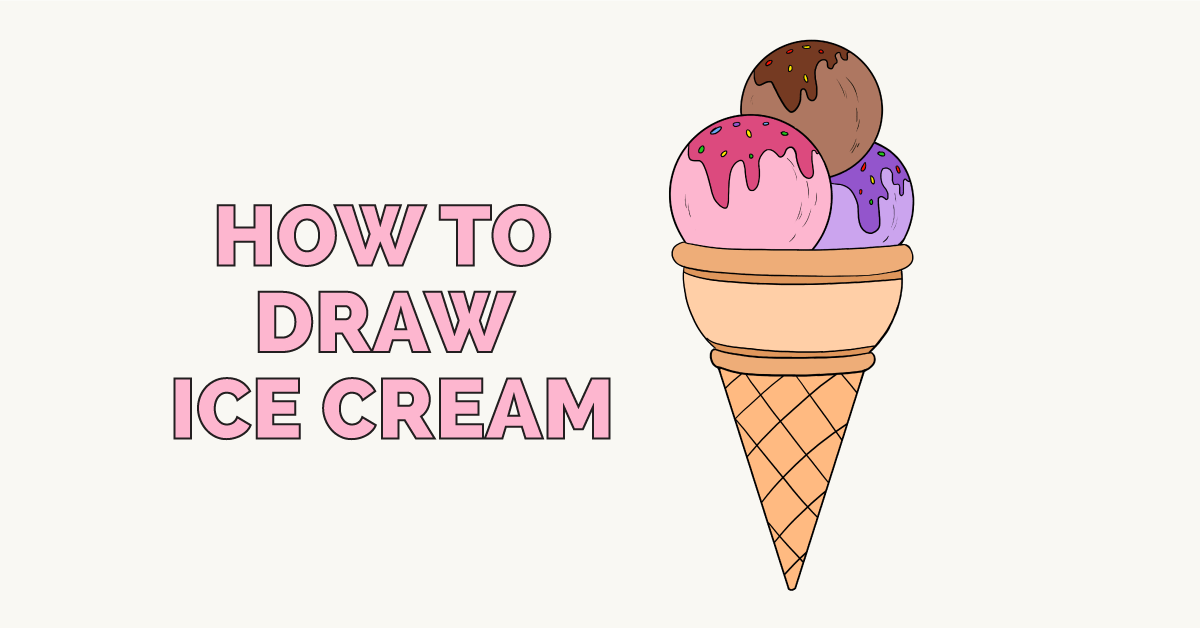
How to Draw Ice Cream Really Easy Drawing Tutorial
Try to draw this without using a ruler. Web take the ice cream out of the refrigerator and allow it to thaw on the counter while you prepare the crust. Draw a short curved line overlapping one end of the first line. Web in a large measuring cup, whisk the peanut butter, milk of choice, sugar or sweetener, salt, and.

How to Draw Ice Cream Really Easy Drawing Tutorial
You can use different colors like red, pink, blue, or green, or leave it white and color the cone cream or brown. Connect the lines using short curved lines at each end. Web how to draw cool ice cream cone. 😋 learn how to draw a cute ice cream sundae summer art easy, step by step drawing lesson tutorial. Web.
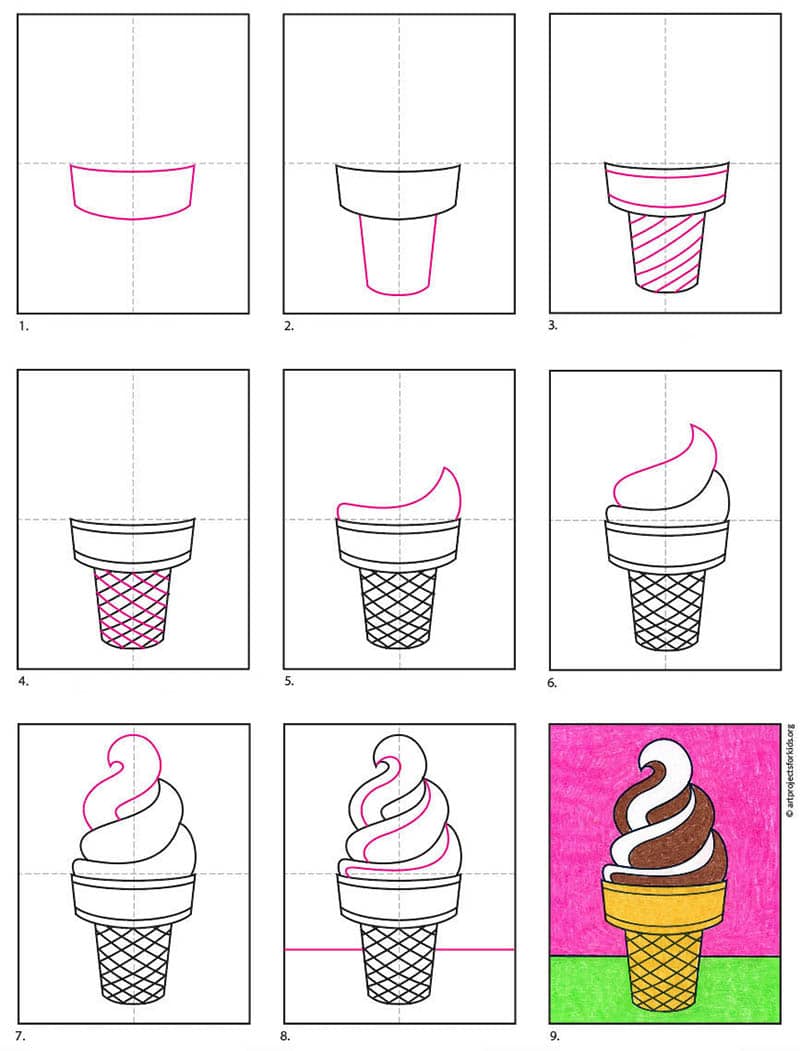
Easy How to Draw Ice Cream Tutorial and Ice Cream Coloring Page · Art
Draw two parallel horizontal lines as in our example. Connect the lines using short curved lines at each end. Connect the lines from the previous step. Cover the surface with plastic. 😋 learn how to draw a cute ice cream sundae summer art easy, step by step drawing lesson tutorial.

How to Draw Ice Cream for Beginners Simple Drawing Tutorial For Kids
This line is slightly tilted to make the drawing more interesting and dynamic. Now, we will add the second layer of this cartoon ice cream drawing. For the best flavor and texture, we highly recommend using no less than the amounts called for of both the peanut butter and sugar. Kawaii scoops of ice cream. Now, add a stick at.

How to Draw a Simple Ice Cream Cone 11 Steps (with Pictures)
Web 🖊️ step 2: There should be a small distance between the lines. You can use different colors like red, pink, blue, or green, or leave it white and color the cone cream or brown. Web learn how to draw a cute ice cream cone with this easy and fun tutorial. Next, connect the bottoms of the two vertical lines.
HOW TO DRAW ICE CREAM EASY STEP BY STEP YouTube
In the bowl of a food processor, combine the whole package of cookies and the vegan butter. 😊learn how to draw a cute ice cream cone easy, step by step drawing lesson. So, grab your crayons, markers or pencils, and let’s create something ‘cool’ together. Churn the mixture according to the manufacturer’s instructions. Now, we will add the second layer.
Let’s Finish The Ice Cream Drawing By Completing The Waffle Cone.
Then draw the rest of the cone, slightly rounding off the sharp tip of the cone. Then, once you have that top. I also add the upper and lower borders of the shape and mark the separating point. 1,900+ drawing & coloring pdfs.
Web Take The Ice Cream Out Of The Refrigerator And Allow It To Thaw On The Counter While You Prepare The Crust.
Kawaii scoops of ice cream. Web learn how to draw a cute ice cream cone with this easy and fun tutorial. Don’t forget to color the cherry in a bright shade of pink or red and leave a small white circle to show a reflection and you’re done! To draw a nice big dollop of ice cream on top of the cone, we shall start with a round, curved line over it.
This Line Is Slightly Tilted To Make The Drawing More Interesting And Dynamic.
Draw a short curved line at the top of the cherry, where the tops of the heart shape meet. This process typically takes 2 to 3 hours, but it's best to check periodically to ensure they're. Easy, step by step kawaii ice cream dessert art. Connecting the bottoms and adding a stick:.
Begin By Drawing A Long Curved Line.
There should be a small distance between the lines. Draw two parallel horizontal lines as in our example. Olivia and i are so excited because today, we’re learning how to draw an ice cream cone wearing cool sunglasses! All that needs to be done now is to go ahead and color the ice cream.