How To Draw A Garlic
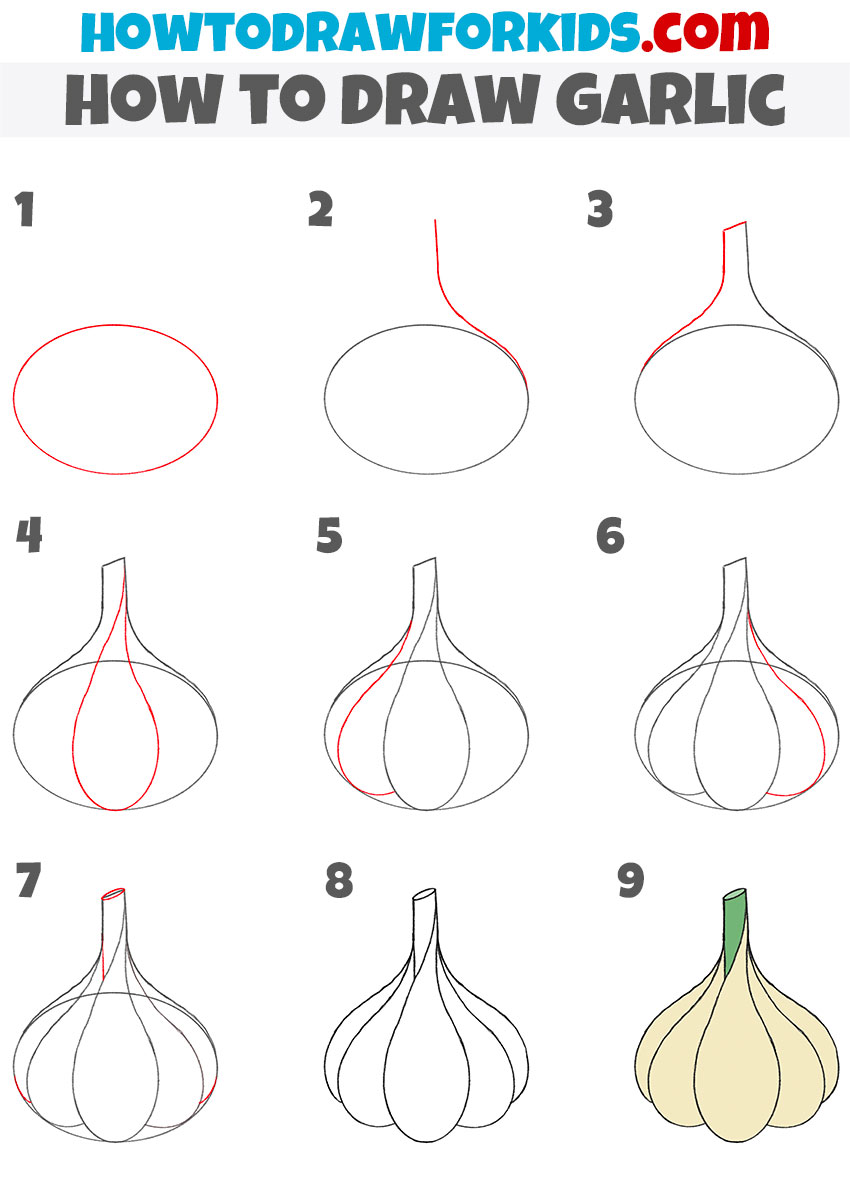
How To Draw A Garlic - Corn acts as a support system for climbing beans, beans add nitrogen to the soil and help stabilize the tall corn during heavy winds, and the large squash leaves shade the ground helping retain soil moisture and prevent weeds. Garlic drawing easy step by step tutori. Web 🎨 get ready to unleash your artistic side and join us in this garlic drawing tutorial! Depict an oval, which will be an auxiliary figure for drawing the garlic. So first, draw a literal oval. At the bottom of the bulb, use a series of short curved lines to enclose the bushy shape of the roots. Web a classic example of companion planting is the three sisters or corn, beans, and squash: Try out different placements for the garlic or add in some herbs or a rustic background to enhance the. Mir nilophar k, tutorials point i. How can i add more energy and movement to my garlic drawing?
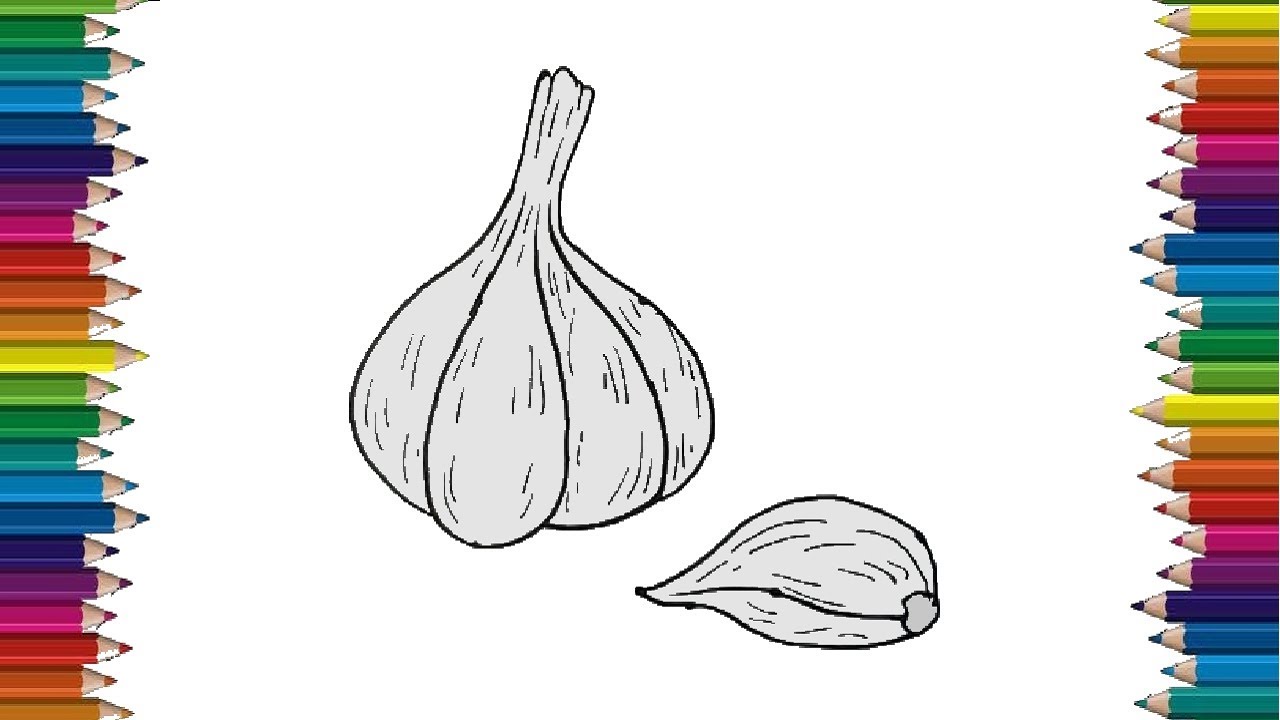
Sketch several small lines at the bottom of the garlic bulb to represent the roots. Experiment with different compositions and angles. Garlic drawing easy for beginners please like comment subscribe to my channel to see more interesting videos ! Sometimes you might have to fill in the space. Complete this head of garlic by drawing more cloves. Draw a curved line continuing the previously drawn oval on the right side. Web make a stroke connecting two adjacent dots. Web a classic example of companion planting is the three sisters or corn, beans, and squash: Web how to draw a garlic step by step. Web take some time to closely observe garlic and try out different shading techniques to enhance your skills.
From the end of the first “clove”, draw a new line connecting to an adjacent dot and add arcs on both sides. Web take some time to closely observe garlic and try out different shading techniques to enhance your skills. Complete this head of garlic by drawing more cloves. Start with a basic outline. 👇 don’t forget to check other herbs and spices 👇. Web how to draw a garlic step by step: Start by drawing a rough outline shape of the garlic. Garlic drawing easy step by step tutori. Web how to draw a garlic step by step. Inside the bulb outline, draw several curved lines that follow the shape of the bulb.

How to draw a Garlic YouTube
Sketch several small lines at the bottom of the garlic bulb to represent the roots. Your final sketch should look like the image on the right. 👇 don’t forget to check other herbs and spices 👇. Now you can add some colors to make your drawing more realistic. Garlic drawing easy step by step tutori.

How to draw a garlic Pencil shading for beginners YouTube
Start by drawing a rough outline shape of the garlic. Web make a stroke connecting two adjacent dots. Connect the sides of the garlic neck using a curved line, and contour it using additional curved lines. At the bottom of the bulb, use a series of short curved lines to enclose the bushy shape of the roots. Now you can.

How to draw a garlic easy Easy Drawings Dibujos Faciles Dessins
Inside the bulb outline, draw several curved lines that follow the shape of the bulb. Web garlic plant drawing | garlic pencil sketch | sinoun drawinglearn how to draw garlic for beginners step by step easy. Keep in mind that garlic cloves are not all the same size, so try to vary the shapes and. At the bottom of the.

How to Draw a Garlic Garlic Drawing Drawing Garlic Easy by Nifty
Now we are drawing a head of garlic. Web for the filling, chapusot advises a blend of “fatty meats,” nutmeg, parmesan, egg, cream, parsley, garlic, salt and pepper. Mir nilophar k, tutorials point i. Web 🎨 get ready to unleash your artistic side and join us in this garlic drawing tutorial! Web in this drawing lesson, we’ll show how to.

How to draw a garlic step by stepeasy garlic drawing YouTube
Now we are drawing a head of garlic. Web make a stroke connecting two adjacent dots. Web in this drawing lesson, we’ll show how to draw a garlic plant total 8 phase here we create a garlic plant it will be easy tutorial. This is the start of our garlic clove baby Web garlic drawing printable pdf (see bottom of.

Garlic Drawing HelloArtsy
To begin drawing garlic, start by sketching a basic outline of the bulb and cloves using a light pencil. Focus on creating a circular shape for the bulb, and then add smaller circular shapes for each individual clove. The drawing will take 6 steps to complete as we continue to create each part moving closer to the completed drawing. Web.

How to draw a Garlic Easy Step by step drawing for kids YouTube
Try out different placements for the garlic or add in some herbs or a rustic background to enhance the. Sometimes you might have to fill in the space. Outline a clove of garli to its left, and another one to it right. Web how to draw a garlic step by step: Connect the sides of the garlic neck using a.
How to Draw Garlic Easy Drawing Tutorial For Kids
Start drawing the top of the garlic. 👇 don’t forget to check other herbs and spices 👇. Web make a stroke connecting two adjacent dots. Complete this head of garlic by drawing more cloves. Garlic drawing easy for beginners please like comment subscribe to my channel to see more interesting videos !
How to draw a garlic step by step Garlic drawing easy YouTube
Web a classic example of companion planting is the three sisters or corn, beans, and squash: Complete this head of garlic by drawing more cloves. Add some vertail curved line for the texture for the head of garli. Being able to draw food accurately and realistically can help you create more compelling and visually. In addition to its artistic benefits,.
How to Draw Garlic Easy Drawing Tutorial For Kids
Inside the bulb outline, draw several curved lines that follow the shape of the bulb. Add some vertail curved line for the texture for the head of garli. Connect the sides of the garlic neck using a curved line, and contour it using additional curved lines. Web detail the clove of garlic with a set of short curved lines. Web.
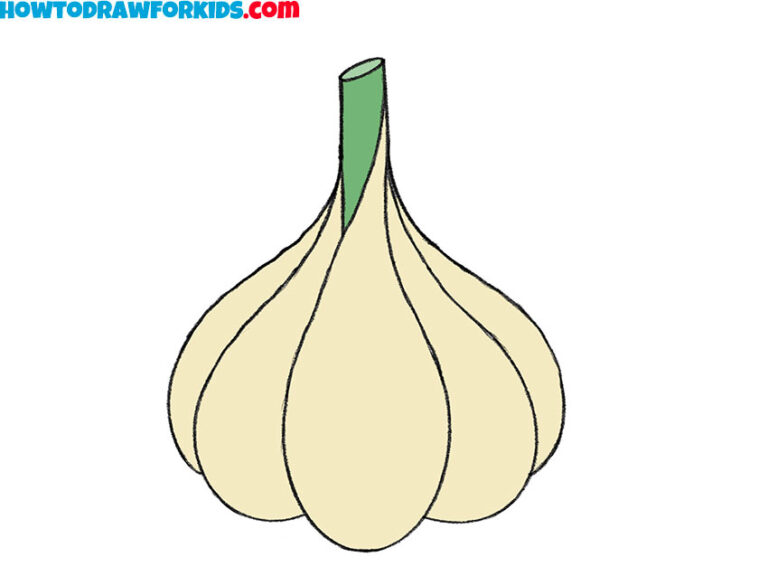
Now You Can Add Some Colors To Make Your Drawing More Realistic.
Depict an oval, which will be an auxiliary figure for drawing the garlic. So first, draw a literal oval. How to draw a garlic plant step by step for beginners Sketch several small lines at the bottom of the garlic bulb to represent the roots.
Inside The Bulb Outline, Draw Several Curved Lines That Follow The Shape Of The Bulb.
While they may be a little harder to see it will also make them much easier to erase. Add a short stem on the top. Connect the sides of the garlic neck using a curved line, and contour it using additional curved lines. Web take some time to closely observe garlic and try out different shading techniques to enhance your skills.
Web How To Draw A Garlic Step By Step:
Start with a basic outline. From the end of the first “clove”, draw a new line connecting to an adjacent dot and add arcs on both sides. Sometimes you might have to fill in the space. Web draw the roots:
Keep In Mind That Garlic Cloves Are Not All The Same Size, So Try To Vary The Shapes And.
Web in this drawing lesson, we’ll show how to draw a garlic plant total 8 phase here we create a garlic plant it will be easy tutorial. We’ve reached the end of this tutorial on how to draw a garlic. Draw the outline of the bottom of the garlic. Focus on creating a circular shape for the bulb, and then add smaller circular shapes for each individual clove.