How To Draw A Mushroom Step By Step
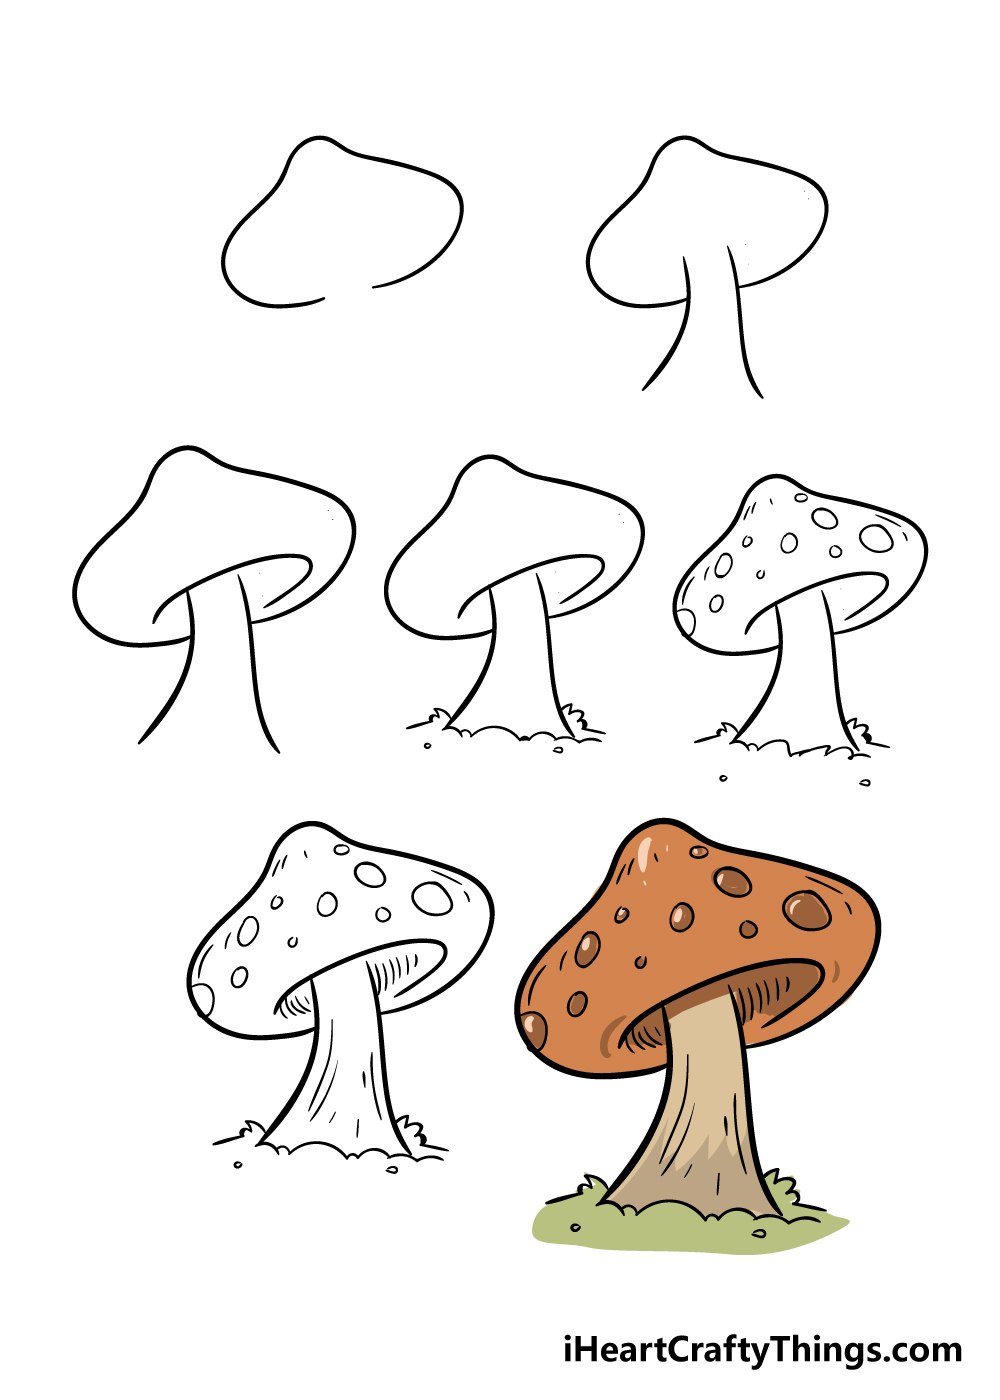
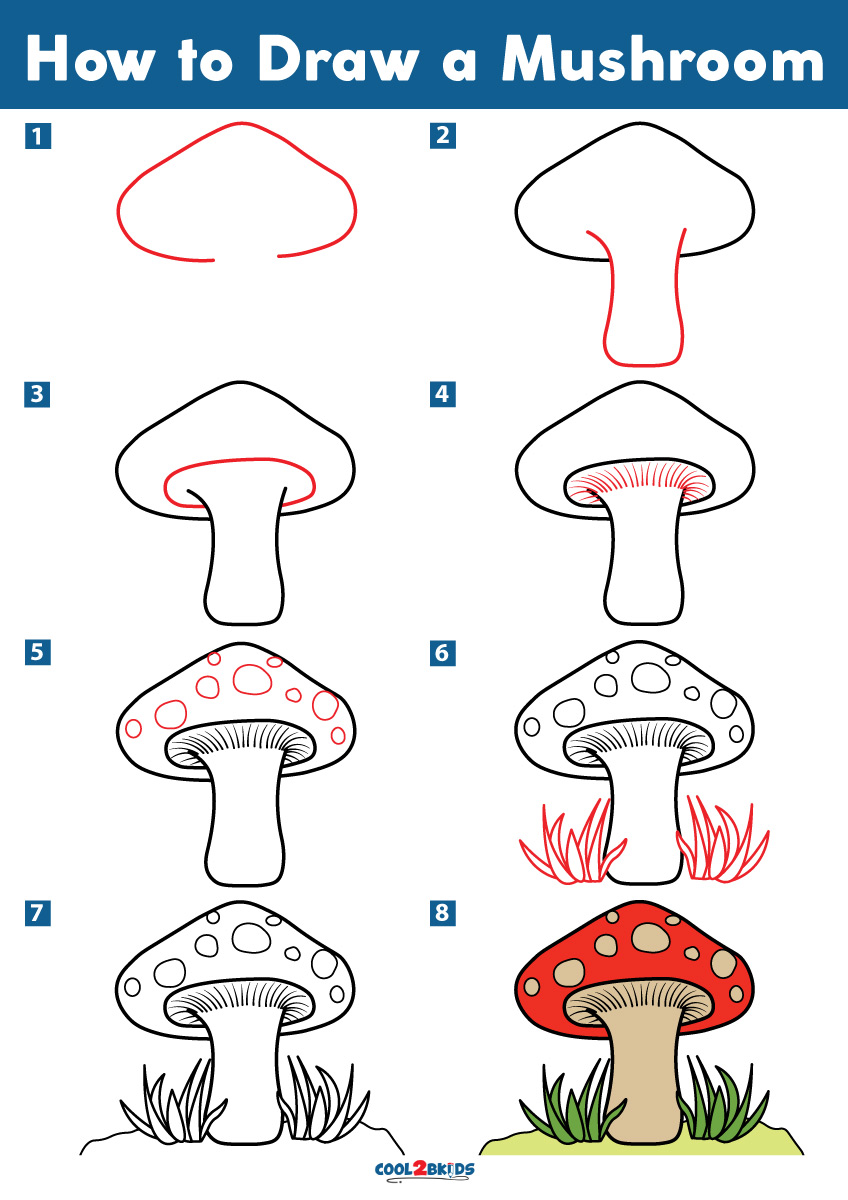
How To Draw A Mushroom Step By Step - To draw this shape you need to draw two sloping lines from the base of the mushroom cap. Draw the outline of the mushroom’s stem. To start, we need to choose where we want our first and largest mushroom to be. Set a timer for three or five minutes. Then, draw two curved lines downward from the cap to form the stem. Sketching the form of the mushroom. We will start on the interior of your mushroom in this step of our guide on how to draw a mushroom. Then add a line on each side of the grass for the ground. Start by outlining the grass blades. Making it precisely symmetrical is not important as slight irregularity gives it a more organic feel.
This will help with the 3d illusion you are trying to create. Draw a mushroom head shape. First, doodle the mushroom’s cap. Set a timer for three or five minutes. This separates the top of the cap from its underside, called the gills. Make sure you don’t press too hard on the paper when you draw your pencil lines so that you can correct your mistakes with an eraser as you go through the tutorial. To complete this step, connect the edges of the previously drawn line with another curved line. The form of the mushroom is quite similar to broccoli, where its stem gets slightly larger as it moves to the cap. In this case the “eye” level” will be slightly underneath the cap so it’s bottom will be visible. Then, use an orange crayon to fill in the ring of the mushroom.
Web method to learn how to draw a realistic mushroom step by step, and learn drawing techniques, with pencil, ink and water. Web observe the light source in your drawing and determine which areas will be in shadow. Hey there, whether you’re just starting out or already really good at drawing, you’re gonna find some super cool stuff here! In this video, we will show you how to draw a mushroom easy step by step with easy drawing tutorial step by. First, doodle the mushroom’s cap. Design and draw a character. Once you have finished, lighten your paint up towards the top area of the grass. Then, draw two curved lines downward from the cap to form the stem. Start by drawing three lines for the fungus locations. How to draw a mushroom.
How To Draw A Mushroom 2 Easy Ways (StepByStep Drawing) Let's Draw
Web observe the light source in your drawing and determine which areas will be in shadow. Beneath the cap of the mushroom is the toadstools curtain. Draw an oval shape to create the base of your first mushroom using a light pencil stroke. Web hi everyone, !welcome to moshley drawing channel. To do this, draw a curved line over the.
Mushroom Drawing How To Draw A Mushroom Step By Step
Web instructions for your mushroom drawing step by step. Web observe the light source in your drawing and determine which areas will be in shadow. Sketch until you run out of time. Draw a skirt on the leg of the fungus and lattice patterns on the cap from below. First, doodle the mushroom’s cap.

How to Draw a Mushroom HelloArtsy
Draw two large, rounded shapes at the top of your paper to form the mushroom’s cap. Experiment with the angle of your lines to create a sense of form and texture on your mushroom. These will help you draw the inner and outer parts of the mushroom body and determine the inclination and angle of each one of them. Add.
How to Draw a Mushroom Step by Step Drawing Tutorial For Kids
Experiment with the angle of your lines to create a sense of form and texture on your mushroom. You’ll follow these simple steps:. The form of the mushroom is quite similar to broccoli, where its stem gets slightly larger as it moves to the cap. Draw the grass and the ground. The shape should not be perfectly symmetrical, so do.

How To Draw Mushroom Easy Step By Step Drawing Tutorial
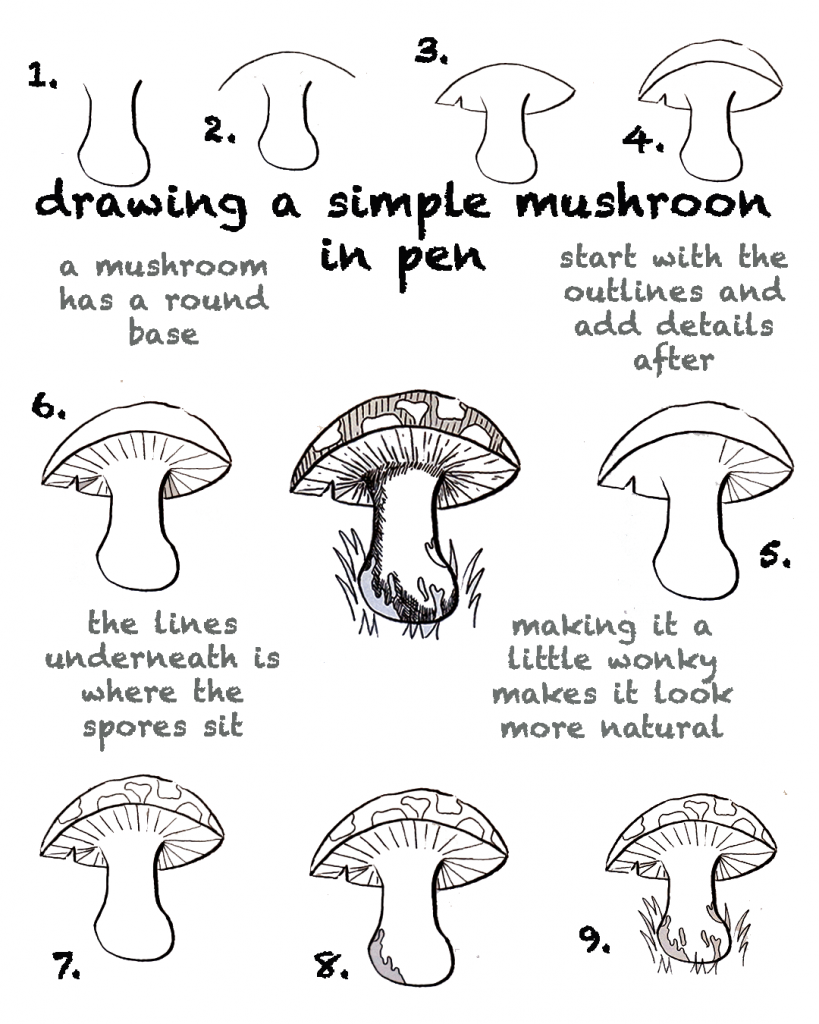
Draw lines upward from the edges of the curves to mimic the folds of a curtain. Set a timer for three or five minutes. Make sure you don’t press too hard on the paper when you draw your pencil lines so that you can correct your mistakes with an eraser as you go through the tutorial. Learn a simple method.
6 easy tutorials how to draw a mushroom How To Draw Tutorials
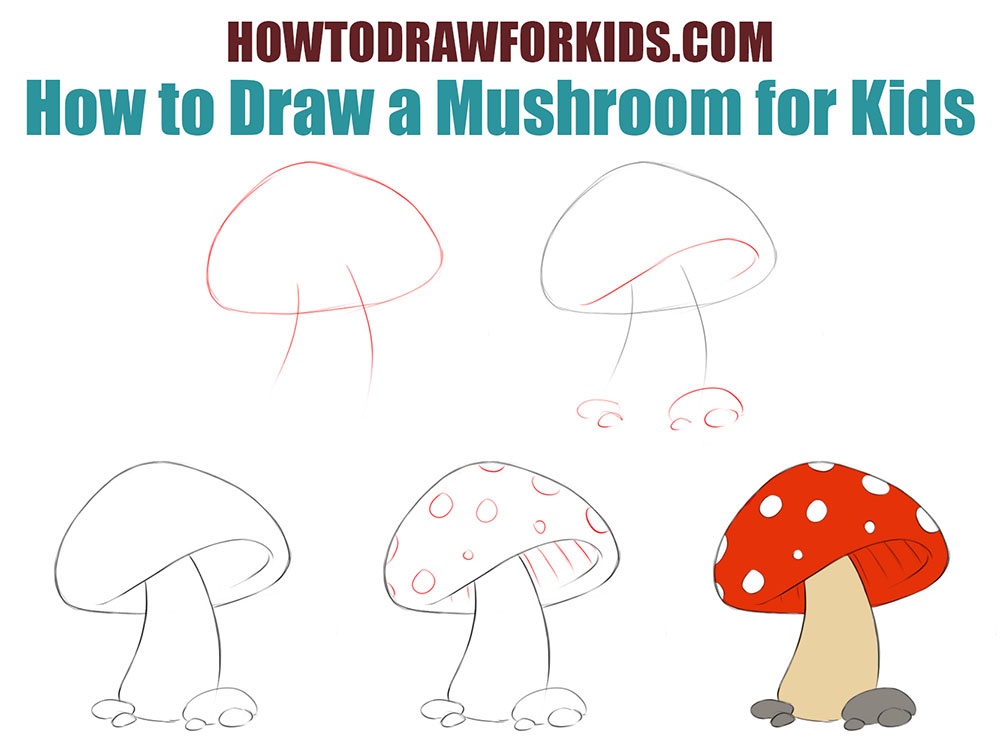
Our how to draw book is here! Design and draw a character. Our printable drawing guide (optional) pencil or black marker; We want to start with a simple sketch of the mushroom, we can do this by sketching the outline of the mushroom at first. Then, draw two curved lines downward from the cap to form the stem.

Easy How to Draw a Mushroom Tutorial and Mushroom Coloring Page
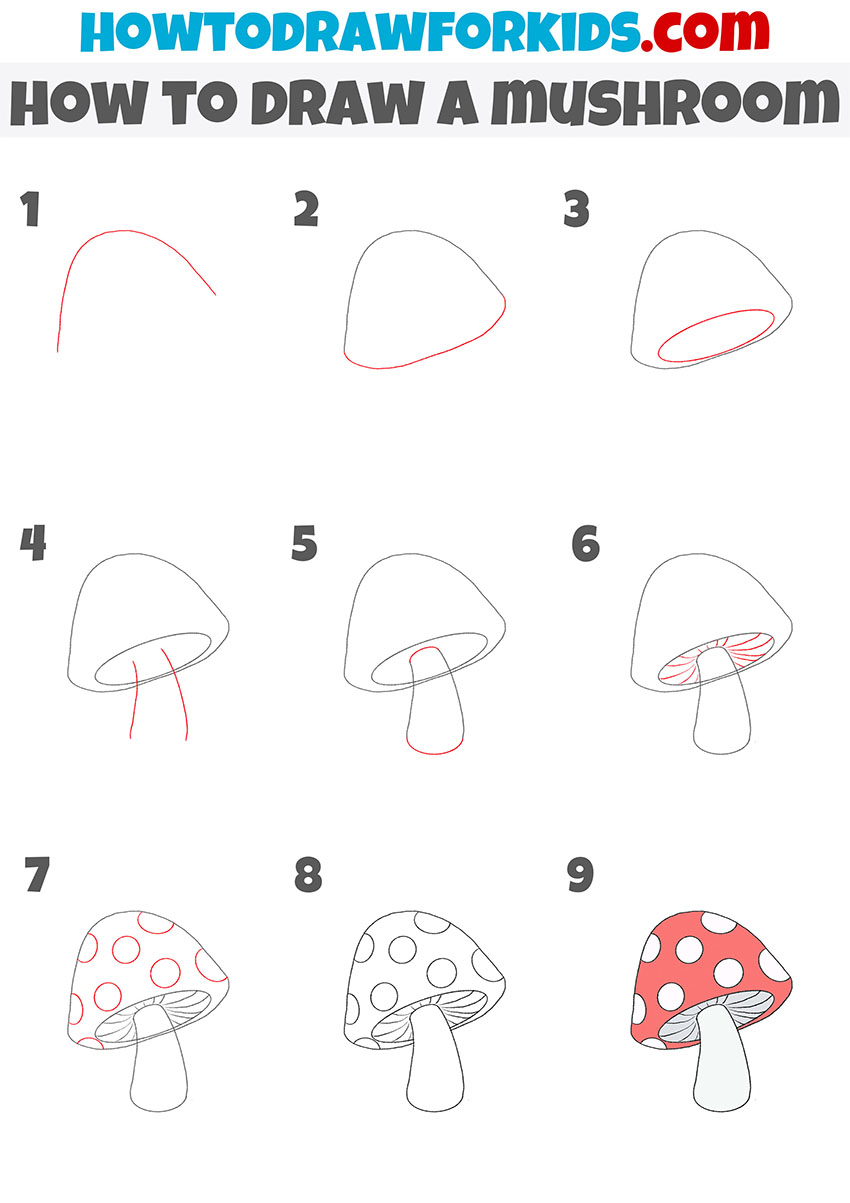
Draw another curved line across the mushroom cap. To do this, draw a curved line over the top of the stalk that is inside the cap of your mushroom. Drawing the vent lines (gills) under the mushroom cap will be easy. The shape should not be perfectly symmetrical, so do not worry if yours. We will start on the interior.
How to Draw a Mushroom
This separates the top of the cap from its underside, called the gills. Beneath the cap of the mushroom is the toadstools curtain. Let’s complete the mushroom drawing by adding some color. To do this, draw a curved line over the top of the stalk that is inside the cap of your mushroom. Draw the curly mushroom curtain.

How to Draw a Mushroom HelloArtsy
A digital twin, by contrast, may have one model for each individual product, which is continually updated using data collected during the product’s life cycle. Beneath the cap, draw vertical lines to represent the stem of the mushroom. Drawing the vent lines (gills) under the mushroom cap will be easy. Draw three ellipses, one per mushroom. These will help you.
How to draw a mushroom for kids
Web how to draw flower step by step. Draw an oval shape to create the base of your first mushroom using a light pencil stroke. Draw the grass and the ground. Draw the outline of the mushroom’s stem. Add the bottom part of the mushroom cap.
Start By Drawing Three Lines For The Fungus Locations.
Add the bottom part of the mushroom cap. Connect the lines at the top of the stem using a short, curved line. Web a conventional plm system uses one digital model to represent each variant of a product. Design and draw a character.
Draw The Curly Mushroom Curtain.
Web how to draw flower step by step. Draw the grass and the ground. Unlock ad free and printable drawing and coloring tutorials. These will help you draw the inner and outer parts of the mushroom body and determine the inclination and angle of each one of them.
Get Some Paper And Something To Sketch With.
Draw the top of the mushroom cap. Experiment with the angle of your lines to create a sense of form and texture on your mushroom. Draw another curved line across the mushroom cap. Our final image will have four magic mushrooms.
Set A Timer For Three Or Five Minutes.
Viewed at this angle the bottom will appear as a very narrower oval. Three of the spots are complete circles and those are the spots on the bottom row. The form of the mushroom is quite similar to broccoli, where its stem gets slightly larger as it moves to the cap. Let’s complete the mushroom drawing by adding some color.