How To Draw A Polar Bear Step By Step
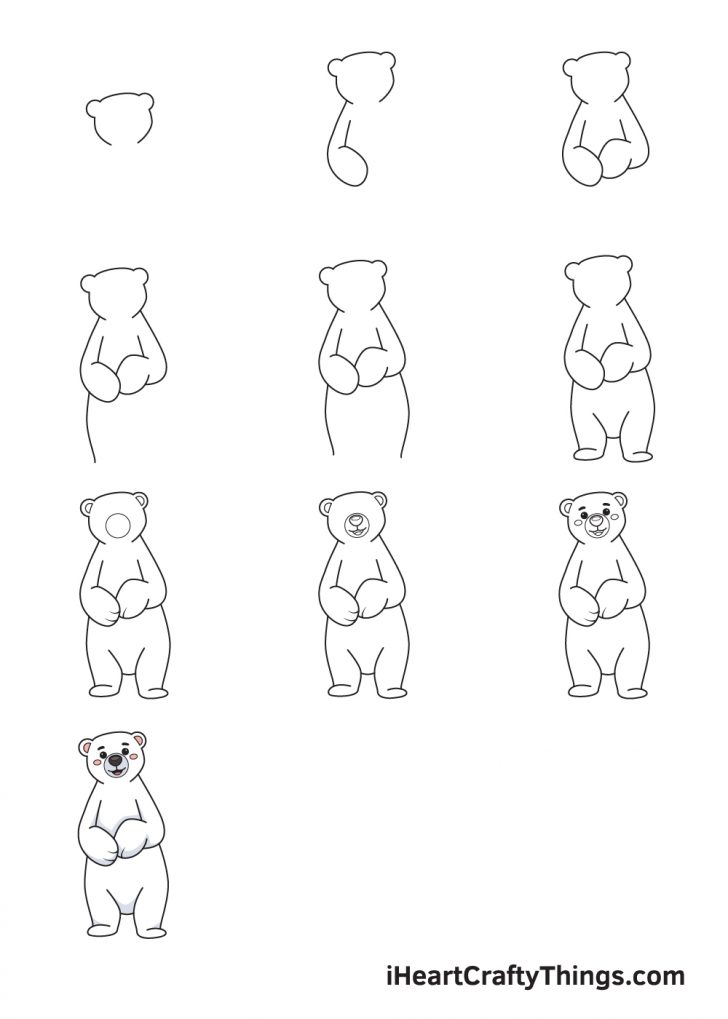
How To Draw A Polar Bear Step By Step - Well done, now that you’ve completed how to draw a polar bear, considering adding some shading or coloring to make your polar bear look realistic! This will help with the placement of the eyes and nose. The rock salt acts as a resist, absorbing the paint to leave lighter spots that are surrounded by darker pigment. You can create the head of the polar bear by simply drawing an irregular circle shape with two semicircles on each side above the head forming the ears. Define the shapes of the rest of the legs. Finish the bottom of the muzzle. Start by lightly sketching the basic shapes that make up the polar bear’s body. For our polar bear drawing we need to start with a circle for the head. Afterward, we're going to start building the body of the polar bear using two different sized circles. Start the top of the head.
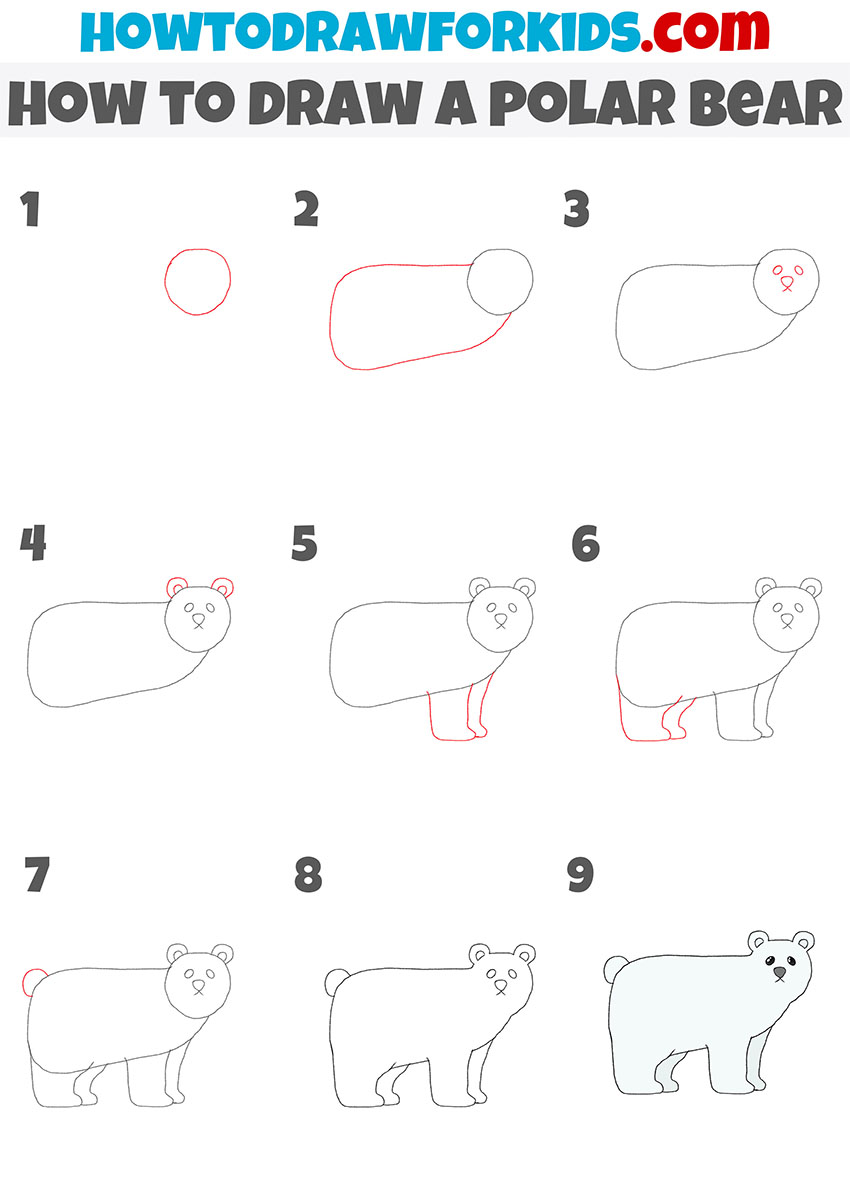
Web to complete this step, you need to draw one long, curved line. Begin with an oval shape for the head, followed by a large oval for the body. Web the fascinating polar bear is the subject of our drawing in this article. For our polar bear drawing we need to start with a circle for the head. Work on the figure by adding a hip, eyes, nose and ears. The first will be the chest, so place it near the head. Draw in the polar bear claws and details in the face. Cute polar bear drawing reference guide: You can create the head of the polar bear by simply drawing an irregular circle shape with two semicircles on each side above the head forming the ears. Use the picture below as a guide to shade or color your bear!
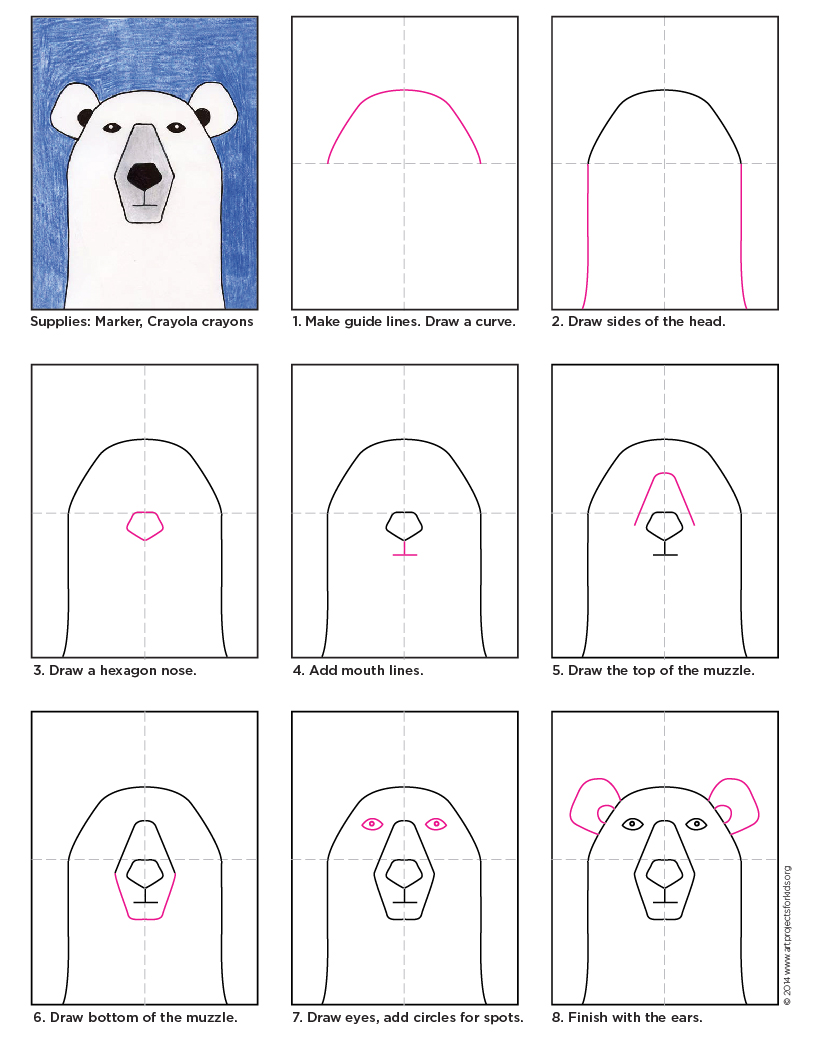
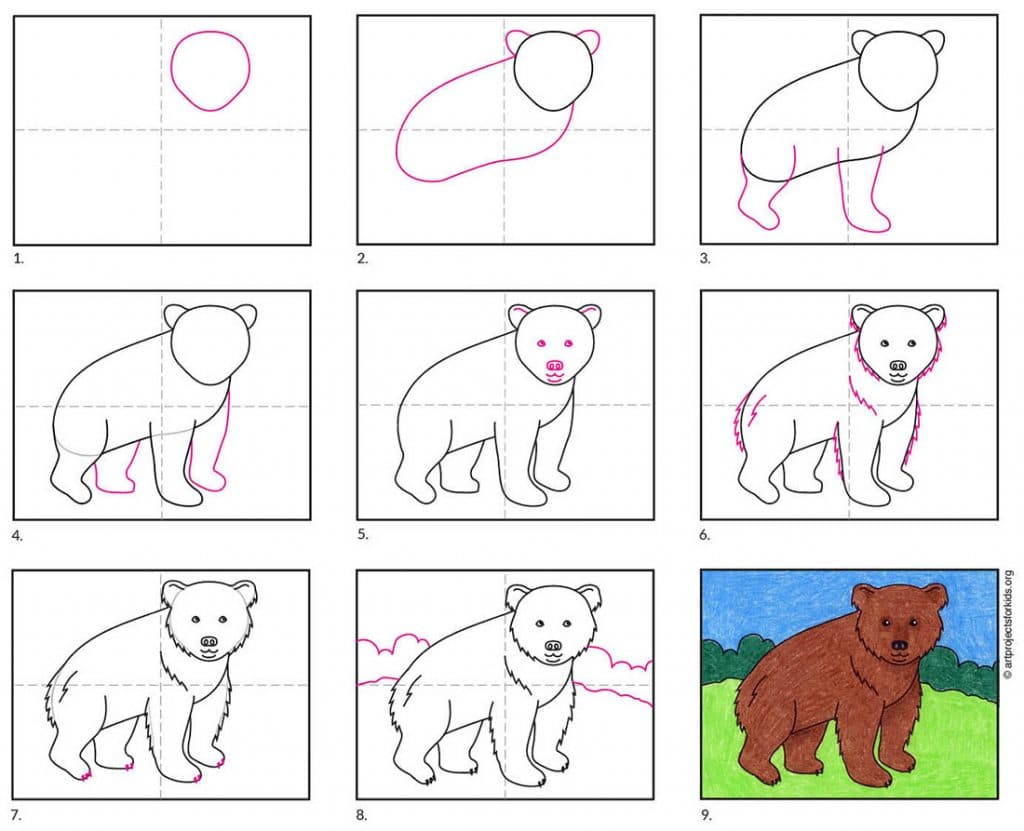
Afterward, we're going to start building the body of the polar bear using two different sized circles. Draw two symmetrical ears on top of the bear’s head using arcs of different sizes. This final step adds small details to the polar bear and provides a scenic background for the image. Draw a square which will act as the frame of the polar bear portrait. Start the top of the head. Begin by drawing an outline of the polar bear’s head on the upper portion of your paper. Sketch the ears, eyes and nose. Draw more details and some snow. Pay attention to the different sizes and shapes contained in the example drawing of the polar bear. Follow these images and you'll be able to draw a polar bear like a pro!
How To Draw A Polar Bear Head Images and Photos finder
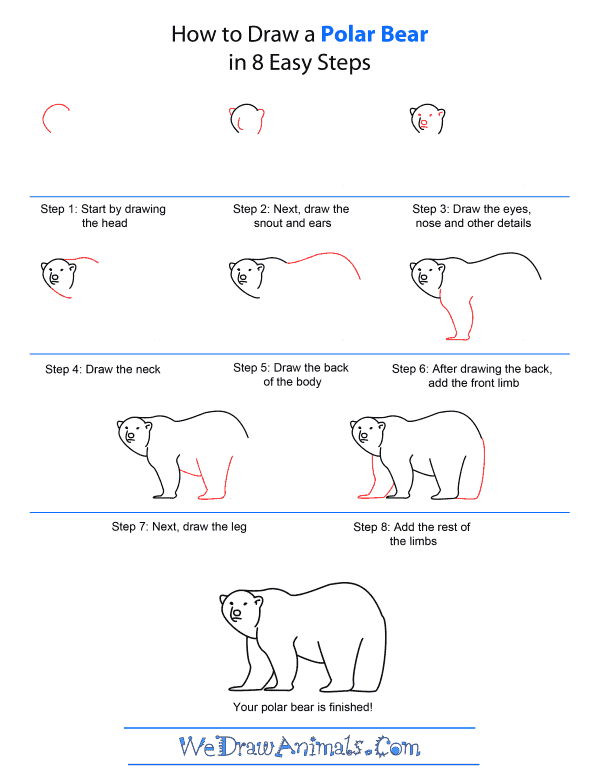
Web learn how to draw a polar bear step by stepurgent request? The massive, white creature native of the arctic region is a great swimmer and feeds mostly on seals. Home » how to draw » 5 steps to draw a polar bear. Sketch the ears, eyes and nose. It's okay if the circles aren't perfect.
How To Draw A Polar Bear Easy Drawing Tutorial For Kids
This is such a fun art process to combine with our polar bear drawing and is an easy way for the children to create a lovely wintery backdrop for their polar bears. The rock salt acts as a resist, absorbing the paint to leave lighter spots that are surrounded by darker pigment. Begin with an oval shape for the head,.
Polar Bear Art Projects for Kids
Outline the snout, ears and tail of the polar bear. The second will encompass the hindlegs of. Start by lightly sketching the basic shapes that make up the polar bear’s body. This will help with the placement of the eyes and nose. Afterward, we're going to start building the body of the polar bear using two different sized circles.

How to Draw Polar Bear HelloArtsy
The massive, white creature native of the arctic region is a great swimmer and feeds mostly on seals. Start the top of the head. It's okay if the circles aren't perfect. Let’s get into the step by step of sketching this marine mammal. Web how to draw a bear #bbeardrawing for kidsteddy bear drawing easyteddy bear drawing for kidshow to.
How to Draw a Polar Bear (Step by Step Pictures)
This will help with the placement of the eyes and nose. Web the fascinating polar bear is the subject of our drawing in this article. The second will encompass the hindlegs of. The rock salt acts as a resist, absorbing the paint to leave lighter spots that are surrounded by darker pigment. Outline the snout, ears and tail of the.
Polar Bear Drawing — How To Draw A Polar Bear Step By Step
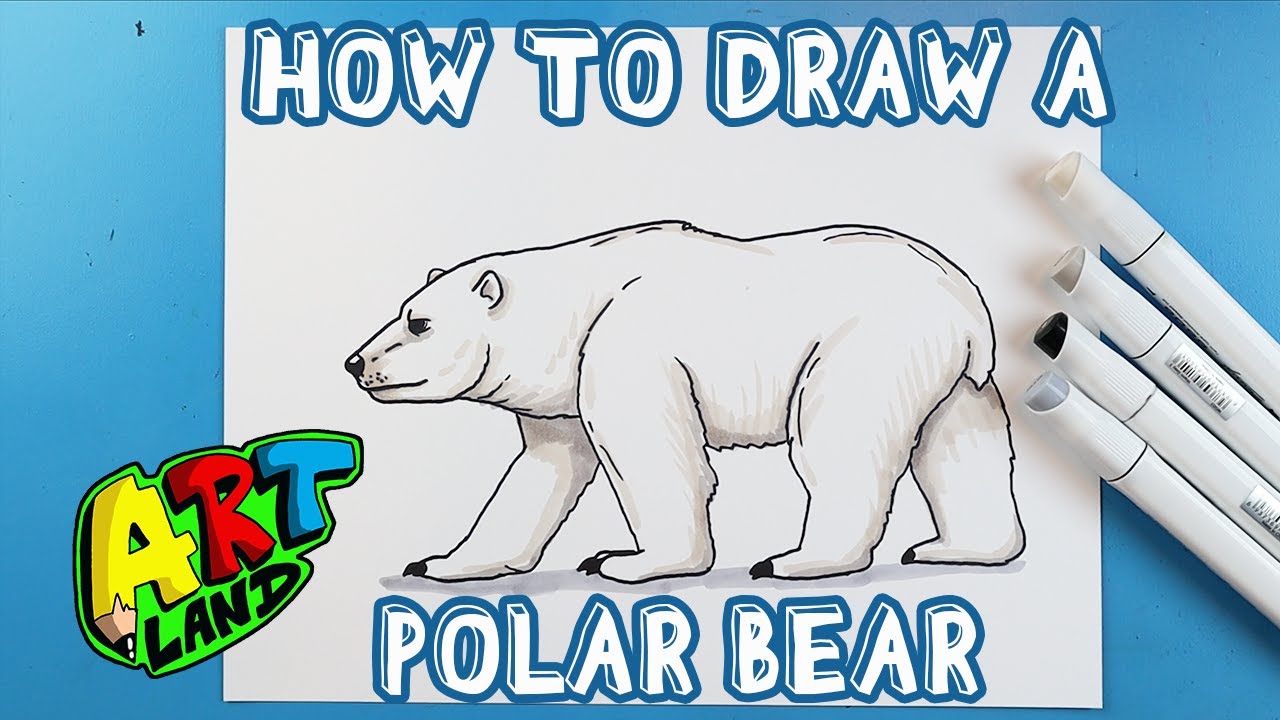
Follow these images and you'll be able to draw a polar bear like a pro! Web learn how to draw a polar bear step by stepurgent request? The easiest way to draw anything is by breaking it down into basic shapes. Web learn how to draw a realistic polar bear! Web how to draw a polar bear portrait.

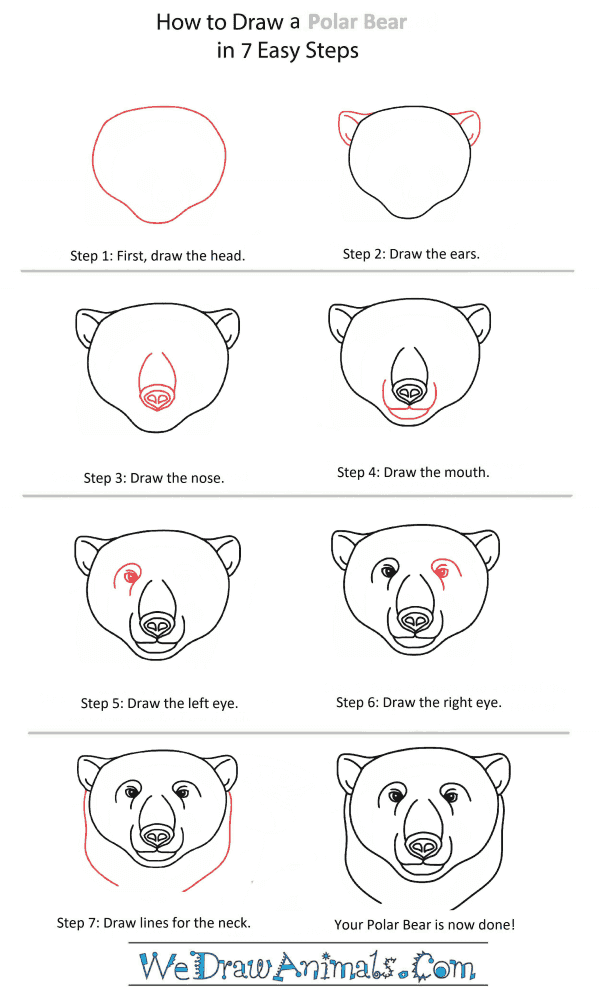
How To Draw A Polar Bear Face Step By Step at Drawing Tutorials
The first will be the chest, so place it near the head. Draw the sides of the head. Web in this beginner’s lesson, we will learn how to draw polar bear with your drawing materials. Outline the snout, ears and tail of the polar bear. Work on the figure by adding a hip, eyes, nose and ears.
How To Draw A Polar Bear
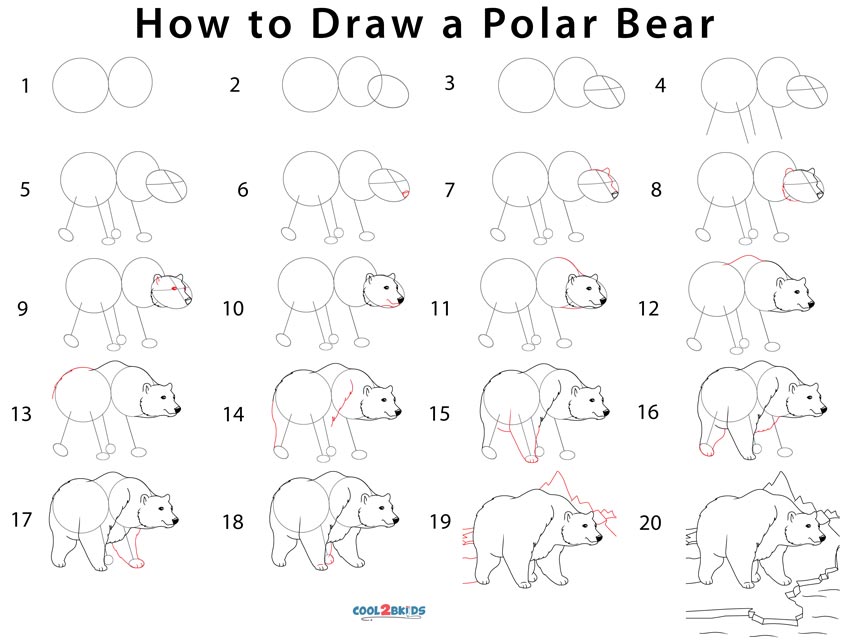
The circle on the left should be a bit smaller and thinner than the one on the right. Well done, now that you’ve completed how to draw a polar bear, considering adding some shading or coloring to make your polar bear look realistic! Web how to draw a polar bear easy and step by step. Draw an even smaller circle.
How to Draw a POLAR BEAR!!!
Web let's draw cute polar bears with this art lesson! It's okay if the circles aren't perfect. Web finish the polar bear drawing. This final step adds small details to the polar bear and provides a scenic background for the image. Define the shapes of the rest of the legs.
How to Draw a Bear · Art Projects for Kids
Start the top of the muzzle. Draw an even smaller circle to the left as a guide for the polar bear's head. The second will encompass the hindlegs of. The easiest way to draw anything is by breaking it down into basic shapes. To ensure that the polar bear will be drawn in the center, you can create reference lines.
Web Let's Draw Cute Polar Bears With This Art Lesson!
Follow these images and you'll be able to draw a polar bear like a pro! Let us draw a polar bear in 5 steps. The first will be the chest, so place it near the head. The easiest way to draw anything is by breaking it down into basic shapes.
Well Done, Now That You’ve Completed How To Draw A Polar Bear, Considering Adding Some Shading Or Coloring To Make Your Polar Bear Look Realistic!
Web the fascinating polar bear is the subject of our drawing in this article. Pay attention to the different sizes and shapes contained in the example drawing of the polar bear. Inside the previously drawn outline of the head, add two ovals as well as a few curved lines. Home » how to draw » 5 steps to draw a polar bear.
The Rock Salt Acts As A Resist, Absorbing The Paint To Leave Lighter Spots That Are Surrounded By Darker Pigment.
Web finish the polar bear drawing. Web to complete this step, you need to draw one long, curved line. Web thanks for watching!#drawing #art #simpledrawing #kids Outline the snout, ears and tail of the polar bear.
Web In This Beginner’s Lesson, We Will Learn How To Draw Polar Bear With Your Drawing Materials.
Sketch out the ears of the bear. Begin by drawing an outline of the polar bear’s head on the upper portion of your paper. Draw a circle and an oval in contact. Sprinkle the salt and leave the background to dry.