How To Draw A Pumpkin Stem
How To Draw A Pumpkin Stem - Add some curved lines all. Start on top of the previous ribs and draw a curve towards your stem (see example). Draw a curved line on the left side of the pumpkin shape. Step by step pumpkin drawing instructions step 1. Leave a little opening at the top for the stem. Web about press copyright contact us creators advertise developers terms privacy policy & safety how youtube works test new features nfl sunday ticket press copyright. Next, begin to draw lines on the stem of the pumpkin. In this case the pumpkin itself and the stem. Draw a circular shape for your pumpkin and add the stem. Begin by drawing a vertical oval on your page.
Web sprinkle green glitter on the pumpkin stem and shade the rest of the pumpkin in hues of orange and yellow. Web to avoid unintentional smudging, be sure to keep a scrap of paper under your drawing hand. Make several different shapes of pumpkins and color them in rainbow colors. Using orange a003, color over the inner areas of the eye, nose and mouth. Web to do this, begin by drawing a curved line towards the top of your pumpkin. Leave a little opening at the top for the stem. Start coloring from the edge of the sketch and fill in. Draw veins in each of the leaves by drawing gently curving lines. Coming out of the top of the pumpkin add the stem. Draw the stem of the pumpkin.
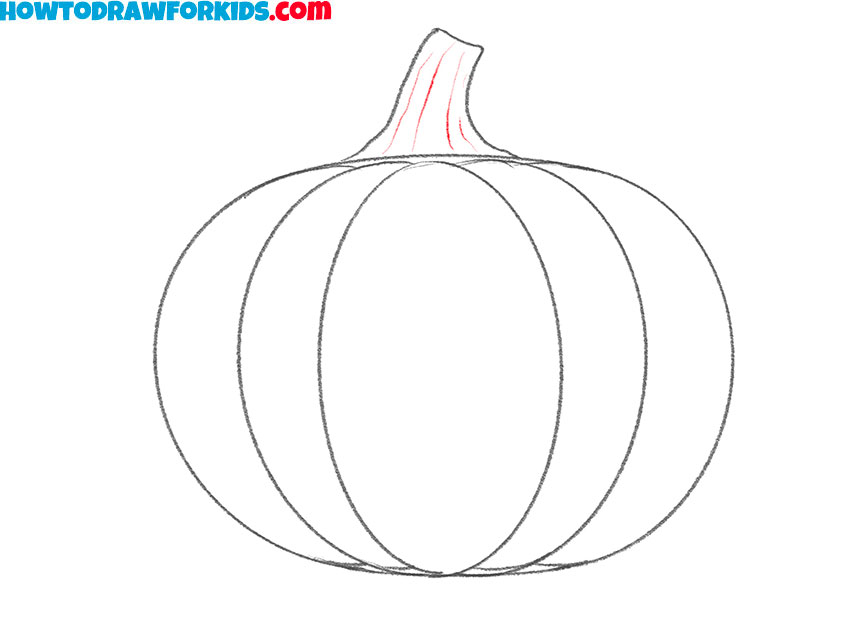
But instead of a full circle, draw a large semicircle for the pumpkin itself. Use a brown pastel to draw a thinner outline around each oval part. Smudge the leaf and stem to smooth out the color. There are all sorts of stems you could draw. Leave a little opening at the top for the stem. The stem of the pumpkin looks a lot like an open triangle with a curved top, closed out on the bottom by a 7 edged star. At this stage of your drawing you can make your stem just a rough sketch. Next, use a brown crayon to fill in the visible edges of the pumpkin’s skin on the carvings. Some oare sqyuatty, some are tall some are lopsided and some are very round. Then, texture the stem with curved lines.

how to draw a pumpkin patch Jame Mckenna
Use raw umber a132 to represent the shadowed areas on the pumpkin stem and add the shadow created by the pumpkin. Stick green pipe cleaners as stems on your drawing. Begin by drawing a vertical oval on your page. The design and proportion of each part will be highlighted in each step of the lesson. This shape drawing can be.

How to draw a pumpkin Step by step Drawing tutorials
The stem of the pumpkin looks a lot like an open triangle with a curved top, closed out on the bottom by a 7 edged star. The design and proportion of each part will be highlighted in each step of the lesson. Go over the contour and lines of the pumpkin sections with this color. Kristi noem (r) is drawing.

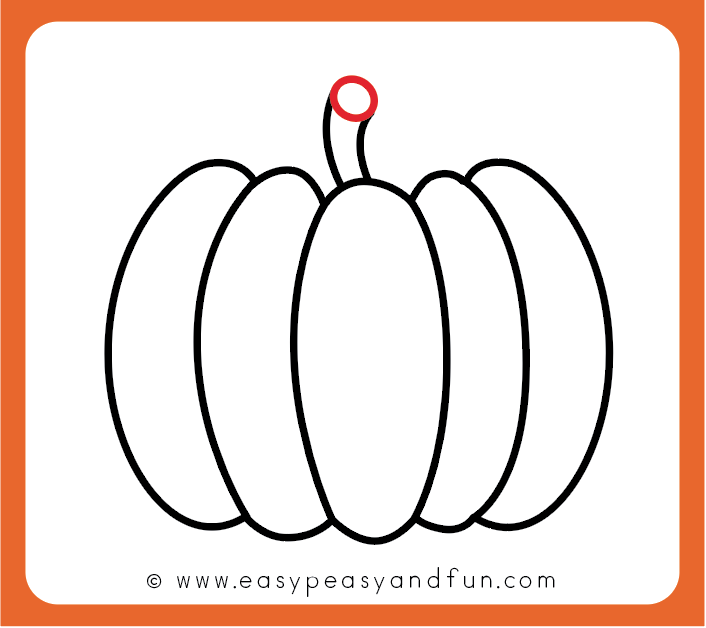
How to Draw a Pumpkin Easy Peasy and Fun
Use a curved line to enclose the end of the stem. Around the stem, draw short curves to show other ridges. Begin the pumpkin drawing by first getting it’s major shapes. Start on top of the previous ribs and draw a curve towards your stem (see example). After you've gone over the basic linework of the pumpkin, consider adding texture.

How to Draw a Pumpkin Realistically with Easy Steps Let's Draw Today
Start small at the top and make it bigger as you go down. In this case the pumpkin itself and the stem. Now, color the stem with a green crayon. Sketch a wide oval with some indentations at the bottom. Go over the contour and lines of the pumpkin sections with this color.
How to Draw a Pumpkin Easy Peasy and Fun
The design and proportion of each part will be highlighted in each step of the lesson. Use a brown pastel to draw a thinner outline around each oval part. Web to draw the ridges in the pumpkin, start with a long, thin oval in the center. Draw scary pumpkin faces, like a jack o lantern expression, for a spooky vibe..
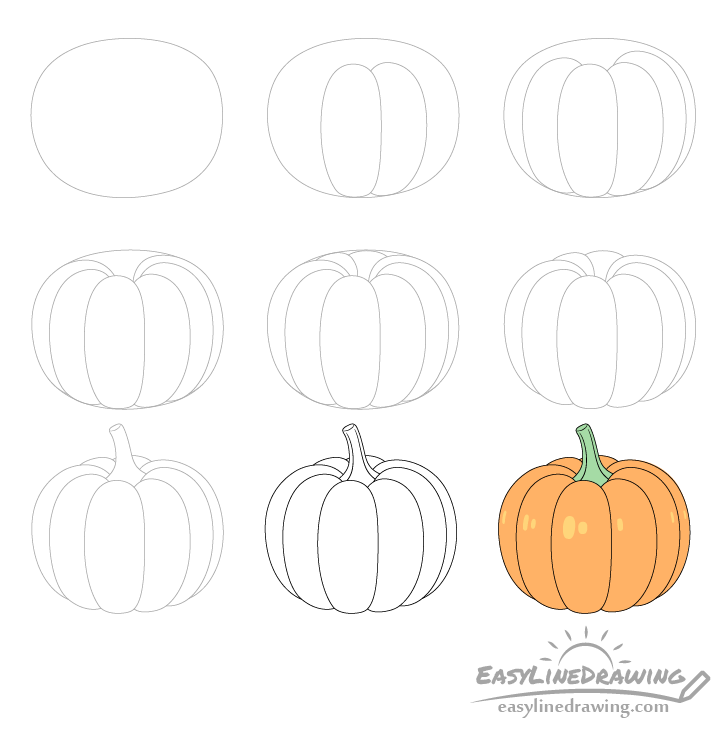
How to Draw a Pumpkin Step by Step EasyLineDrawing
Use a curved line to enclose the end of the stem. There is this little depression at the tip of the stem, so we need to draw some bumpy lines to indicate that. Then with with pumpkin saw cut the lid out. Finally, let’s light our halloween pumpkin by filling the carved out face. Use raw umber a132 to represent.

How To Draw a Pumpkin Step by Step Fall Drawings, Halloween Drawings
Web repeat until all the pumpkin sections are blended. The strongest light source is coming from. Web sprinkle green glitter on the pumpkin stem and shade the rest of the pumpkin in hues of orange and yellow. Web to draw the ridges in the pumpkin, start with a long, thin oval in the center. Leave a little opening at the.

EASY How to Draw a Cute Pumpkin Tutorial for Halloween/Fall
Web to do this, begin by drawing a curved line towards the top of your pumpkin. Now, color the stem with a green crayon. Web and so we begin: Web repeat until all the pumpkin sections are blended. Use raw umber a132 to represent the shadowed areas on the pumpkin stem and add the shadow created by the pumpkin.
How to Draw a Pumpkin Easy Drawing Tutorial For Kids
Web pumpkin drawing step 1. Draw lines close together that follow the curvature of the stem. Draw the stem right over top of the rest of the pumpkin and then erase the lines of the ribs that are now overlapped by it. Web draw the pumpkin’s stem. Start on top of the previous ribs and draw a curve towards your.
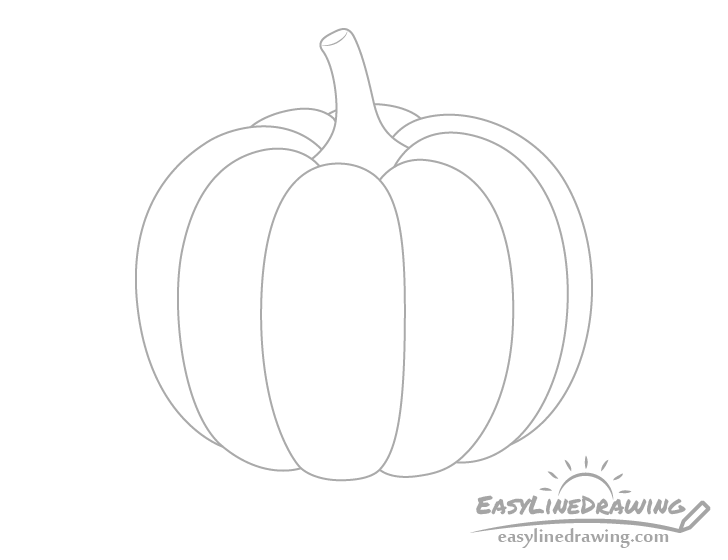
How to Draw a Pumpkin Step by Step EasyLineDrawing
Start by drawing the overall shape of your pumpkin with a two curved lines. Let’s draw the outline of the pumpkin. Go over the contour and lines of the pumpkin sections with this color. Take notice that the blue outlines are used to indicate the newest components being drawn in each in each of the steps. An easy way to.
Draw The Stem Of The Pumpkin.
Gently smudge the brown outlines so they blend with the orange. Take notice that the blue outlines are used to indicate the newest components being drawn in each in each of the steps. Interrupt the lines where they meet the leaf. Start by using an orange crayon to color the pumpkin’s skin.
At This Stage Of Your Drawing You Can Make Your Stem Just A Rough Sketch.
Web repeat until all the pumpkin sections are blended. Begin the pumpkin drawing by first getting it’s major shapes. Finally, add the last set of ribs in the back. Around the stem, draw short curves to show other ridges.
Start Small At The Top And Make It Bigger As You Go Down.
Using orange a003, color over the inner areas of the eye, nose and mouth. Coming out of the top of the pumpkin add the stem. Fill in the leaf and stem shapes with a green pastel. The stem of the pumpkin looks a lot like an open triangle with a curved top, closed out on the bottom by a 7 edged star.
Stick Green Pipe Cleaners As Stems On Your Drawing.
Web in today’s tutorial, we will discover how to draw a pumpkin on paper. Start coloring from the edge of the sketch and fill in. Add some curved lines all. Leave a little opening at the top for the stem.