How To Draw Easy Curly Hair
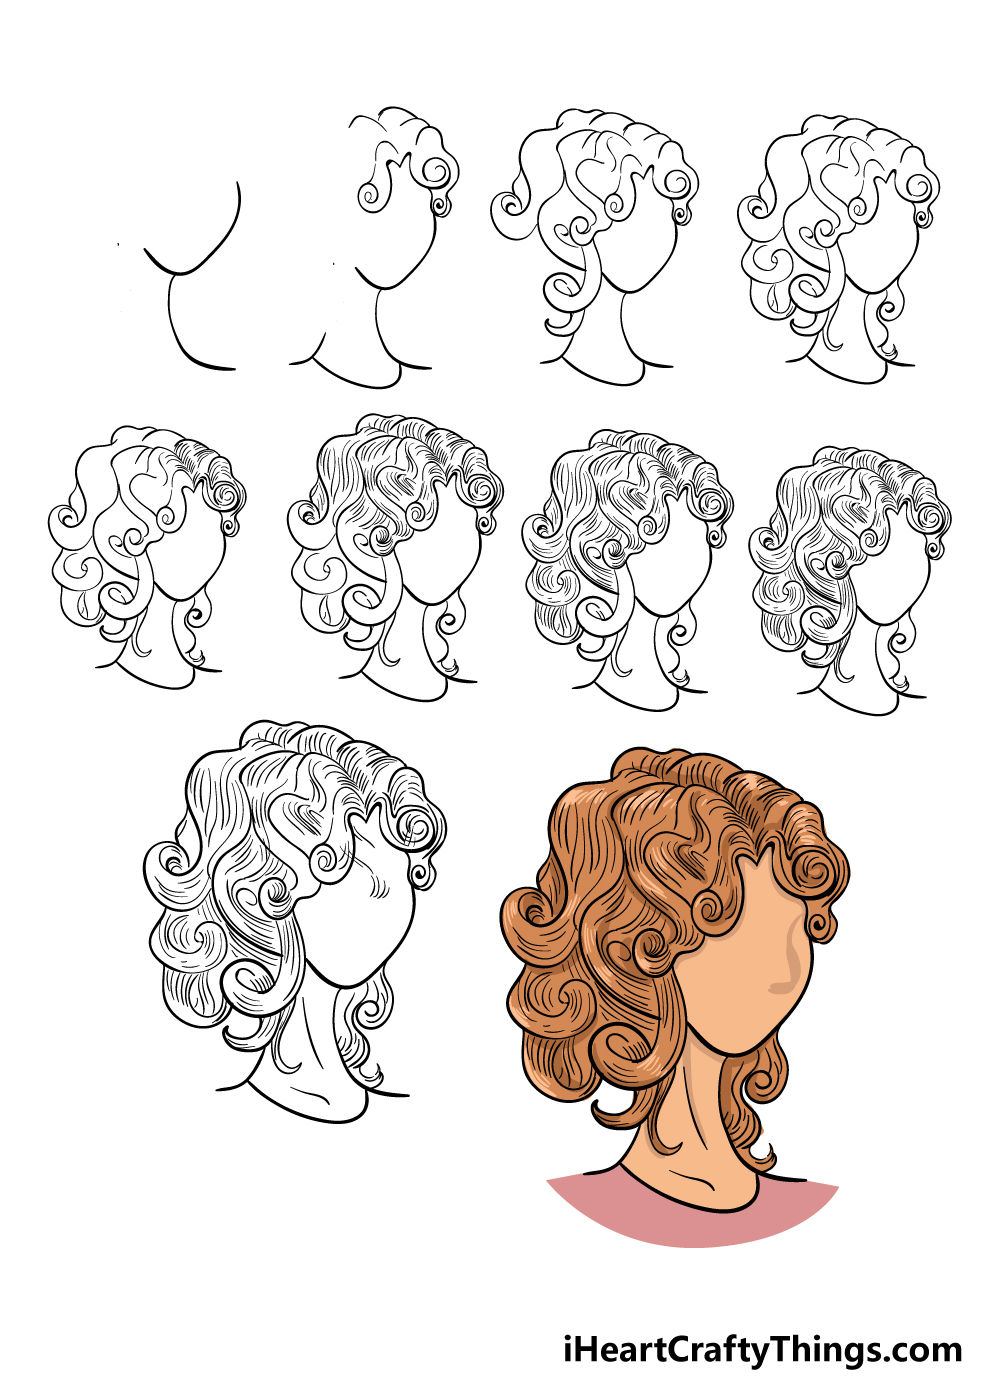
How To Draw Easy Curly Hair - Web get the free hair workbook to practice drawing lifelike hair with confidence: The next step when drawing curly hair is to draw a straight horizontal line to mark out where the upper part of the hair/head will come up to near the top of the paper. Visualize the type of hairstyle you like. Web initiate your drawing by sketching the head, determining where the hair will be, and finding the center point to guide the hair growth. Remove highlights gradually with a kneaded eraser. Choose which side you want to be in the front and which you will like in the shadow areas. Web start at the front, where the hair is shorter. Onto the head add the hairline. Here, the hair is more dense and light doesn’t hit this part. Once you decide, delete the extra lines.
Establish the hair’s volume using basic shapes, keeping in mind the irregularities due to curls, and ensure these shapes roughly adhere to the head’s contour. Web crown braid bun. Draw an outline of the head and shoulders. Use several short, curved strands to give it a bit more volume but keep it close to the head. Click the link below the picture to access the full tutorial. The small volume it can have is because of bouncing with the ears. Mine is directly in front of the hair. Find out where the light source is. For instance, at the hair parting (1). There are three types of curls but the theory is similar for each.
Establish the hair’s volume using basic shapes, keeping in mind the irregularities due to curls, and ensure these shapes roughly adhere to the head’s contour. Once you decide, delete the extra lines. Here, the hair is more dense and light doesn’t hit this part. @michair_company_vn see more updated hair ideas for your new look!!!👌🏽. Use scribbly lines to form the outline for the coily hairstyle. Continue to add the tight curls around the scalp to form the hair’s outline: Rename this layer “sketch” to keep things organised. Construct the shape of the head and position the ear in the correct place. The outline for the coily hair is ready! This was definitely one of my most requested videos so i hope it might help out at leas.
How to Draw Curly Hair in 3 Steps Step by Step Tutorial for Beginners
When you draw the hair that curls over the front a second time, choose an angle that is comparable to the angle you used the first time so that the curls are uniformly spaced. Onto the head add the hairline. Draw an outline of the hair using curly lines. Web i have launched my first 'beginner to advanced level’ of.

How to Draw Curly Hair Drawing Male Hair, Guy Drawing, Portrait Drawing
Rename this layer “sketch” to keep things organised. From there, it becomes easier to see the direction that each section will take (2). Web whether you have natural curls lacking definition or straight hair seeking extra oomph, there are options to get your max styling waves and curls sans scorching heat (and the resulting damage. When you draw the hair.

How To Draw A Girl With Curly Hair Step By Step
From the opposite side, draw a short curved line, nearly enclosing an oval to form the ear. So, on a new layer, i’m going to go in with a medium purple and draw shadows gently under the head. @michair_company_vn see more updated hair ideas for your new look!!!👌🏽. The outline for the coily hair is ready! Hair is affected by.
Curly Hair Drawing How To Draw Curly Hair Step By Step
Draw an outline of the hair using curly lines. Find out where the light source is. Extend a long, curved line downward from one side of the circle. Once you decide, delete the extra lines. Gain full access to my exclusive drawing tutorials and more!medium:
![How to Draw Curly Hair Realistic with Pencil [ Step by Step Tutorial ]](https://drawanart.com/wp-content/uploads/2021/07/image-5.jpeg)
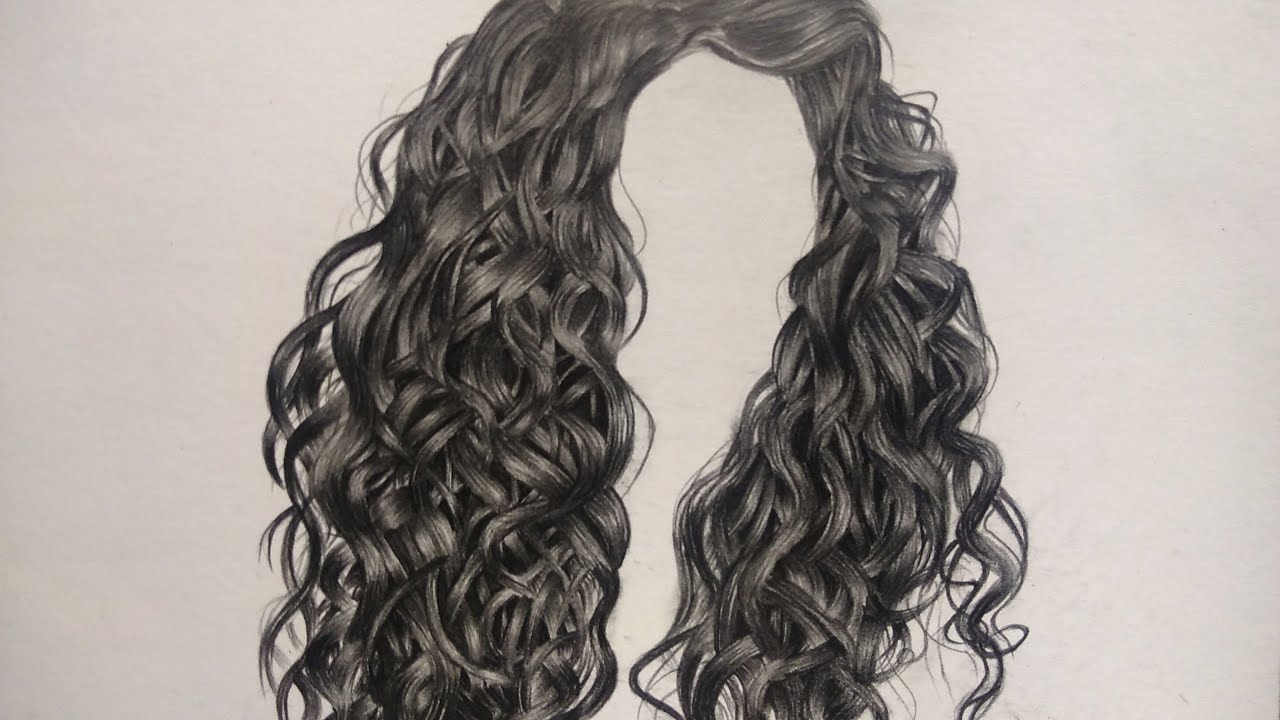
How to Draw Curly Hair Realistic with Pencil [ Step by Step Tutorial ]
Add texture to the hair. I am offering a 20% discount. The small volume it can have is because of bouncing with the ears. Draw a loose outline of the hair using strokes that flow in the actual direction the hair is pointing. Web curly hair styles easy.
Curly Hair Drawing How To Draw Curly Hair Step By Step
Use scribbly lines to form the outline for the coily hairstyle. Hair is affected by gravity and, on the contrary, on the top of the head, the hair on the sides falls down. Remove highlights gradually with a kneaded eraser. The next step when drawing curly hair is to draw a straight horizontal line to mark out where the upper.

How to Draw Curly Hair Drawing Spiral Curls Tutorial How to Draw
For instance, at the hair parting (1). Wrap or curl each section, one by one, around one or two of your fingers. Use several short, curved strands to give it a bit more volume but keep it close to the head. There are three types of curls but the theory is similar for each. Web crown braid bun.

How To Draw Curly Hair by 87tors Drawing Technique Curly hair
Web first, for drawing both female hair and male hair, we must define the hairline and areas of our character’s hair. Here, the hair is more dense and light doesn’t hit this part. Rename this layer “sketch” to keep things organised. Decide on what type of curl you wish for your drawing and which direction the curls fall. Manga female.

How to Draw Curly Hair Really Easy Drawing Tutorial
Marking a reference point or a route which divides the hair can help us. Gain full access to my exclusive drawing tutorials and more!medium: Repeat the steps until you are satisfied with the way the hair looks. The next step when drawing curly hair is to draw a straight horizontal line to mark out where the upper part of the.

Wavy And Curyl Hair Art inspiration drawing, Art reference, Drawing
Here, the hair is more dense and light doesn’t hit this part. Marking a reference point or a route which divides the hair can help us. Visualize the type of hairstyle you like. Draw a loose outline of the hair using strokes that flow in the actual direction the hair is pointing. Hair is affected by gravity and, on the.
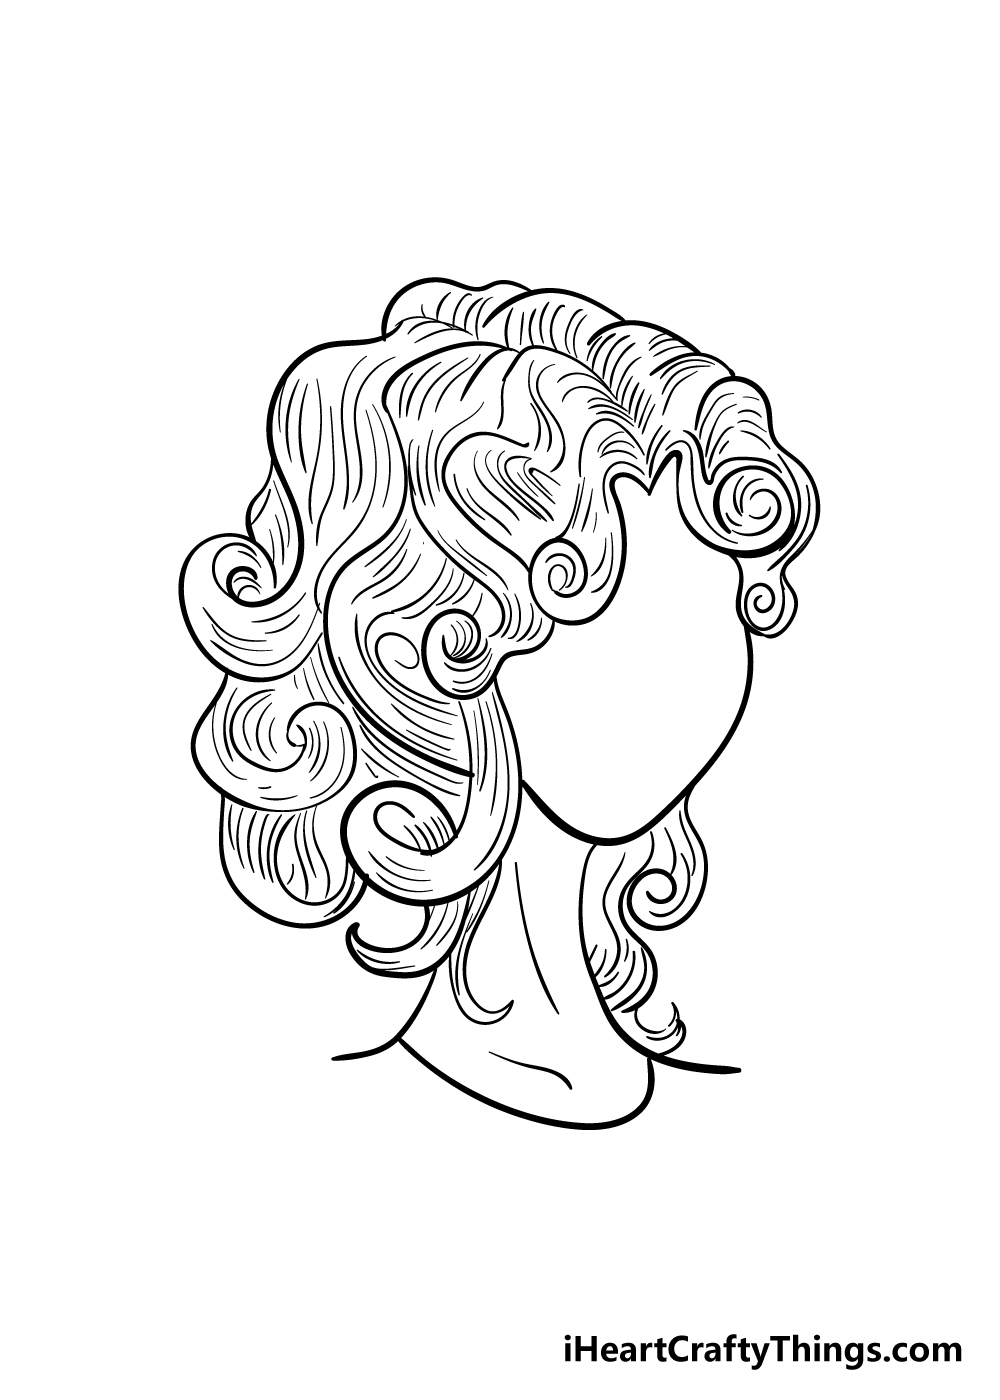
Continue To Draw Scribbly Lines All Over The Head And Point Them Outward, Like This:
Click the link below the picture to access the full tutorial. I am offering a 20% discount. Establish the hair’s volume using basic shapes, keeping in mind the irregularities due to curls, and ensure these shapes roughly adhere to the head’s contour. Marking a reference point or a route which divides the hair can help us.
Draw An Outline Of The Hair Using Curly Lines.
So, on a new layer, i’m going to go in with a medium purple and draw shadows gently under the head. Blend the graphite from dark to light in the direction of the curls. Draw a straight horizontal line for the upper part of the hair. Style your edges with a strong.
Visualize The Type Of Hairstyle You Like.
To do this, move your pencil to the hair part and draw several lines in the direction of where the hair grows. These lines can vary in length, from long to. Add texture to the hair. Adding a chic crown braid to the front of your hair (like yara shahidi did) can instantly elevate a loose, curly bun.
Find Out Where The Light Source Is.
Web get the free hair workbook to practice drawing lifelike hair with confidence: Web initiate your drawing by sketching the head, determining where the hair will be, and finding the center point to guide the hair growth. From there, it becomes easier to see the direction that each section will take (2). We want it to look heavier.