How To Draw Letter
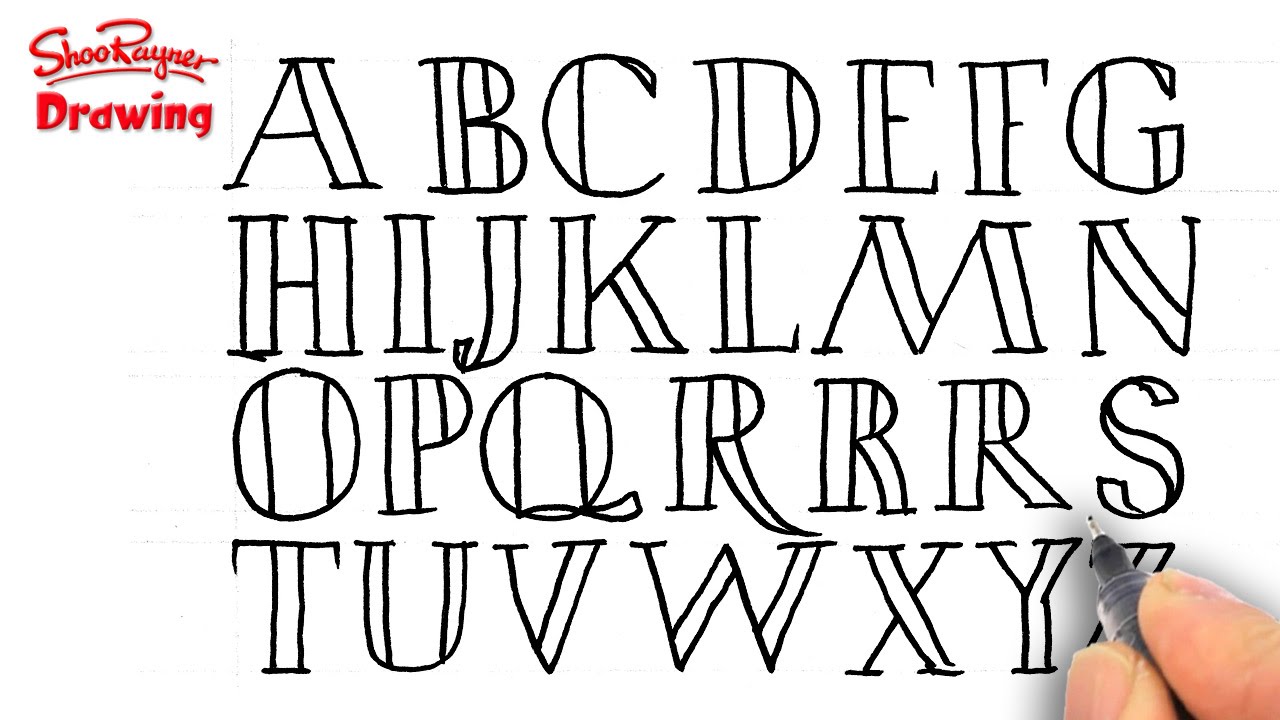
How To Draw Letter - Within each letter, use a dark, medium and light shade of the same color to create variation. Draw the frame of the letter In his speech to the delegates, cox noted he had “stopped dei, esg. The next step is to determine how deep our 3d goes, and again, it’s totally up to you. For an “a,” you could use a triangle in the upper middle part of the letter. Web hello, fellow artists and lettering enthusiasts! For an “e,” you would only need one circle inside the upper loop of the letter. Web just remember that if a 3d line goes “through” the letter (or object) you can skip it. For example, for a “b,” you could draw two little circles, one in each hole in the letter. Finish with another downward stroke and a small curl.
Web inspiration is all around you, and the basics are easy to learn. The second line really adds a special extra pop to the whole look of your bubble letters. These words consist of letters which are easy to draw and connect. Scribble onto your lines and modulate the widths of your stems. Use this to ‘huff’ deep breaths onto the instacoll. So let’s draw our 3d lines for the letter r. The first line that you draw will determine the depth and it will be the same everywhere else. Web in this post, you’ll see an excerpt from mary kate mcdevitt’s skillshare class on hand lettering. Peel off the sheet slowly, and the gold will now be attached to your work. Web by keeping our letters consistent, we increase the visual harmony, and it just makes the whole thing look so much better.
Web just remember that if a 3d line goes “through” the letter (or object) you can skip it. Next, we’ll work on the letters to the left if the e. In his speech to the delegates, cox noted he had “stopped dei, esg. The second line really adds a special extra pop to the whole look of your bubble letters. The thickness of this line will depend upon how thick your letters were to begin with. Within each letter, use a dark, medium and light shade of the same color to create variation. Basic strokes of the letters. Web start with your pen tip on the bottom line. Web the three dimensions. Web let’s start drawing our first words.

How to draw a Letter Step by Step Drawing a Letter YouTube
Using the tip of the end of a marker, add dots to the letterforms. Web guidelines are very important in the process of drawing letters. Web how to draw the letter a in 3dwhat you'll need:pencileraserblack marker medium size tipblack marker fine/small tip (for cleaning up lines)light grey marker. Web roll a piece of cartridge paper to make a fat.

How to Draw Bubble Letters in Easy Step by Step Drawing Tutorial for
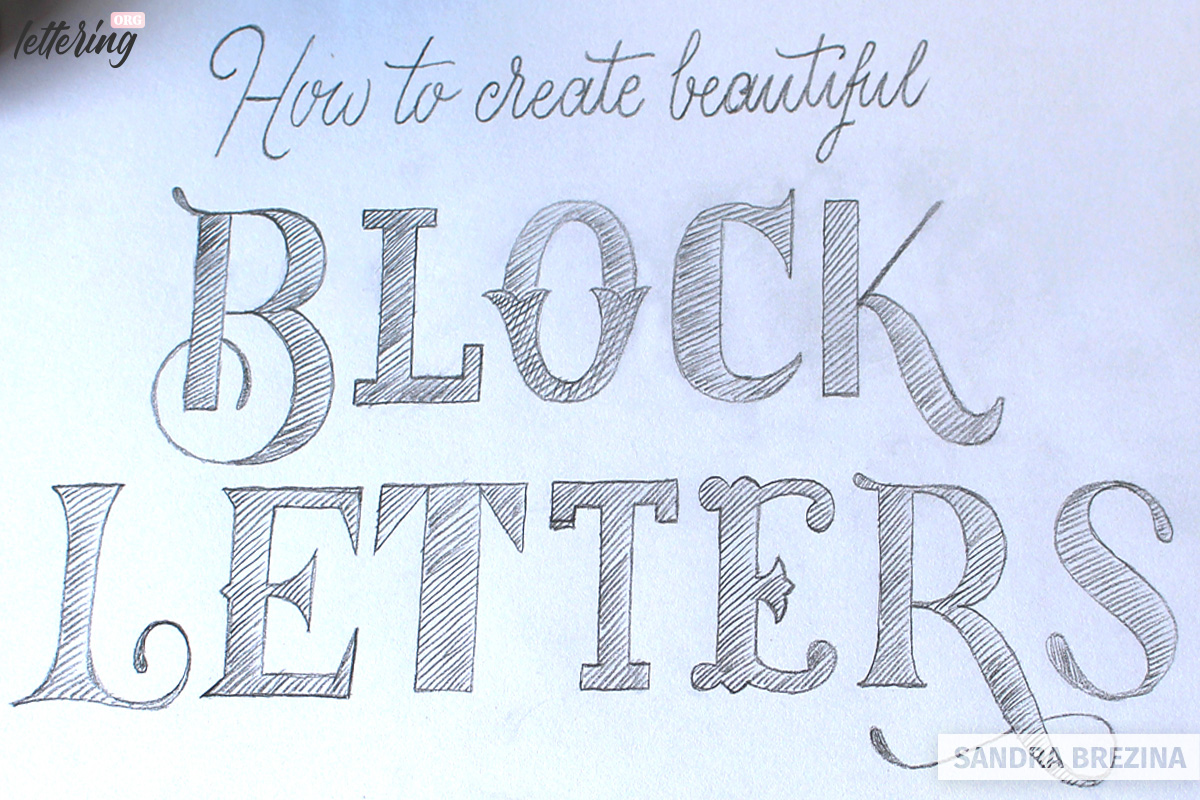
The next step is to determine how deep our 3d goes, and again, it’s totally up to you. Web by keeping our letters consistent, we increase the visual harmony, and it just makes the whole thing look so much better. Today, we're going back to basics with a tutorial on how to draw perfect block letters. Scribble onto your lines.
How Draw Letters Draw Spaces
When adding depth to rounded areas of letters, it can get a little tricky. Scribble onto your lines and modulate the widths of your stems. That means both the letter and the shadow as well. Then, use a straight edge to line up each line with that vanishing point before you draw it. Web draw two vertical lines between your.
How to Draw Capital Letters Draw Stuff On Mondays 1 YouTube
Web when drawing your lines for the top or the insides of your letters, stop your line when it reaches the body of the letter. Web mary kate mcdevitt breaks down letter drawing into four distinct steps that will make constructing letters a breeze, even for beginners working with an easy hand lettering font. Outline and optimize your scribblings to..

How to Draw Fantastic Letters by Hand in 4 Simple Steps Drawing
Outline and optimize your scribblings to. The cap height is the height of an uppercase letter. When working through these steps, it would be a good idea to sketch the letters with either your dixon ticonderoga or your blackwing pencil. For an “e,” you would only need one circle inside the upper loop of the letter. They want phil lyman.

How to Draw 3D Letters Tutorial Video and a 3D Letters Coloring Page
Within each letter, use a dark, medium and light shade of the same color to create variation. They want phil lyman to replace current utah gov. Use this to ‘huff’ deep breaths onto the instacoll. The basics of beginning with a brush. In his speech to the delegates, cox noted he had “stopped dei, esg.
How to draw letters Real Easy YouTube
You can start either at the bottom or at the side. Place the transfer gold, shiny side down on that area and press firmly. In his tutorial on the basics of beginning lettering with a brush, lettering artist james lewis ( @jamesllewis) shows you how to prepare the necessary materials, where to position your hands, and tips for correcting small.

How to Draw 3D Letters · Art Projects for Kids Lettering alphabet
Use this to ‘huff’ deep breaths onto the instacoll. Close to the edge of each letter, draw a short white line. Find hand letterers whose work inspires you and follow them for insights into the design process and the world of hand lettering. Basic strokes of the letters. Web inspiration is all around you, and the basics are easy to.

How to Draw Bubble Letters Wiki Drawing Text and Lettering English
There are some typical (lowercase) words, which are perfect for learning hand lettering. If small areas of gold don’t stick, don’t worry. Outline and optimize your scribblings to. Draw the frame of the letter Find hand letterers whose work inspires you and follow them for insights into the design process and the world of hand lettering.
Let's Learn How to Draw Letters Alphabets A to Z Drawing, Coloring
The depth (or back) of the letter will be angled away towards the left vanish point. Peel off the sheet slowly, and the gold will now be attached to your work. This means the letter needs to extend in a sideways direction. For an “e,” you would only need one circle inside the upper loop of the letter. For example,.
Web Draw Two Vertical Lines Between Your Guidelines On Either Side Of Your Point Of Sight Line.
Mary finishes up the rest of the video by discussing how to know where to put the thicks. Draw the frame of the letter Finish with another downward stroke and a small curl. This is the art of drawing letters by hand, so of course, you don’t have to go crazy with mathematical precision here.
Web By Keeping Our Letters Consistent, We Increase The Visual Harmony, And It Just Makes The Whole Thing Look So Much Better.
Web start with your pen tip on the bottom line. Then, use a straight edge to line up each line with that vanishing point before you draw it. Place a sketch paper or squared paper above your skeleton. The cap height is the height of an uppercase letter.
This Means The Letter Needs To Extend In A Sideways Direction.
Web use it as your starting point to develop further block letter shapes. And finally, there was the delegates’ worst nomination. Good words for practising hand lettering are “menu”, “minimum” or “millennium”. The basics of beginning with a brush.
For Example, For A “B,” You Could Draw Two Little Circles, One In Each Hole In The Letter.
You can start either at the bottom or at the side. Draw an upward stroke to the middle line, and make a downward stroke that reaches to the bottom line and then, curves back up. Use this to ‘huff’ deep breaths onto the instacoll. Mary will walk you through four simple steps to creating beautifully complex letters.