How To Protect Cells In Excel Without Protecting Sheet
How To Protect Cells In Excel Without Protecting Sheet - Web to only protect or lock individual cells in excel without locking the whole worksheet: Go to the home tab. Select review > allow edit ranges. Web methods to protect cells without protecting the entire sheet in excel 1. Open the target worksheet and select all cells by pressing ctrl + a. Select the worksheet that you want to protect. Web lock only specific cells and ranges in a protected worksheet. Select the whole worksheet using either 'ctrl + a' or click in the top left corner of the sheet (little pale. Web click on “protect sheet” now that you’ve protected your cells, navigate to the “review” tab and click on “protect sheet.” this will open the “protect sheet” dialog box. Uncheck the box next to.
Select the whole worksheet using either 'ctrl + a' or click in the top left corner of the sheet (little pale. Do one of the following on the allow users to edit ranges dialog box:. Web methods to protect cells without protecting the entire sheet in excel 1. Open the target worksheet and select all cells by pressing ctrl + a. Web click on “protect sheet” now that you’ve protected your cells, navigate to the “review” tab and click on “protect sheet.” this will open the “protect sheet” dialog box. Go to the home tab. Select all cells by clicking on the little triangle in the upper left corner of the spreadsheet. Web to only protect or lock individual cells in excel without locking the whole worksheet: Select the worksheet that you want to protect. Web quick answer to protect all cells in excel without protecting the entire sheet, follow these steps:
Web lock only specific cells and ranges in a protected worksheet. Go to the home tab. Web quick answer to protect all cells in excel without protecting the entire sheet, follow these steps: Web click on “protect sheet” now that you’ve protected your cells, navigate to the “review” tab and click on “protect sheet.” this will open the “protect sheet” dialog box. Select the whole worksheet using either 'ctrl + a' or click in the top left corner of the sheet (little pale. Web methods to protect cells without protecting the entire sheet in excel 1. Select all cells by clicking on the little triangle in the upper left corner of the spreadsheet. Open the target worksheet and select all cells by pressing ctrl + a. Select review > allow edit ranges. Select the worksheet that you want to protect.

3 Ways to Protect Cells in Excel Without Protecting Sheet TechCult
Open the target worksheet and select all cells by pressing ctrl + a. Web to only protect or lock individual cells in excel without locking the whole worksheet: Go to the home tab. Web click on “protect sheet” now that you’ve protected your cells, navigate to the “review” tab and click on “protect sheet.” this will open the “protect sheet”.

How to Protect Cells without Protecting Sheet in Excel (3 Ways)
Web methods to protect cells without protecting the entire sheet in excel 1. Web lock only specific cells and ranges in a protected worksheet. Uncheck the box next to. Select review > allow edit ranges. Select all cells by clicking on the little triangle in the upper left corner of the spreadsheet.
How to protect individual cells and cell areas in Excel
Select review > allow edit ranges. Web to only protect or lock individual cells in excel without locking the whole worksheet: Select the worksheet that you want to protect. Select all cells by clicking on the little triangle in the upper left corner of the spreadsheet. Uncheck the box next to.

How to Protect Cells without Protecting Sheet in Excel (3 Ways)
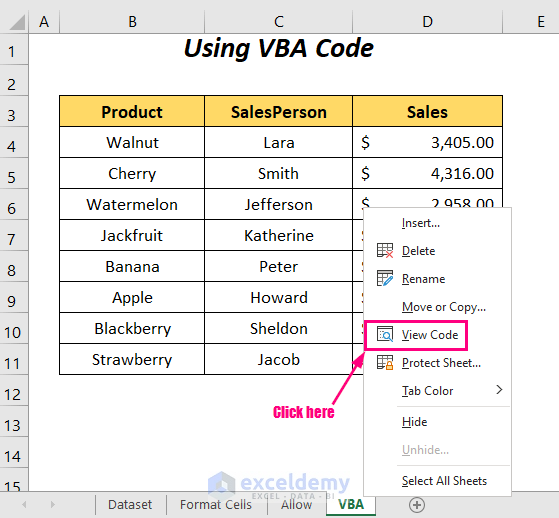
Web methods to protect cells without protecting the entire sheet in excel 1. Do one of the following on the allow users to edit ranges dialog box:. Select review > allow edit ranges. Web click on “protect sheet” now that you’ve protected your cells, navigate to the “review” tab and click on “protect sheet.” this will open the “protect sheet”.
How to Protect Cells Without Protecting Sheet in Excel (3 Ways)
Select review > allow edit ranges. Select the worksheet that you want to protect. Uncheck the box next to. Open the target worksheet and select all cells by pressing ctrl + a. Do one of the following on the allow users to edit ranges dialog box:.

How to Protect Cells without Protecting Sheet in Excel (3 Ways)
Select review > allow edit ranges. Select all cells by clicking on the little triangle in the upper left corner of the spreadsheet. Web lock only specific cells and ranges in a protected worksheet. Select the worksheet that you want to protect. Open the target worksheet and select all cells by pressing ctrl + a.
How to Protect Cells without Protecting Sheet in Excel (3 Ways)
Web quick answer to protect all cells in excel without protecting the entire sheet, follow these steps: Web click on “protect sheet” now that you’ve protected your cells, navigate to the “review” tab and click on “protect sheet.” this will open the “protect sheet” dialog box. Select review > allow edit ranges. Select the whole worksheet using either 'ctrl +.
How to Protect Cells Without Protecting Sheet in Excel (3 Ways)
Select all cells by clicking on the little triangle in the upper left corner of the spreadsheet. Web click on “protect sheet” now that you’ve protected your cells, navigate to the “review” tab and click on “protect sheet.” this will open the “protect sheet” dialog box. Uncheck the box next to. Web lock only specific cells and ranges in a.
Excel Protect Cells from Editing YouTube
Uncheck the box next to. Go to the home tab. Open the target worksheet and select all cells by pressing ctrl + a. Web lock only specific cells and ranges in a protected worksheet. Select review > allow edit ranges.

How to Protect Cells in Excel Without Protecting Sheet Zebra BI
Web quick answer to protect all cells in excel without protecting the entire sheet, follow these steps: Open the target worksheet and select all cells by pressing ctrl + a. Uncheck the box next to. Select all cells by clicking on the little triangle in the upper left corner of the spreadsheet. Go to the home tab.
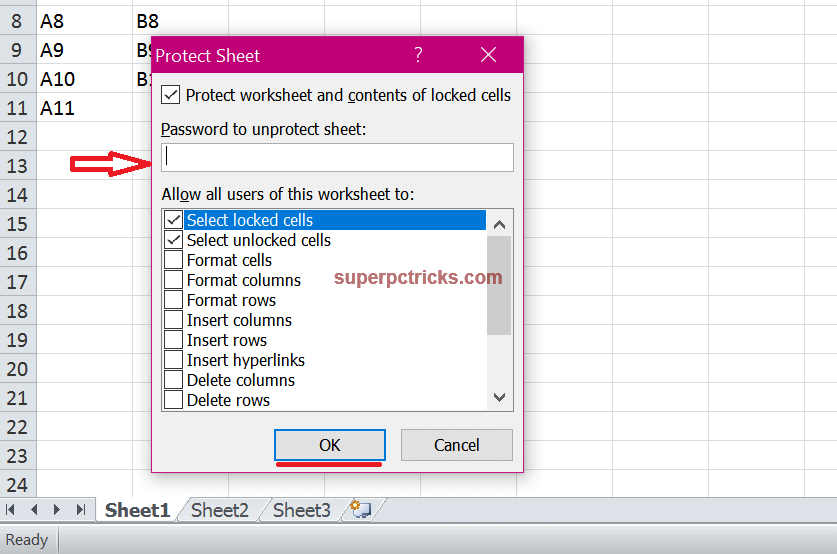
Web Click On “Protect Sheet” Now That You’ve Protected Your Cells, Navigate To The “Review” Tab And Click On “Protect Sheet.” This Will Open The “Protect Sheet” Dialog Box.
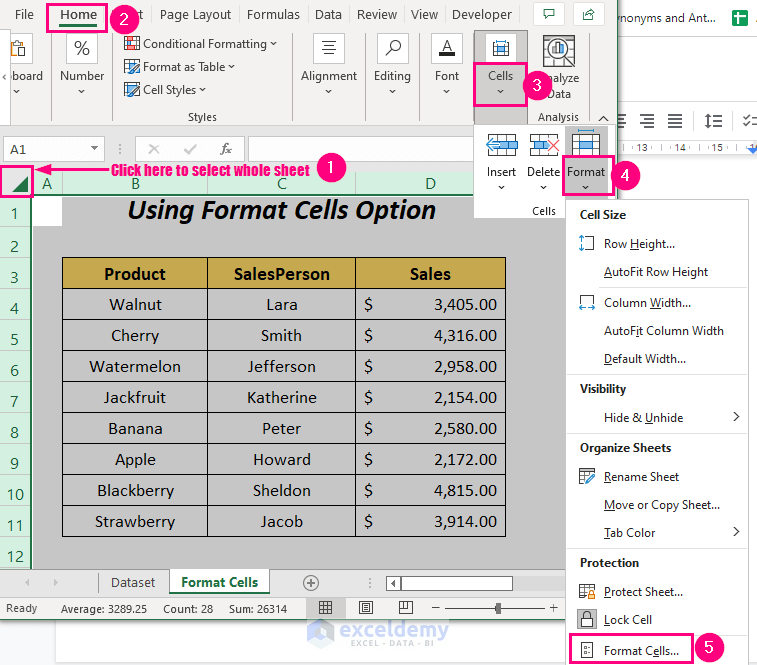
Go to the home tab. Do one of the following on the allow users to edit ranges dialog box:. Web quick answer to protect all cells in excel without protecting the entire sheet, follow these steps: Select all cells by clicking on the little triangle in the upper left corner of the spreadsheet.
Select The Whole Worksheet Using Either 'Ctrl + A' Or Click In The Top Left Corner Of The Sheet (Little Pale.
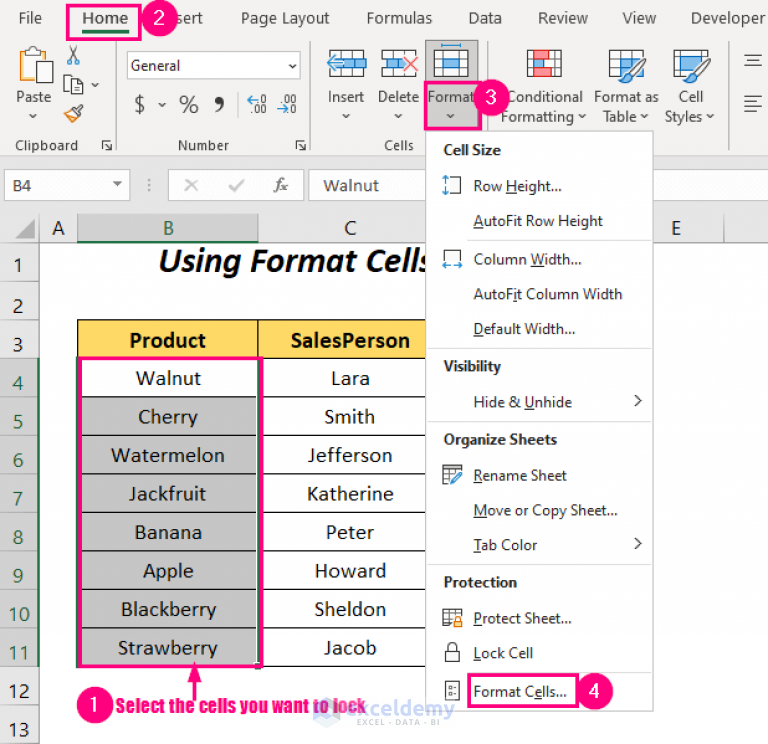
Web methods to protect cells without protecting the entire sheet in excel 1. Uncheck the box next to. Web lock only specific cells and ranges in a protected worksheet. Web to only protect or lock individual cells in excel without locking the whole worksheet:
Open The Target Worksheet And Select All Cells By Pressing Ctrl + A.
Select review > allow edit ranges. Select the worksheet that you want to protect.