Lily Drawing Step By Step
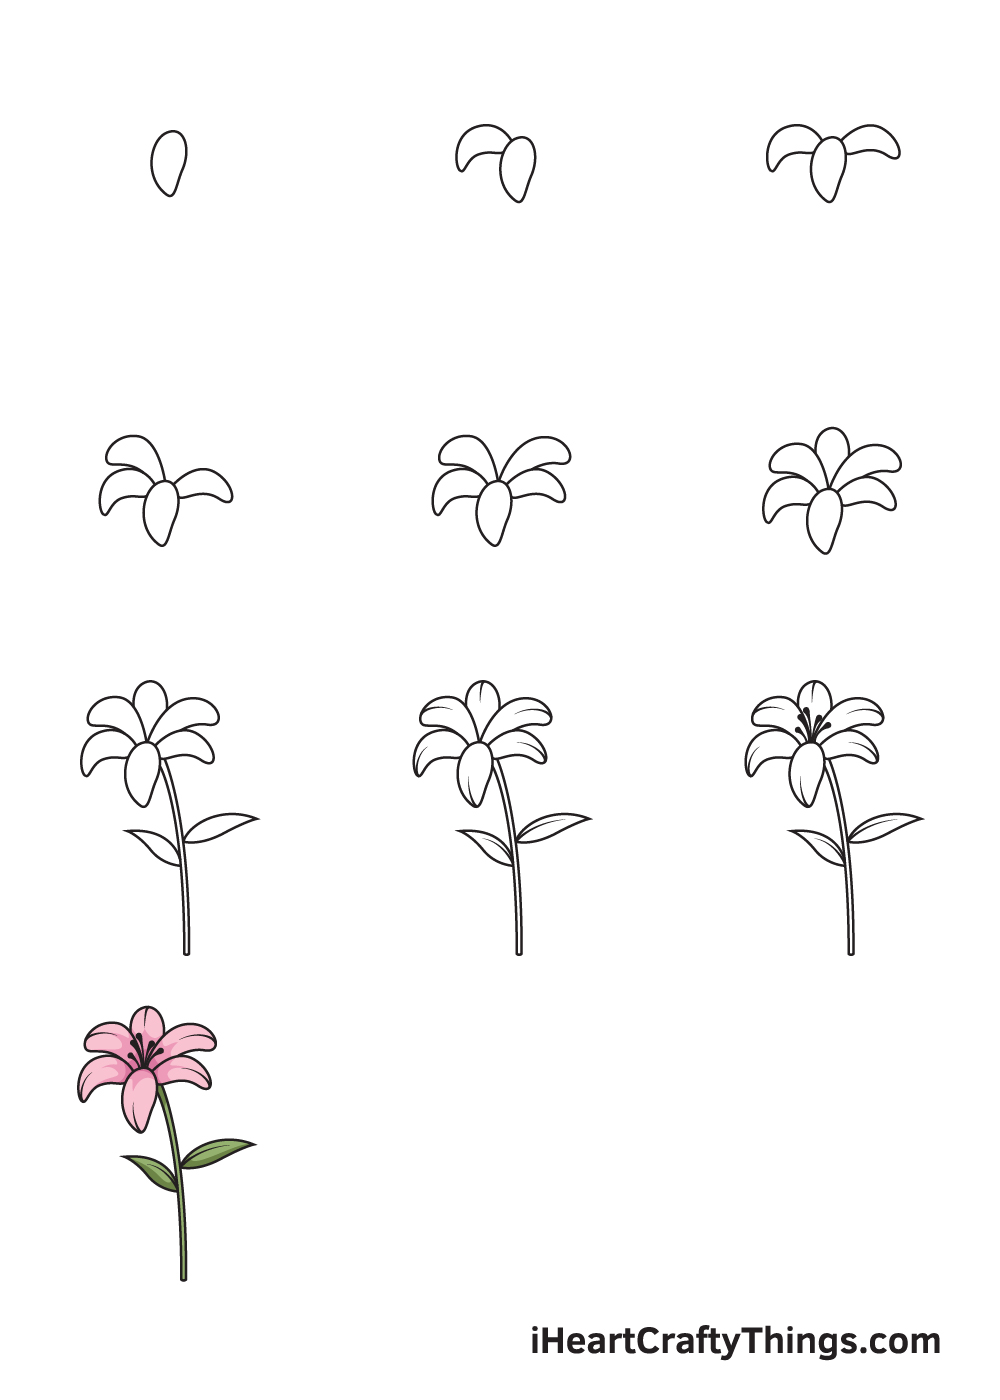
Lily Drawing Step By Step - In the topmost leaf, draw a line down the center. Draw another open irregular oval shape below the first petal. Begin with the center of the flower and then work. Feel free to copy what i’m doing in the photos! Begin a second line, also within the flower, touching the opposite side of the u, and meeting the first line in a point. Composition and a rough drawing of the general shapes of the lily; Start by sketching the basic shape of the lily’s petals using a light hb pencil. Create detailing along the petals of your lily drawing. Afterwards, draw an irregular oval shape that is wide in the middle and tapers towards both ends on each side of the stem. Draw the petals of the lilies with rounded triangular shapes as shown.
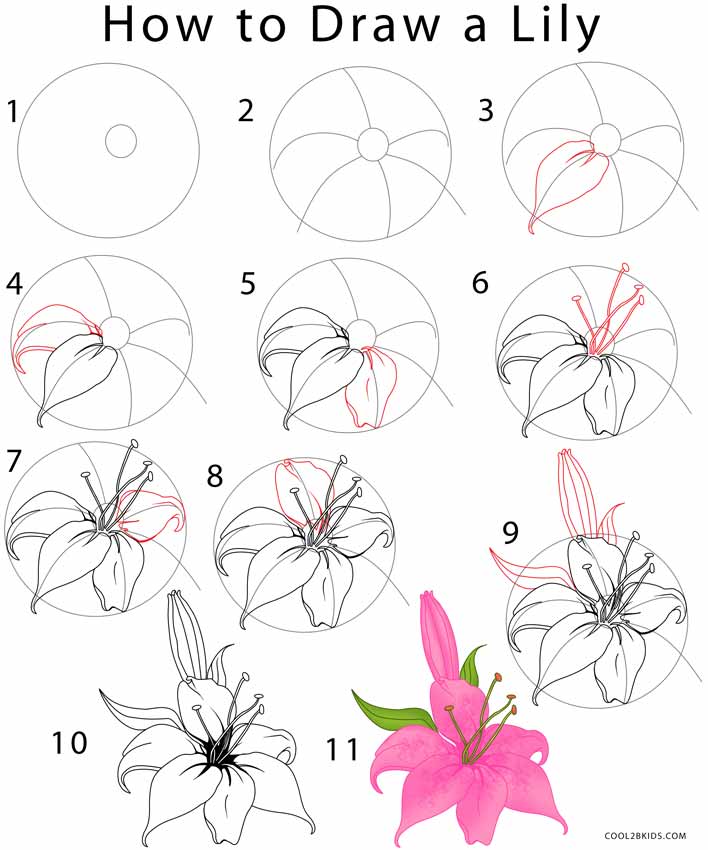
The third one is devoid of a pointed. Join db besties for exclusive access to bundles, freebies, discounts and games! This will form the flower head of your lily. Connect the line directly to the outline of the circle and make it roughly five to seven times longer than the. Draw more spots on the petals for a better look. Start by sketching the basic shape of the lily’s petals using a light hb pencil. A double margin at the bottom signifies a fold. Continue shading and add the markings to the petals; Add some detail to the flower's petals. Then, extend a graceful curving line from the flower's center towards the tip of each petal.
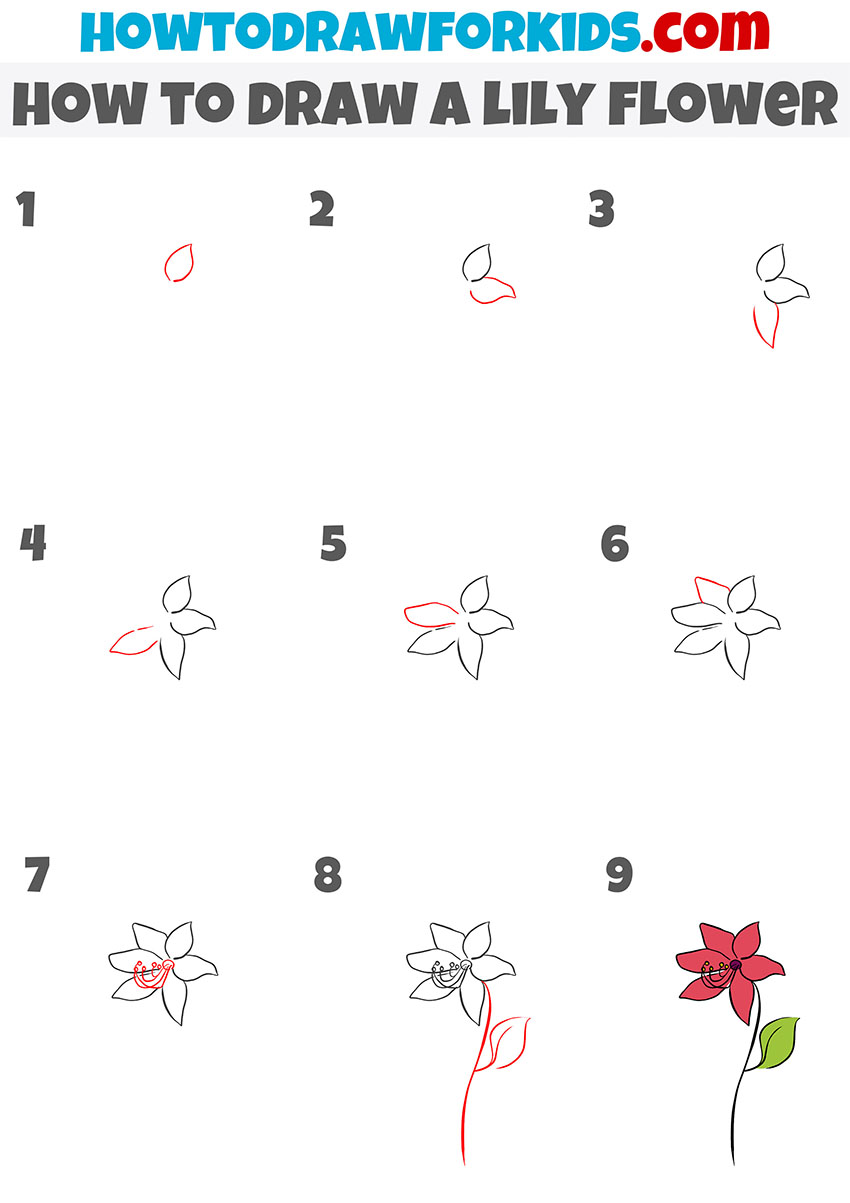
Draw more spots on the petals for a better look. Draw another open irregular oval shape below the first petal. Web this is a simplified approach to drawing the beautiful calla lily flower. Now lets add two small nodes to each side, draw one node slightly higher than the other to give it a natural feel. With a small paintbrush and purple paint, add some dots and fine texture lines to each lily petal. Similarly, we will draw six petals of the lily flower. Moving forward to the other parts of the lily, proceed by drawing two parallel slightly curved lines underneath the petals. Draw the centers of the flowers with four small ovals attached to short lines. Then, extend a graceful curving line from the flower's center towards the tip of each petal. The center of a lily is kind of a strange shape, so i like to use a pencil to sketch it out before using ink.
Lily Drawing How To Draw A Lily Step By Step
Draw the petals of the lilies with rounded triangular shapes as shown. Beautiful easter lily flower colored with copic markers with leaves and buds. From the center of the flower, add several strokes that reach outwards and gently fade these lines. How to draw a lily step 3. Add some detail to the flower's petals.
How to Draw a Lily Flower Easy Drawing Tutorial For Kids
This forms the long, thin stem of the lily flower. From the center of the flower, add several strokes that reach outwards and gently fade these lines. In the first step, we will draw a lily flower. Let me know in the comments which flower i should do next! Draw a curved line, beginning within the flower's base, touching the.

How To Draw a Lily Flower Rainbow Printables
This will form the flower head of your lily. Draw another open irregular oval shape below the first petal. The circle will become the bud of the lily and the line will become the stem. Lily is native to europe, asia, and america. Connect the base and the sphere with a stem by drawing two vertical lines that are thinner.

How to Draw A Lily Step by Step
This will form the flower head of your lily. It doesn’t matter if you’re a beginner or have some drawing experience, our guide is designed for everyone. Now lets add two small nodes to each side, draw one node slightly higher than the other to give it a natural feel. In the first step, we will draw a lily flower..
How To Draw a Beautiful Pink Lily Flower (Easy For Little Kids
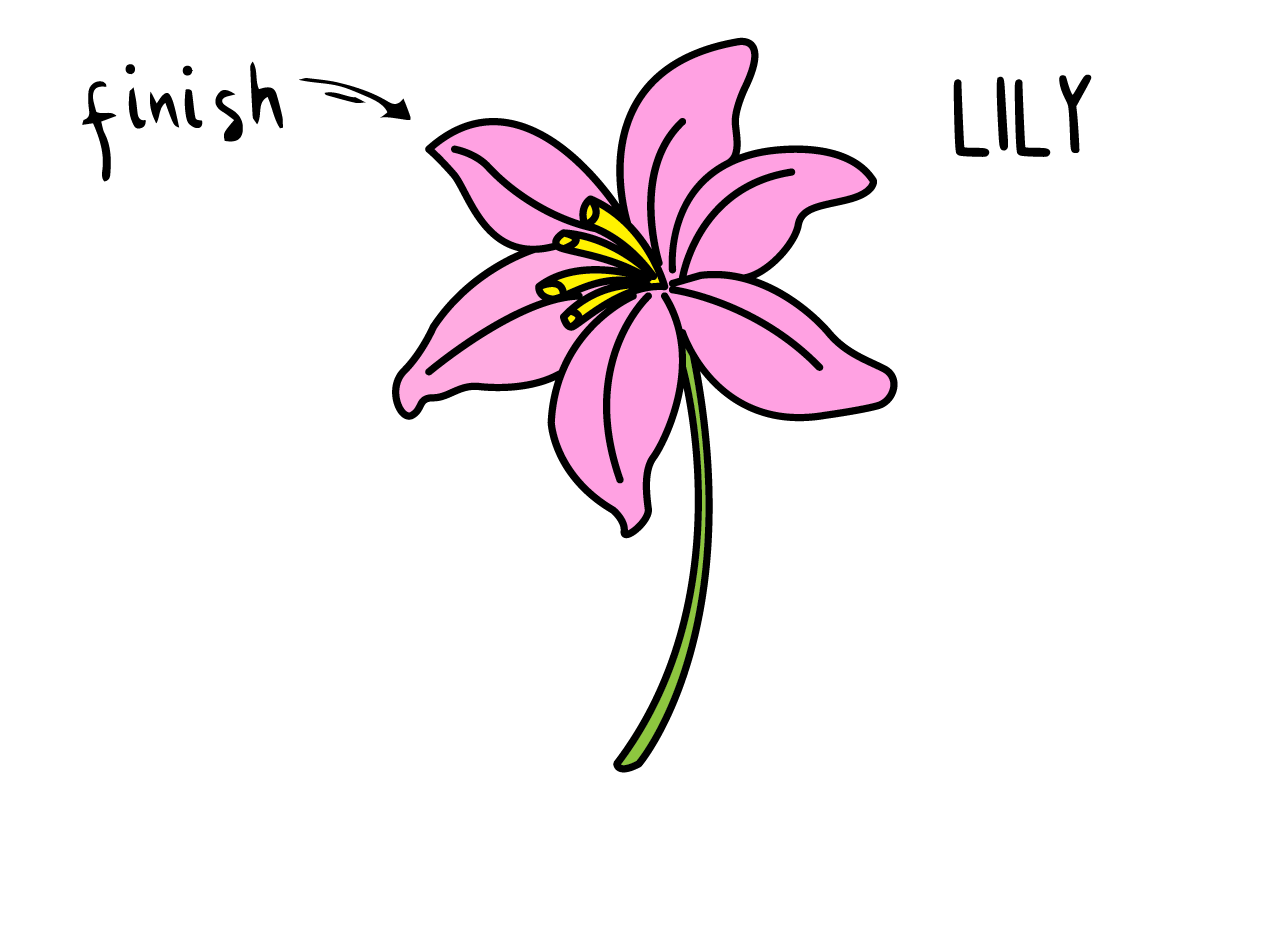
In the topmost leaf, draw a line down the center. Same goes for the second that shows up at a different angle. Moving forward to the other parts of the lily, proceed by drawing two parallel slightly curved lines underneath the petals. After this, switch over to a clean paintbrush and green paint. Learn how to draw a lily flower,.
How to Draw a Lily (Step by Step Pictures) Cool2bKids
Composition and a rough drawing of the general shapes of the lily; Similarly, we will draw six petals of the lily flower. It doesn’t matter if you’re a beginner or have some drawing experience, our guide is designed for everyone. Keep your lines loose and light, as you’ll be refining them later. Draw the centers of the flowers with four.

11+ Step by Step lily flower drawing Easy ways. Drawwiki
Let me know in the comments which flower i should do next! Learn how to draw lily easily step by step at drawing123.com. For each line, draw a short, curved line parallel to half. Begin a second line, also within the flower, touching the opposite side of the u, and meeting the first line in a point. Learn a simple.

How to Draw a Lily HelloArtsy
With a small paintbrush and purple paint, add some dots and fine texture lines to each lily petal. Hopefully, this simple tutorial on drawing lily flower for kids will help you have a beautiful painting step. Let me know in the comments which flower i should do next! Draw another open irregular oval shape below the first petal. You can.
How to Draw a Lily Flower
Draw another open irregular oval shape below the first petal. Moving forward to the other parts of the lily, proceed by drawing two parallel slightly curved lines underneath the petals. From the center of the flower, add several strokes that reach outwards and gently fade these lines. Add some detail to the flower's petals. Connect the line directly to the.

How to Draw a Lily HelloArtsy
Now lets add two small nodes to each side, draw one node slightly higher than the other to give it a natural feel. The circle will become the bud of the lily and the line will become the stem. Web if you enjoy drawing realistic looking flowers then this is the tutorial for you! Let’s begin your lily drawing. Begin.
Make Sure The Lines Are Smooth And Symmetrical.
Design and draw a character. Web easy lily drawing tutorial! Similarly, we will draw six petals of the lily flower. Same goes for the second that shows up at a different angle.
Web This Is A Simplified Approach To Drawing The Beautiful Calla Lily Flower.
From the center of the flower, add several strokes that reach outwards and gently fade these lines. Web this is absolutely an easy lily drawing idea for beginners. This forms the long, thin stem of the lily flower. Draw a curved line, beginning within the flower's base, touching the top of the u shaped line, and ending above the flower.
It Doesn’t Matter If You’re A Beginner Or Have Some Drawing Experience, Our Guide Is Designed For Everyone.
How to draw a lily step 3. Lily is native to europe, asia, and america. A double margin at the bottom signifies a fold. Begin by drawing a small u shaped line at the flower's center, just below the base of the anthers.
Whenever I Show A Beginner Artist How To Draw A Calla Lily Flower I Find This Metho.
Begin with sketching the first petal that resembles the tapering shape of a leaf with a couple of folds at its base. Draw an elliptical shape on a sheet of paper for the first petal of the lily. Web learn how to draw a pretty lily flower easy, step by step drawing tutorial. Draw little stems with bulbs on the end.