Printable Embroidery Placement Guide
Printable Embroidery Placement Guide - It has the center of the design identified, as well as the horizontal and vertical axis lines. Web below you will find guidelines for placing designs on everything from bibs to polo shirts, onesies to jacket backs. While this guide is a great starting point, we suggest that you print a paper template of the design, at full size, to best determine appropriate placement. Web step by step embroidery stitch guide. Web we've put together an embroidery placement guide to get you started. Therefore, when you are placing a design make sure that it looks good to you. Web how to determine the embroidery placement measurement. Web master the art of embroidery placement with our comprehensive guide. Use a similar distance between bottom of design and edge of fabric, to make placement appear nore Web master a dozen classic embroidery stitches when you've got this illustrated guide handy.
This guide provides step by step diagrams for popular stitches and explains their uses. Web step by step embroidery stitch guide. Print out the design in 1:1 scale. There are many factors that depend on the positioning of your embroidery, like size, design, garment type, and more. It has the center of the design identified, as well as the horizontal and vertical axis lines. Web print out designs before embroidering, and place them around the skirt to figure out equal distances between designs. Web tools for perfect embroidery placement only you can decide what works for you and will make you comfortable so whatever you choose, be consistent and give it a chance to work. Therefore, when you are placing a design make sure that it looks good to you. Web when you’re stitching an embroidery design, it can be useful to have a paper template of the design to help plan exactly where the embroidery will go. Use a similar distance between bottom of design and edge of fabric, to make placement appear nore
When it comes to putting an embroidery design in the right spot, a template is a handy, essential tool. Use the links below to jump to specific stitches or scroll through them all for inspiration. A template is printout of a design. Web the chart for the left/right placement works for most applications but there are other factors to be taken into consideration when placing logos on the left or right chest of shirts, jackets and sweaters. Web proper embroidery placement can transform a simple garment into a masterpiece. For finding exactly where you should place the design accurately, measure the width of the item, usually on clothes from one side seam to the other side seam or if there is a placket, from the placket to the side seam. There are many factors that depend on the positioning of your embroidery, like size, design, garment type, and more. Dive in as we unravel the secrets to achieving perfect embroidery placement and elevating your designs. You’ll see me use them quite a bit in our tutorials, but first you need to know how to get them, and how exactly to use them to get the placement you want. While this guide is a great starting point, we suggest that you print a paper template of the design, at full size, to best determine appropriate placement.
Free Printable Embroidery Placement Ruler Printable Ruler Actual Size
You’ll see me use them quite a bit in our tutorials, but first you need to know how to get them, and how exactly to use them to get the placement you want. Use the links below to jump to specific stitches or scroll through them all for inspiration. In this guide, you'll find steps on how to determine embroidery.
Free Printable Embroidery Placement Ruler
There are many factors that depend on the positioning of your embroidery, like size, design, garment type, and more. This guide provides step by step diagrams for popular stitches and explains their uses. You’ll see me use them quite a bit in our tutorials, but first you need to know how to get them, and how exactly to use them.

Printable Embroidery Placement Guide
Therefore, when you are placing a design make sure that it looks good to you. Trim the paper around the shape of the design. Print out the design in 1:1 scale. There are many factors that depend on the positioning of your embroidery, like size, design, garment type, and more. This information is a guide and should only be followed.

Printable Embroidery Placement Guide Printable Word Searches
Dive in as we unravel the secrets to achieving perfect embroidery placement and elevating your designs. We suggest that you print a paper template of the design at full size (using embroidery software). For finding exactly where you should place the design accurately, measure the width of the item, usually on clothes from one side seam to the other side.
Free Printable Embroidery Placement Ruler
When it comes to putting an embroidery design in the right spot, a template is a handy, essential tool. Web proper embroidery placement can transform a simple garment into a masterpiece. Print out the design in 1:1 scale. Web master a dozen classic embroidery stitches when you've got this illustrated guide handy. This guide provides step by step diagrams for.
Free Printable Embroidery Placement Ruler
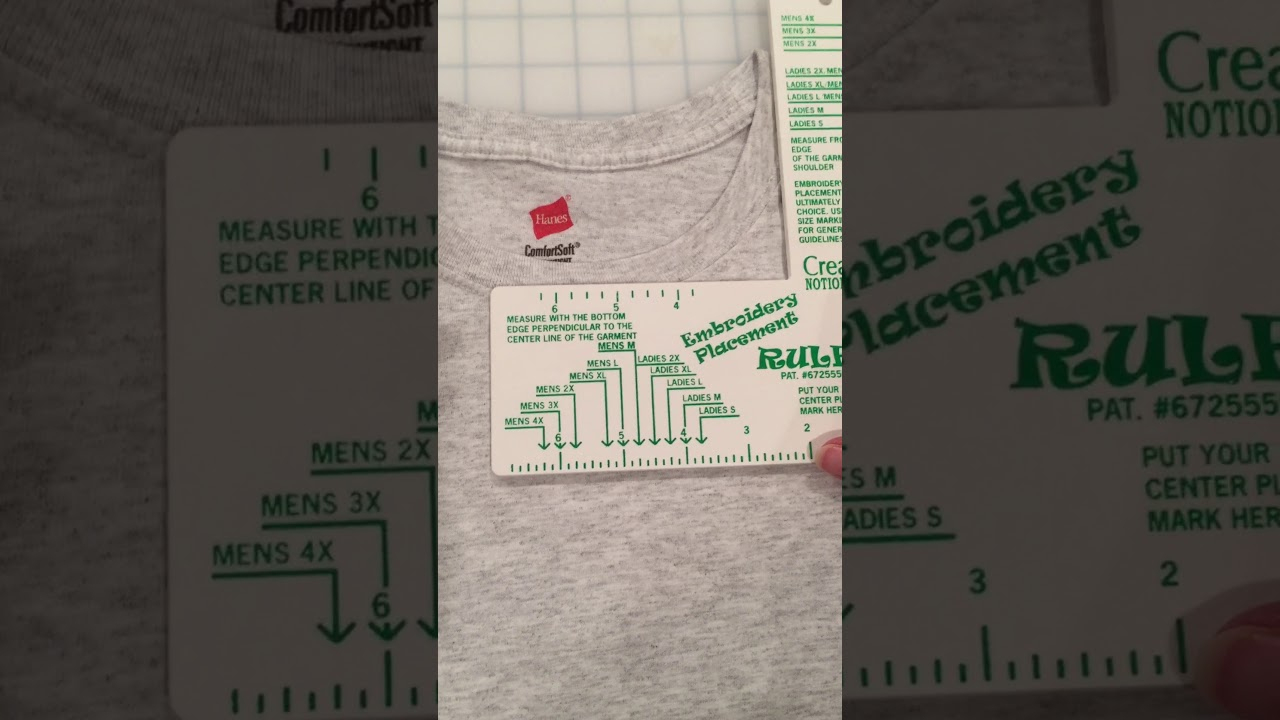
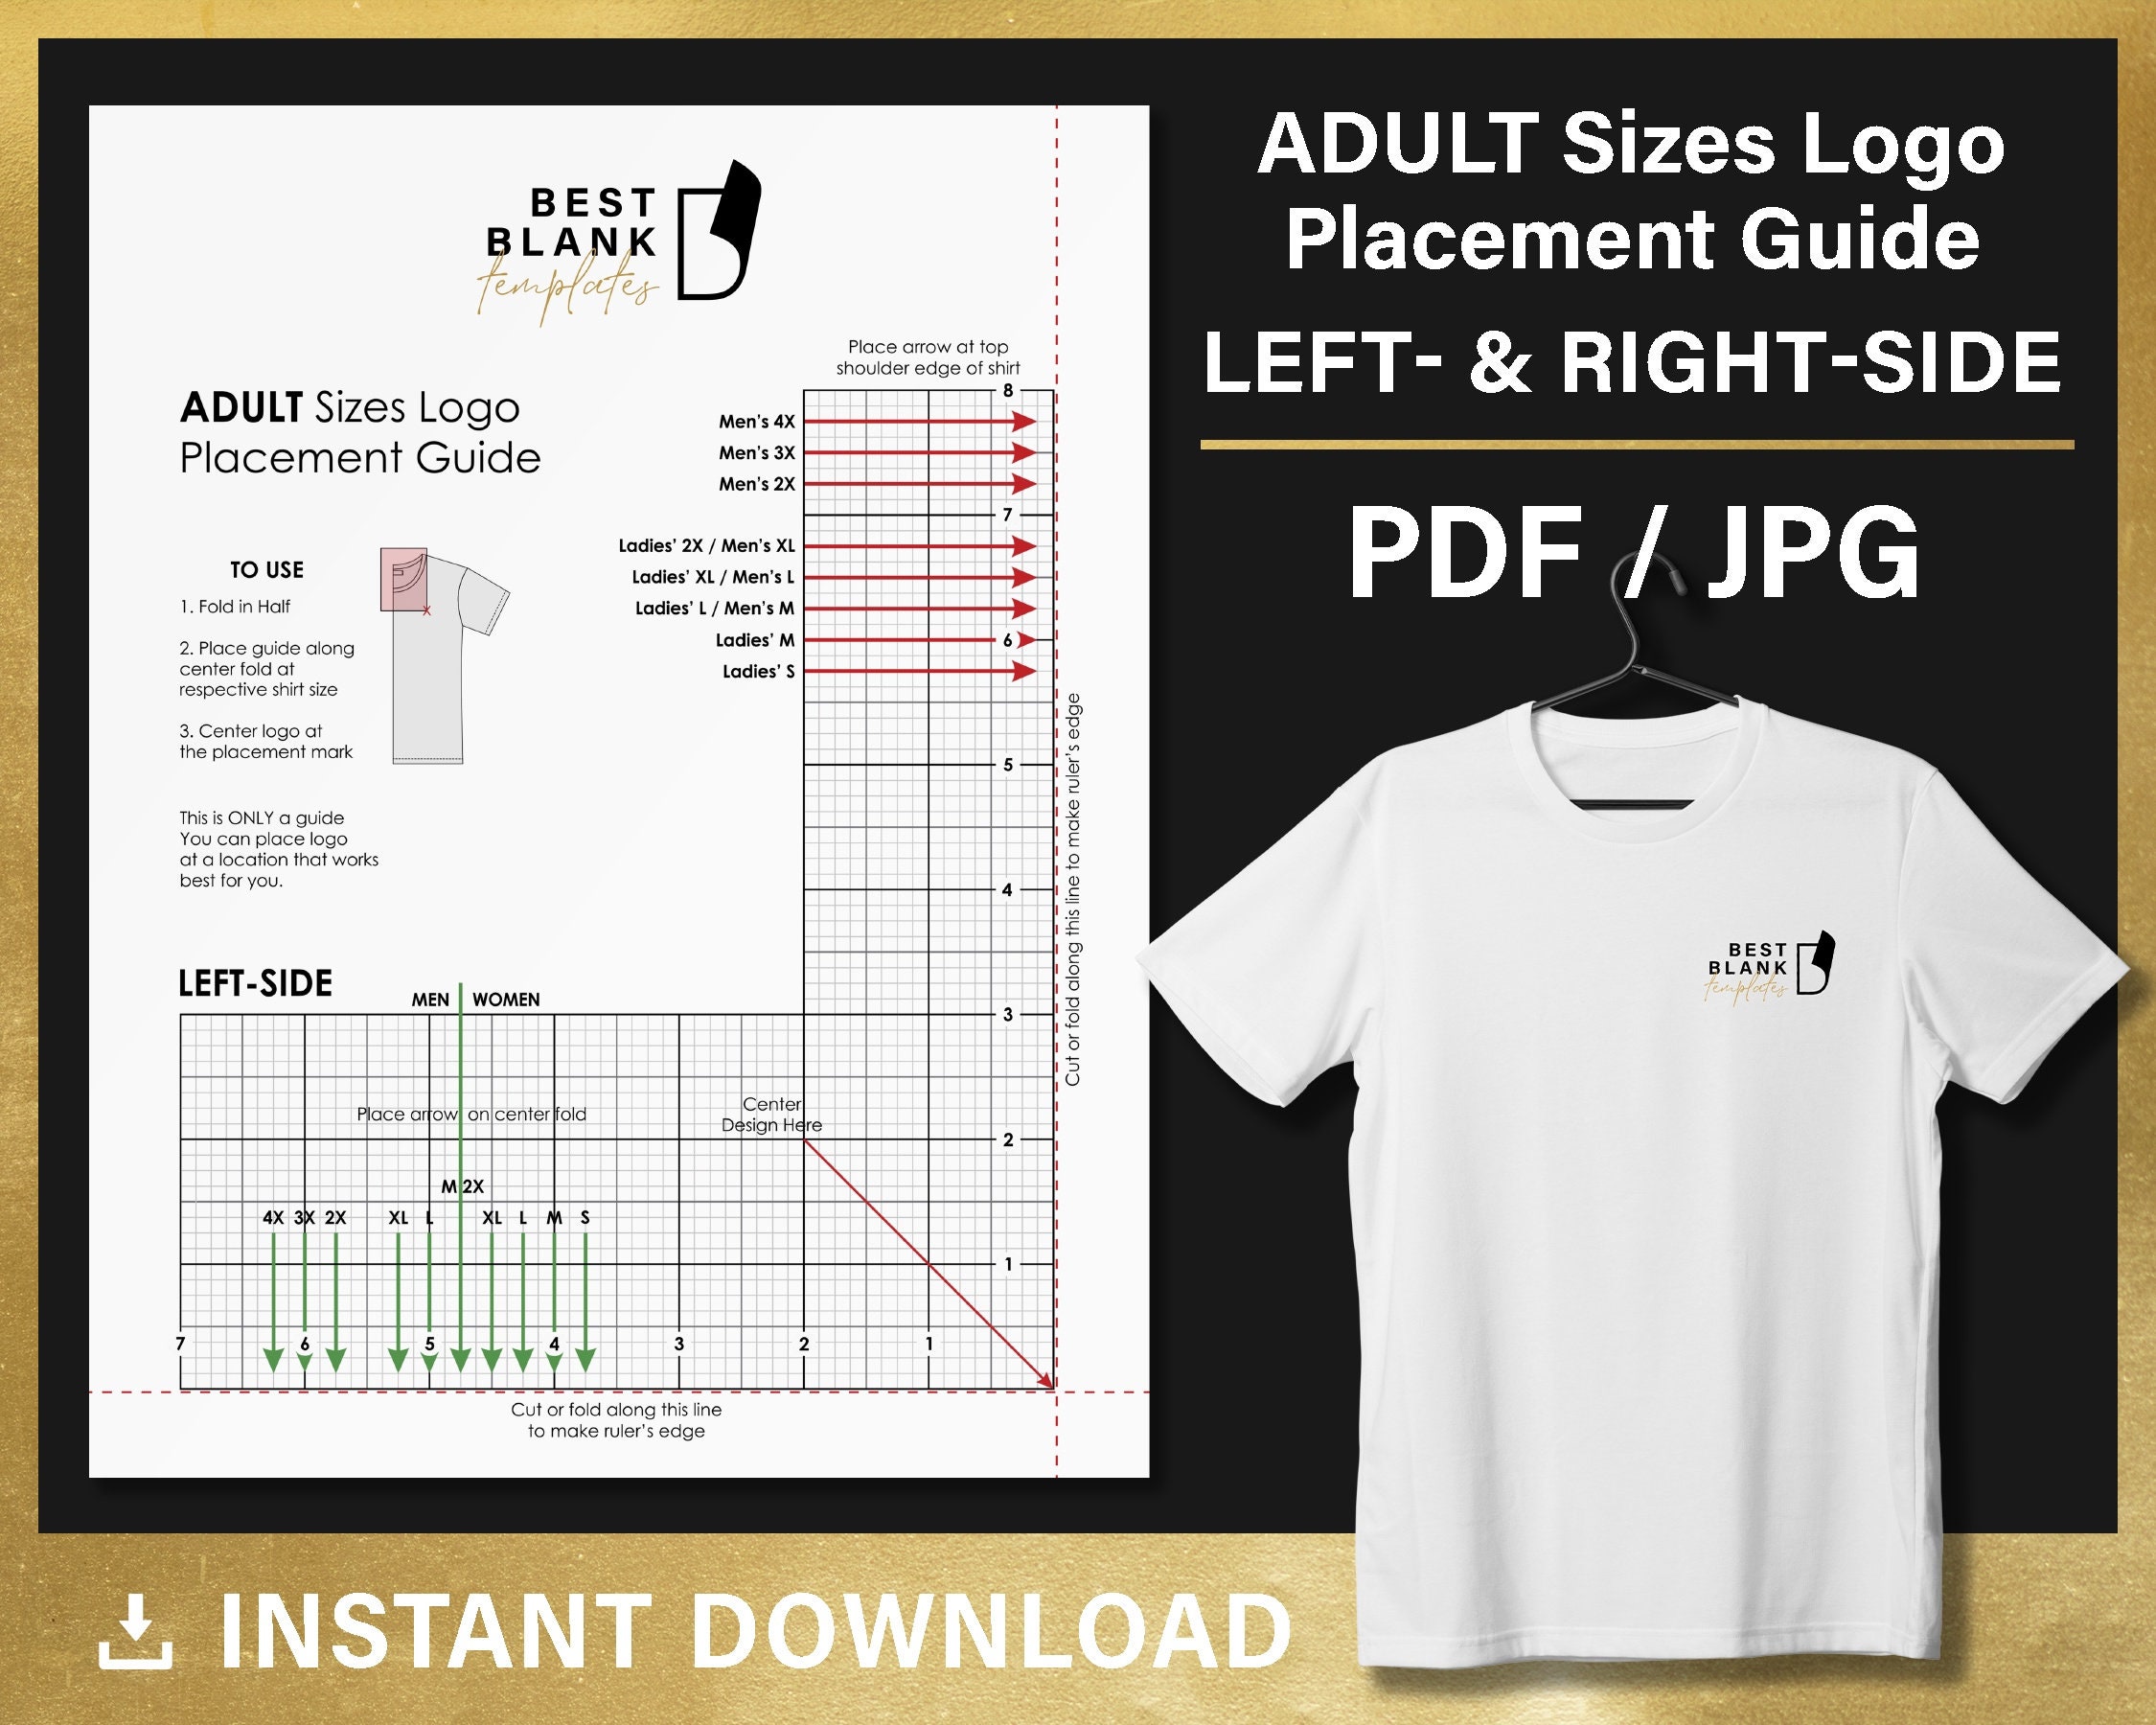
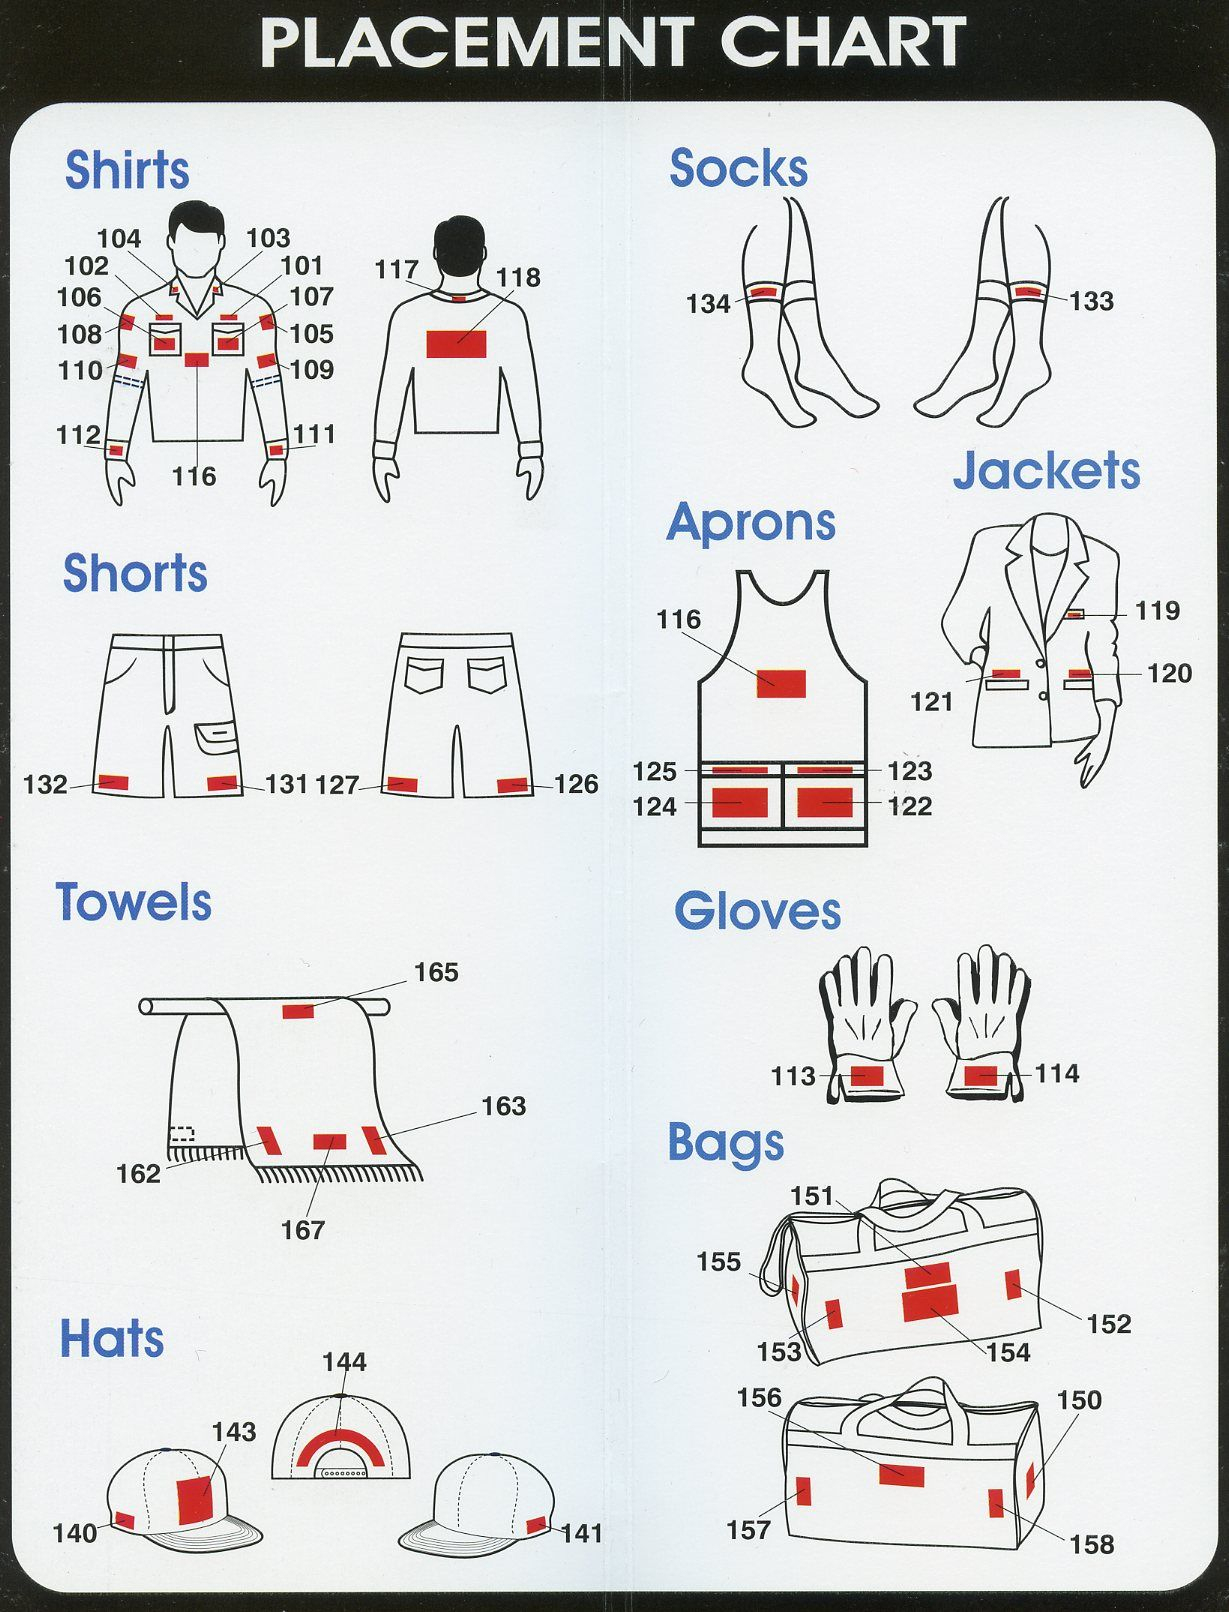
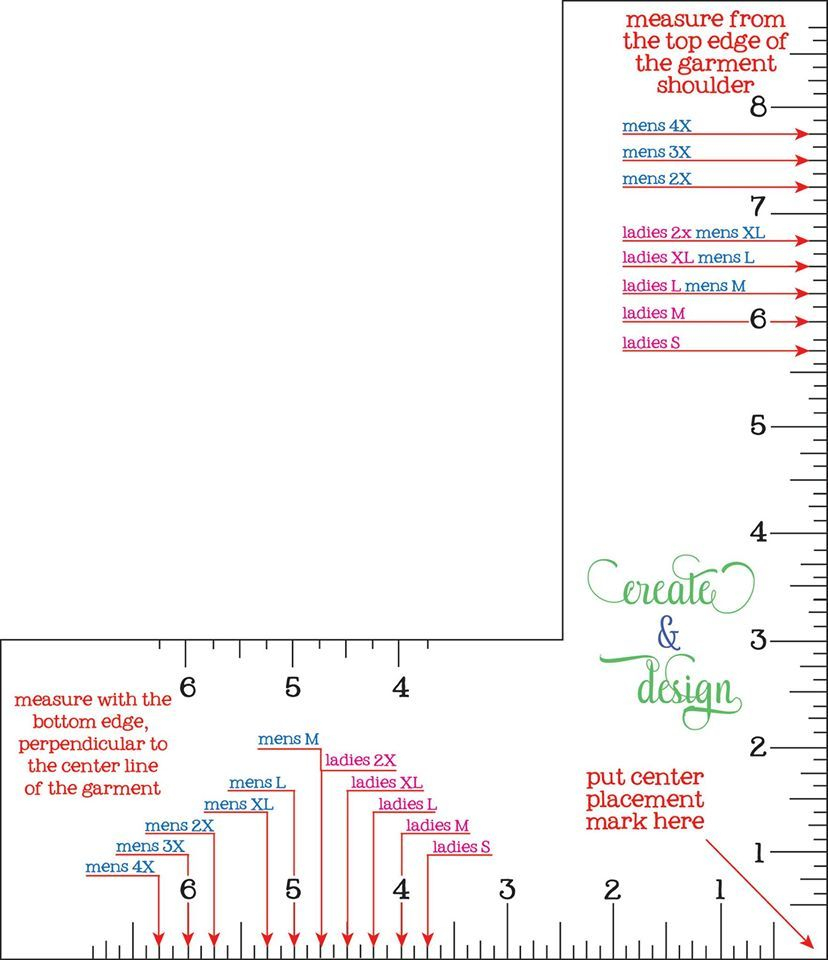
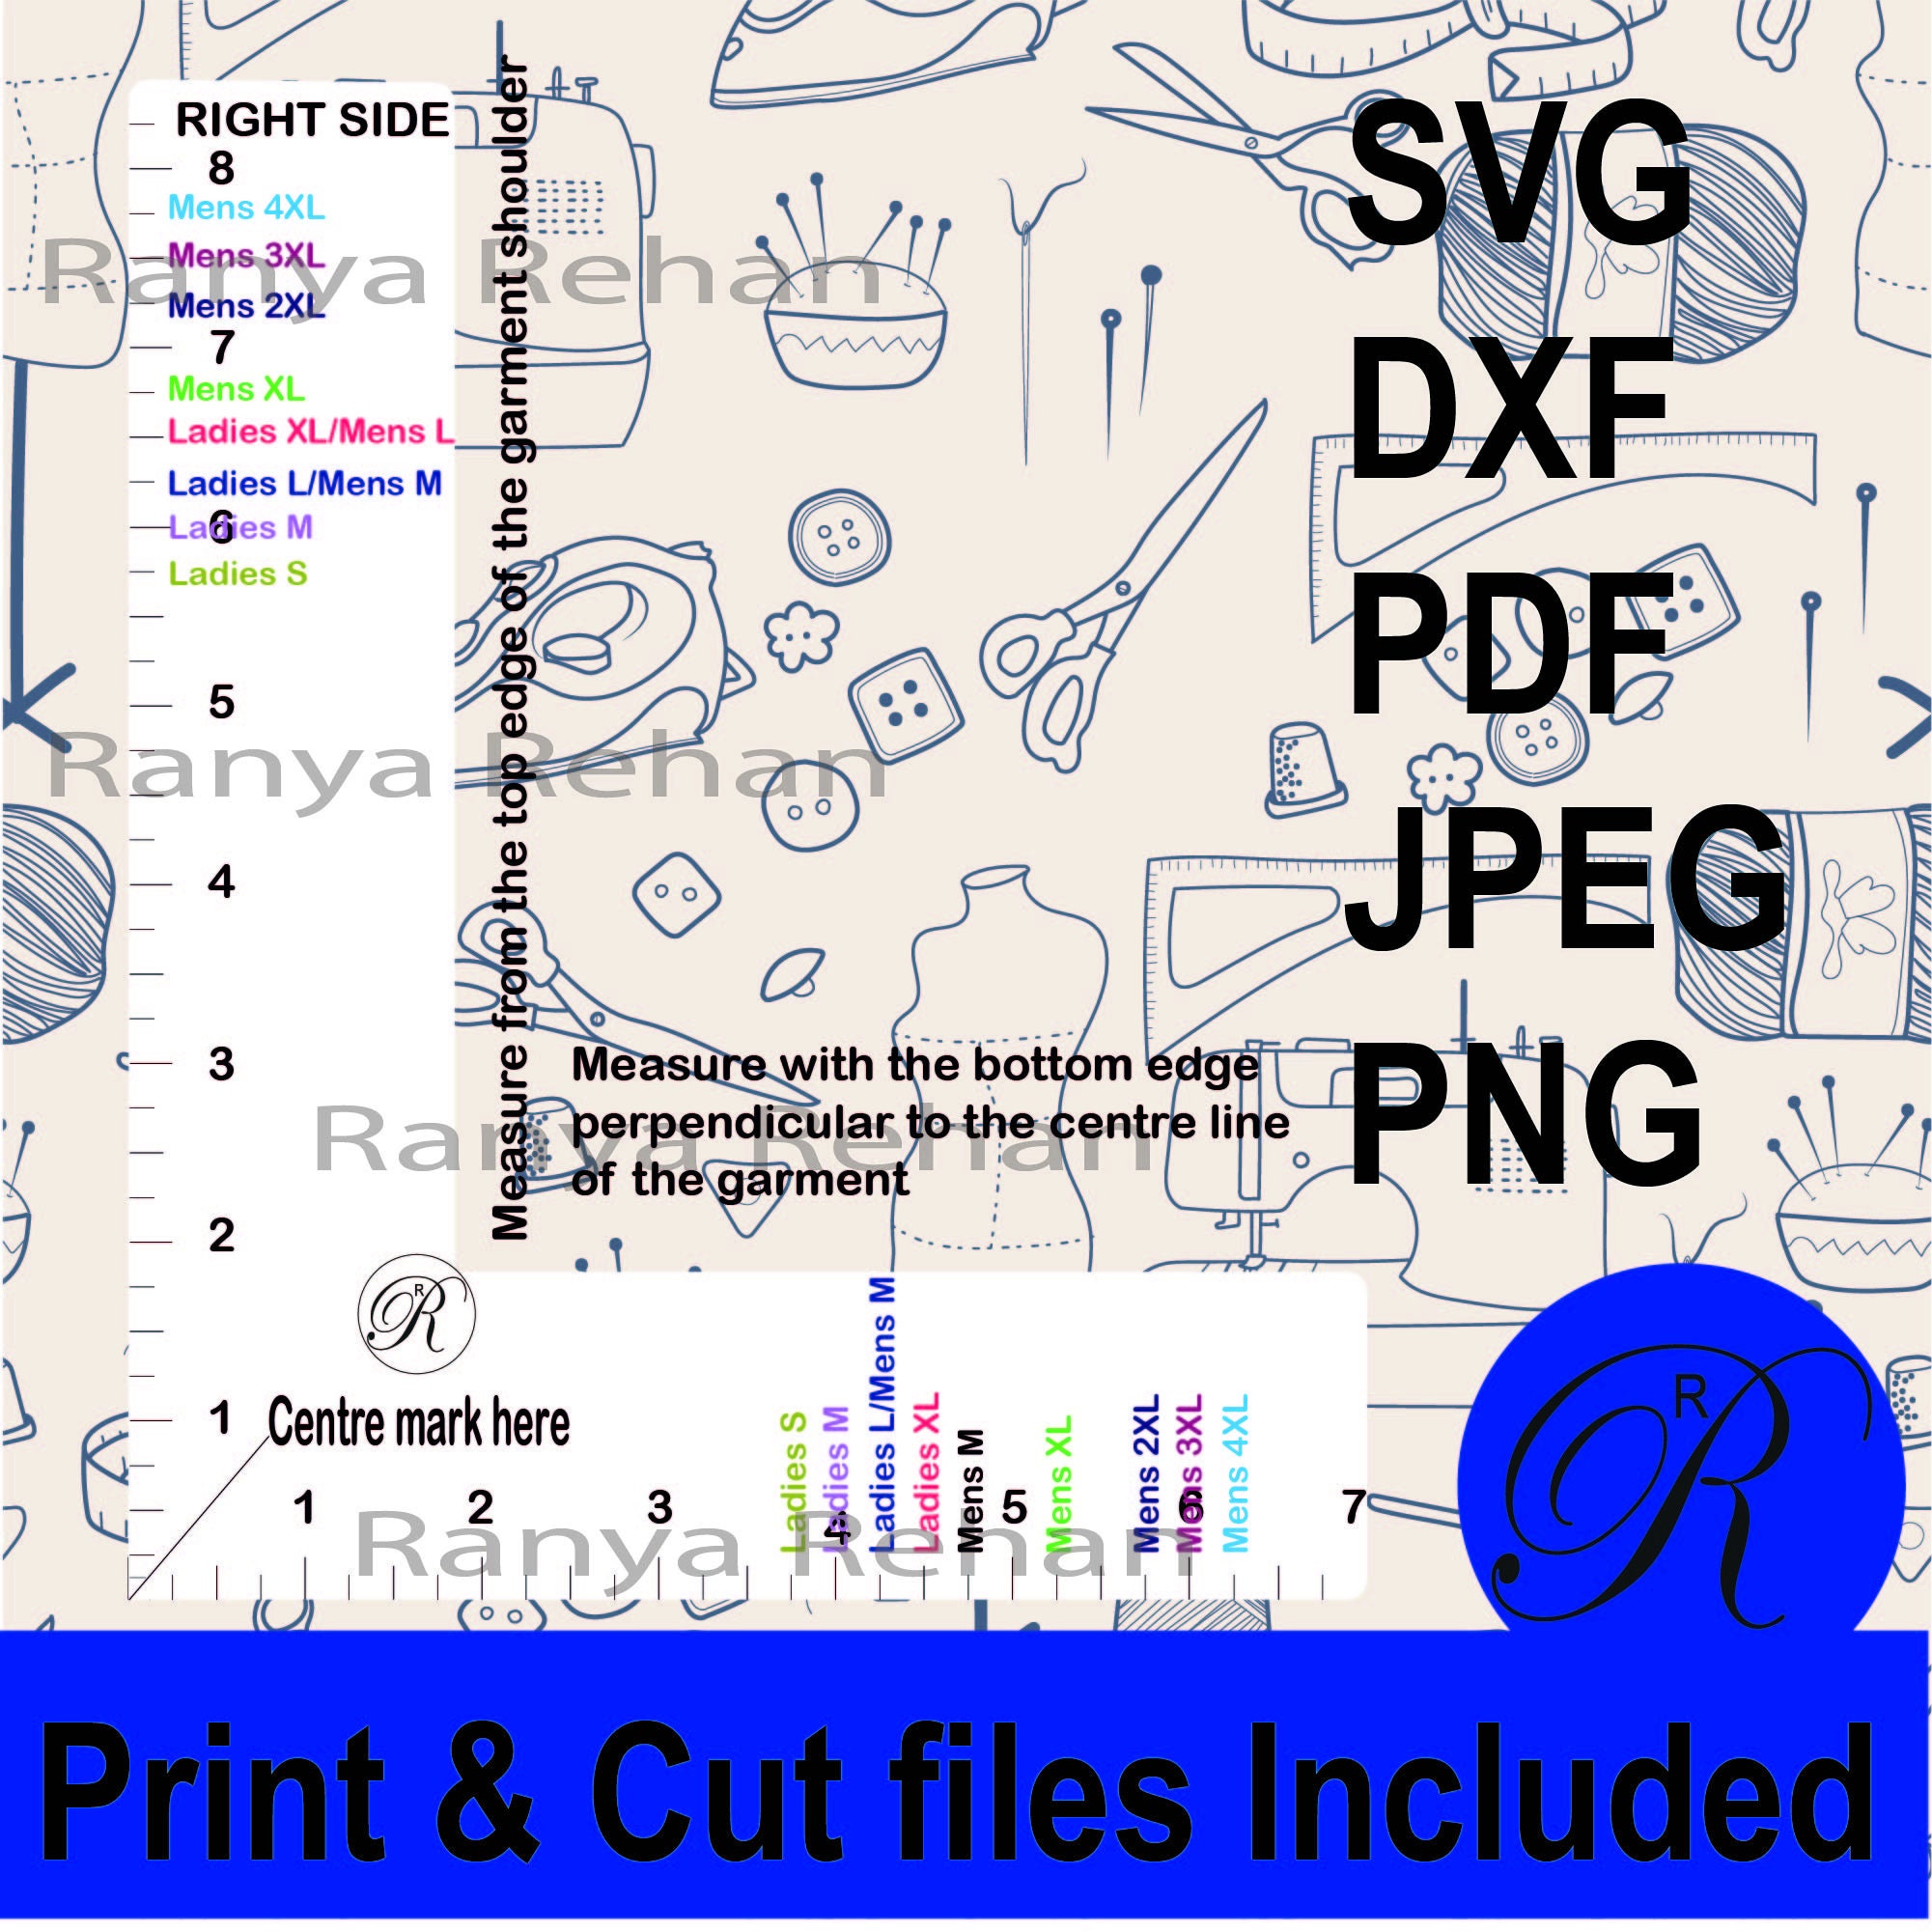
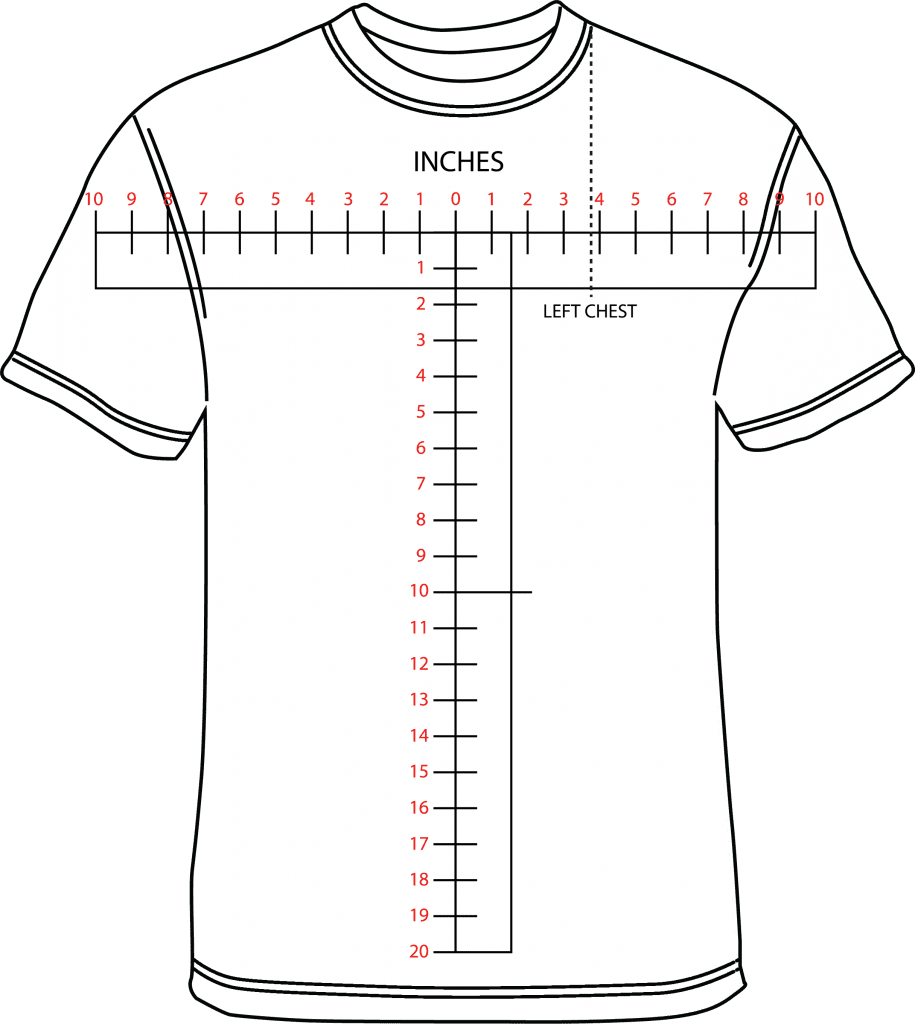
Web embroidery placement recommendation charts apparel item position back / topping apron center bib, 4” down from top edge 1 tearaway bib centered 1 tearaway, solvy (opt) blouse 1” toward button hole (from center fold, 1/4” above topstitching 1 tearaway, solvy (opt) cap centered cap tearaway jacket left chest 6.5” to 8” down. You’ll see me use them quite a.

Printable Embroidery Placement Guide
They are available on line and in printable form. Web how to determine the embroidery placement measurement. Web print out designs before embroidering, and place them around the skirt to figure out equal distances between designs. When it comes to putting an embroidery design in the right spot, a template is a handy, essential tool. For finding exactly where you.
Free Printable Embroidery Placement Ruler
Print out the design in 1:1 scale. Web embroidery placement recommendation charts apparel item position back / topping apron center bib, 4” down from top edge 1 tearaway bib centered 1 tearaway, solvy (opt) blouse 1” toward button hole (from center fold, 1/4” above topstitching 1 tearaway, solvy (opt) cap centered cap tearaway jacket left chest 6.5” to 8” down..
For Adults Printable machine embroidery logo placement guide Etsy
Web correct design placement depends largely on individual taste. It has the center of the design identified, as well as the horizontal and vertical axis lines. Web master a dozen classic embroidery stitches when you've got this illustrated guide handy. We suggest that you print a paper template of the design at full size (using embroidery software). Web how to.
Free Printable Embroidery Placement Ruler
We suggest that you print a paper template of the design at full size (using embroidery software). Use a similar distance between bottom of design and edge of fabric, to make placement appear nore It has the center of the design identified, as well as the horizontal and vertical axis lines. Web proper embroidery placement can transform a simple garment.
Web Proper Embroidery Placement Can Transform A Simple Garment Into A Masterpiece.
Web how to determine the embroidery placement measurement. Web use our embroidery placement guide to get you started. A template is printout of a design. Use the links below to jump to specific stitches or scroll through them all for inspiration.
Web Master The Art Of Embroidery Placement With Our Comprehensive Guide.
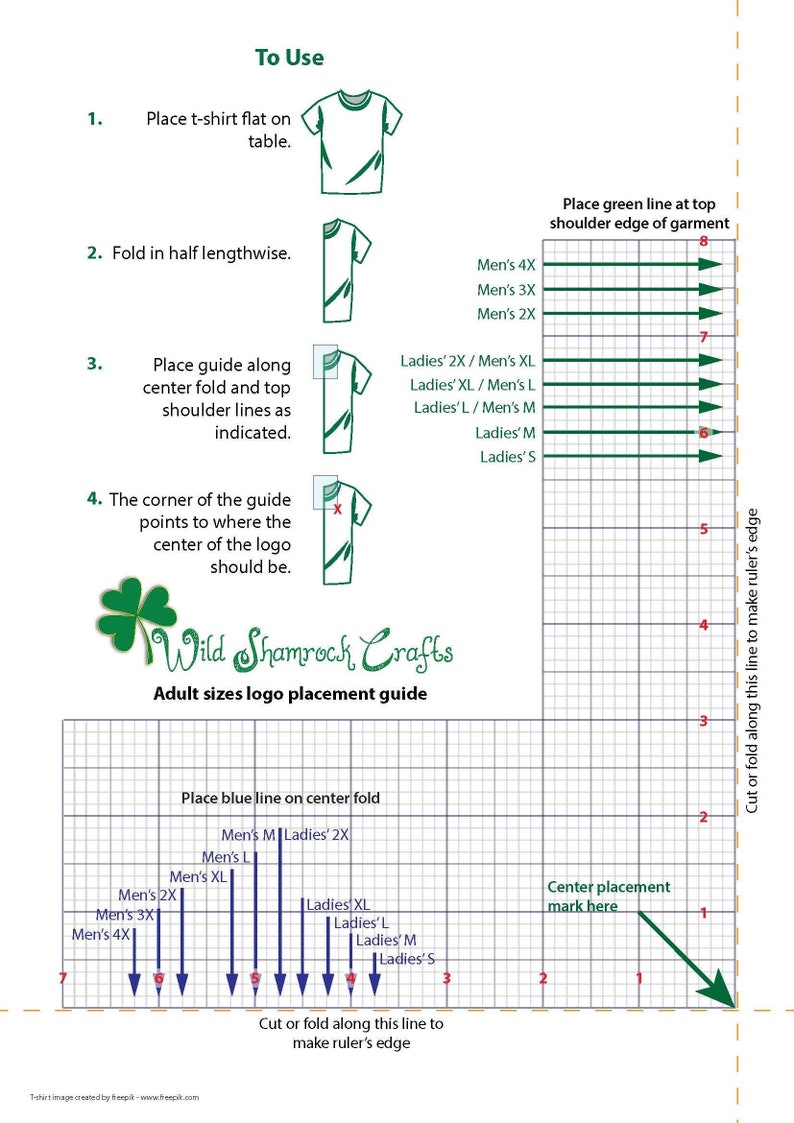
Web master a dozen classic embroidery stitches when you've got this illustrated guide handy. In this guide, you'll find steps on how to determine embroidery placement on: Your printout will have helpful markings, including a horizontal axis, a vertical axis, and the center point of the design. Web print out designs before embroidering, and place them around the skirt to figure out equal distances between designs.
This Guide Provides Step By Step Diagrams For Popular Stitches And Explains Their Uses.
It's designed to be a companion to our video tutorials which can be viewed here. Print a template of the design from your embroidery software, at full size. Web we've put together an embroidery placement guide to get you started. Web step by step embroidery stitch guide.
Therefore, When You Are Placing A Design Make Sure That It Looks Good To You.
It has the center of the design identified, as well as the horizontal and vertical axis lines. Web here are the basic steps for placement of any embroidery design, on any fabric or garment that you need to precision place it: Print out the design in 1:1 scale. There are many factors that depend on the positioning of your embroidery, like size, design, garment type, and more.